Finding users and topics using the expertise feature
Three web parts provide users the ability to search for users based on their areas of expertise, or to discover what a particular user’s interests or areas of expertise are.
These are available under the NewsGator Spotlight Web Parts category when adding web parts to any page. They are:
- Expertise Browser
- Expertise Search
- Areas of Expertise
Expertise Browser web part
The Expertise Browser web part comes in two versions:
- the original, a Silverlight web part that requires users to have Silverlight 4 or higher to use;
- and the new HTML5 version, with no such Silverlight requirement, but that does require a browser that has HTML5 support to have full functionality
Only the HTML5 version is available in the web part gallery for deployment; however those with the Silverlight version installed will find that it works the same as before.
The Expertise Browser web part allows users to navigate through the expertise data in an unstructured pattern. It requires extra steps to deploy properly.
The view begins with the top 50 highest scoring tags in the system arranged alphabetically and sized by overall score.
50 highest scoring tags
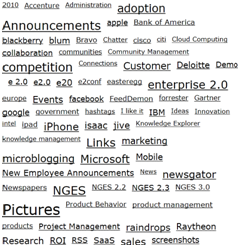
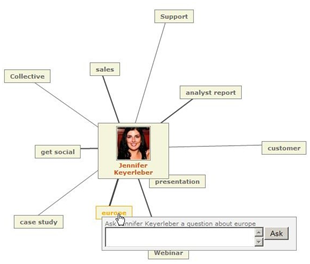
Clicking one of these tags creates a view centered on that tag with up to ten users arrayed around it (as pictured on the left, below). User image distance from the tag is inversely proportional to their score (the highest scoring users are closest to the tag).
Users associated with a tag (marketing)
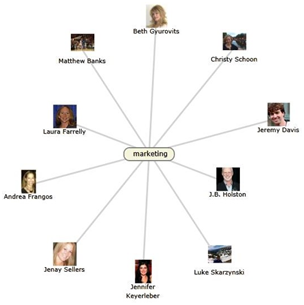
Tags associated with a user
Click on any user image in this view to re-center the view on that user, with up to ten of that user’s highest scored tags displayed around them (as pictured on the right, above). As is done in the tag-centered view, the highest scoring tags for that person are displayed nearest to the person.
Click any tag to re-center the view on that tag (left, above). Proceeding this way, you can continue switching between tag-centered and user- centered views.
This can be an effective way to find a person who has expertise on a particular topic. When you have done so, it will be natural to want to ask that person a question.
You can easily do so from either view. Just move your mouse pointer over the topic you want to ask about (when in the person-centered view), or over the person you want to ask (when in the tag-centered view).
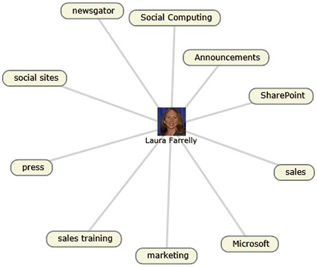
In the former case (pictured below right), you'll see a popup that allows you to ask that person a question about the topic represented by the tag by just typing your question and clicking Post.
You don't need to include the person's @ target, nor the topic's hashtag: these are both added automatically after you click Post. In the latter case, (pictured below left) you'll see “mini profile” card popup.
Near the bottom of the card is a link that brings up the same popup for asking a question. In the example pictured, the link text is “Ask Christy Schoon a question about Social Computing”; this will vary depending on the person and topic selected.
This same mini profile card provides other actions to the viewer. Clicking on the user’s name at the top takes you to the full profile page of that person.
Clicking on the Send an email text near the bottom opens a window for composing an email to that person.
Expertise Search web part
Not all organizations have Silverlight deployed. In addition, some use cases require more focused querying. We need to provide a search interface (either a dedicated page or flexible web parts) that allows for two key search cases:
- Tag-based search (with one or two tags)
- User-based search
The Tag-based search is on a tab titled Search by tag, and has two text entry boxes. These text boxes support auto-complete so that as a user begins typing a tag, all matching tags in the score database are displayed, and one can be chosen from the options. If only a single tag entry box is used, the search returns all users with a connection to that tag.
The users are ordered by their expertise score for that tag, though the scores are not shown. If two tags are entered on the search page, the results show all users (and only those users) who have a score against both of these tags. This list should be ordered by the sum of each user's two tag scores.
Each person shown in these results has a checkbox next to his or her name. The viewing user can select up to three of the people displayed in the results and click Compare to see a side-by-side comparison of the users and their top twenty scoring tag associations (ordered from highest scoring tag to lowest).
The goal of this view is to allow someone to compare potential people across multiple tags (e.g. to understand if the person with the strongest connection to a tag is also strong across related areas or more distributed than another person).
From this side-by-side view, clicking the person’s name takes you to their profile page.
The User-based search is much like the admin report except it does not display the actual score for the person’s top tag and it does not provide the delete option.
Enter any text string and click the search icon to see all users whose name contains that string anywhere. Each matching user is displayed with his or her top tag, and clicking on the user shows their top twenty tags, with the highest at the top.
Areas of Expertise web part
The Areas of Expertise web part is intended for display on users’ public profile pages. It lists the tags that the user has the highest expertise scores for, but no more than ten of them. These are displayed with the best matches at the top.
Often this web part is displayed directly adjacent to the SharePoint Ask Me About web part on the user’s profile page, and when Spotlight is first installed the lists of tags displayed in these two web parts will usually look very similar.
However, over time, the tags in the Areas of Expertise web part will more reflect the user’s actual use of the system, and can therefore give a better reflection of what subjects the user is actually engaged in and knows a lot about.
This difference is of value to visitors to the page, in giving an even better sense of who the user is and/or what role they functionally play in the organization.
It can be additionally valuable to the user visiting his own profile page, for re-evaluating the self-assessments he did when filling out his My Interests and Ask Me About profile properties.
A user visiting his own profile page will therefore see the message Click a tag to manage in this web part. Clicking one of his areas of expertise shows a popup menu with up to three options, as appropriate:
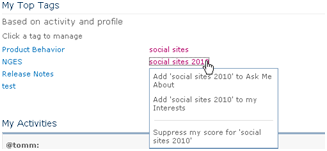
- Add to my Ask Me About. This adds the tag to the Ask Me About list in the user's SharePoint profile. This will let others find the user more easily in People Search.
- Add to my My Interests. This adds the tag to the My Interests list in the user's SharePoint profile. This will let others find the user more easily in People Search.
- Suppress my score for this tag. This removes your score for this tag. Only do this if you think the tag does not relate to you. This actually hides your score for the tag instead of deleting it, so the tag won’t return as an area of expertise for you based on your future use of the system.
The user will also see these tags listed among the recommendations for adding to Ask Me About and My Interests when editing their SharePoint profile.
Visitors to another user’s profile page will not see these options. Instead, when a visitor clicks on one of these tags, they see a popup that allows them to ask that person a question about the topic represented by the tag, by just typing their question and clicking Post (see picture below).
They don't need to include the person's @ target, nor the topic's hashtag: these are both added automatically after they click Post.

My top tags