Setting up and administering
For further details, see Setting up Spotlight for instructions on getting the Recognition feature up and running.
When that is complete, go to the Spotlight Management page to take your next steps.
Similar to the Expertise feature, administration of Recognition relies heavily on defining inputs on which to score user behavior, and can involve both internal and external inputs.
A badge’s display elements are defined separately from any rules that would automatically award the badge. This is to allow flexibility in re-using badges or restarting the accumulation of points toward a badge, which can be done by simply creating a new rule for awarding the same badge (and deactivating the existing one).
Therefore, the badge itself consists of only a graphic, a name, and a description.
In choosing a badge name and description, keep in mind that these becomes the default name and description of any rule you create that awards that badge.
In choosing a badge graphic, you may use any size graphic you like, but NewsGator recommends using a 96 x 96 pixel image in PNG format.
Several such graphics are provided to you with your Spotlight installation package - consult with the administrator who installed Aurea Social, and ask for BadgeIcons.zip.
These icons are described below in Spotlight Module - Suggested uses for the included badge icons (and in a similar document included in BadgeIcons.zip).
To create a badge, do the following:
Have a graphic ready, either that you made or selected from BadgeIcons.zip.
- Go to the Spotlight Management page and navigate to Recognition – Create and Manage Badges > Create and Manage Badges. A page that lists already created badges is displayed (when you initially install, it shows no badges)
- Scroll to the bottom of the page, and enter the badge name and description.
- Click Browse to select your image. (If your employees speak multiple languages, you may want to click Add Localization at this point to provide your own translations of the name and description you’ve provided.)
- Click Insert to create the new badge. You should see it in the listing immediately.
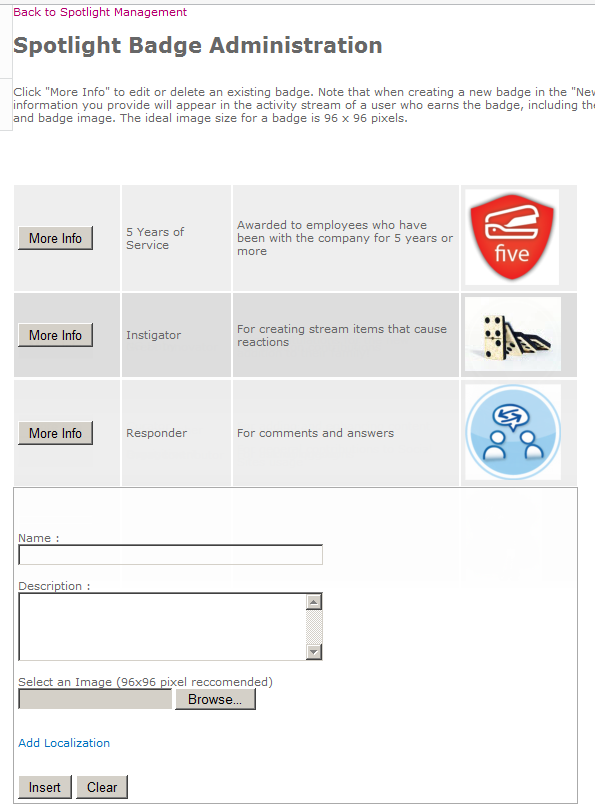
Spotlight Badge Administration
To edit or delete an existing badge, go to this same page by clicking Create and Manage Badges from the Spotlight Management page. Click the More Info button next to the badge you wish to change.

Click Edit or Delete
The entry expands vertically, showing what localization has been done if any, and presenting Edit and Delete buttons. To delete the badge, click Delete. This deletes the badge permanently; it can’t be restored.
To edit the badge,
- Click Edit. Update and Cancel buttons are displayed and all fields become editable.
- Make your changes and click Update.

Click Edit or Delete
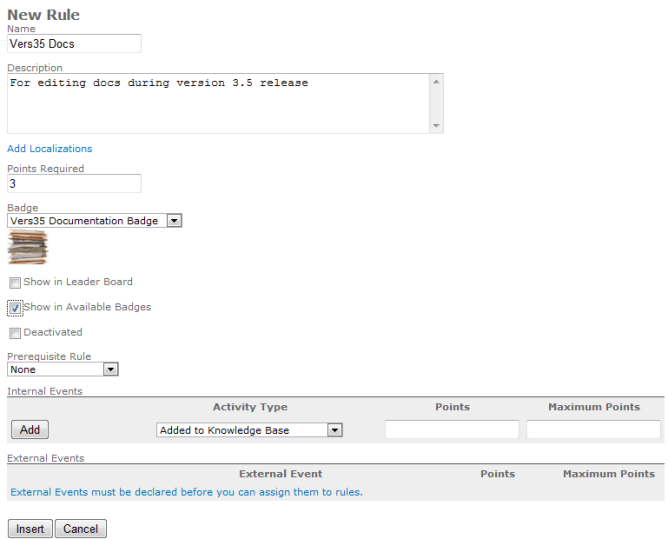
Enter details

Current rules can be viewed here
To create the rule, you must enter details on the New Rule section, including Name and Description (these will appear in both web parts and admin interfaces), the points required to meet the rule, and the badge that is earned when a user meets the rule.
You must also specify whether this rule will be an available option in the Leader Board web part, and whether it will be displayed as an earnable badge in the Available Badges web part.
For further details, see the Recognition feature Web Parts section below for full descriptions of these web parts.
The rule is not created until all of the above are specified.
The rule can be created as either active or inactive. Check the Deactivated checkbox if you don’t want the rule to start tracking user actions and accumulating scores for them just yet. You may want to do so if you haven’t quite worked out yet which inputs you want, or how you want to weight them.
Another case for doing so is if you want the badge to be awarded only for actions taken in a specific quarter or other time span, that hasn’t yet begun. Or you may be using external inputs, and you do not yet have all the code in place and operational on the external system to inform Recognition of when the events to be scored have occurred.
To have the rule start tracking user actions immediately upon creation, leave the Deactivated checkbox unchecked.
At rule creation time, you can specify what event types will be used in the scoring rule and how to score them, but you are not required to do so just yet. You can add these inputs later when editing the rule (see Editing and existing rule, below).
However, without any such inputs defined, the rule will do nothing and will not lead to any badges being awarded (and you ought to leave it deactivated until you do add some inputs for it). You also can add localizations of the rule name and description now, or wait until later.
See the three sections below for details on doing each of these:
- Adding internal events as rule inputs
- Adding external events as rule inputs
- Localizing a rule
To specify event types to be scored for the rule, do the following:
- Select an activity type from the pull-down list and specify points to be awarded for each occurance of an event of that type, and maximum points (if applicable) for events of that type to be used when adding up points to see if the badge should be awarded.
- Click Add. This makes the added activity part of the scoring rules and allows specifying additional activities.
- After all activities are defined, create the new rule by scrolling down to below the input areas for internal and external events, and clicking Insert.

Select an activity type

Click Add
To make changes to an existing rule,
Click the More Info link next to the listing of the rule in the Spotlight Rule Definitions page.

Click More Info
This displays more details about the rule composition and its localizations, if any.
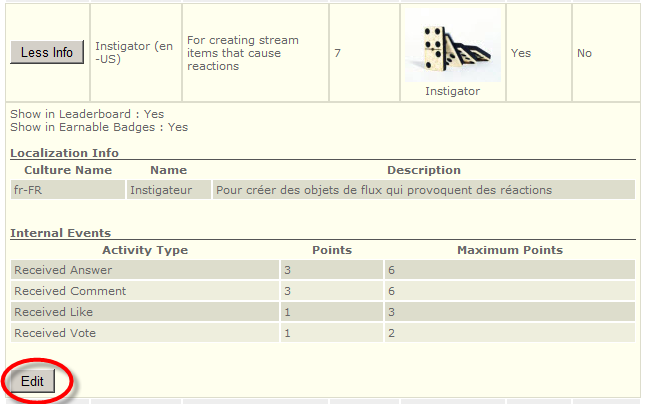
Click Edit
Click the Edit button at the bottom of these details to enable editing. The same UI used to create the rule appears, allowing editing any setting for the rule.
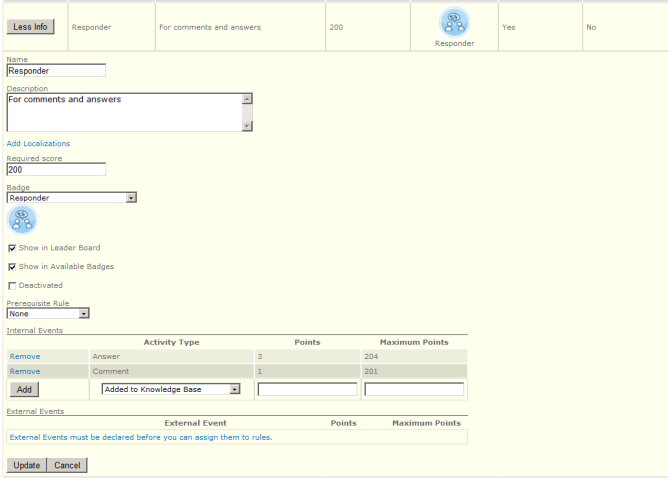
Edit rule and click Update button
You can also add or remove the internal and external event inputs that define the rule's scoring, and create or remove localizations of the rule's name and description. See the three sections below for details on doing each of these: Adding internal events as rule inputs, Adding external events as rule inputs, and Localizing a rule.
When you are done with all changes, including those to localizations and rule inputs, finish and commit your changes by scrolling down to the Update button and clicking it.
When adding event types to a badge rule as outlined in the next section, some of the internal event types listed as available for inclusion in the rule will not actually be counted towards awarding the badge when in a SharePoint 2013 environment. Additionally, there are other event types that won’t be counted towards awarding the badge when the badge is a community-level badge.
In SharePoint 2013, any SharePoint-generated events won’t get counted towards a badge. This is because of the difference in SharePoint 2010 and SharePoint 2013 event streams which results in Aurea Social merely displaying these events without making a record of them. These event types include:
- Job title change
- Manager change
- Upcoming birthday
- Birthday
- Upcoming workplace anniversary
- Workplace anniversary
- Profile update
- New colleague
- New membership
- Status Message
- Note Board post
- Rating
Although they show as options when creating badges in SharePoint 2013 environments, the above event types should not be used as rule inputs for badges in SharePoint 2013 environments as they will have no effect.
When adding event types to a community badge rule, only actions of that type that occur within the community will be counted toward the badge rule.
Because the following event types are always global in nature (and so never associated with a particular community), they are not available to select for community badge rules (in previous editions of Spotlight, these event types would be selectable, but would accumulate no points):
- Job title change
- Manager change
- Upcoming birthday
- Birthday
- Upcoming workplace anniversary
- Workplace anniversary
- Profile update
- New colleague
- New membership
- Status message
- Kudos
- Sent kudos
These are also not available in community badge rules, because they do not properly associate themselves to a community:
- Blog comments
- Blog posts
When creating or editing a Recognition rule, you will see an interface like the one pictured here for identifying which events will be part of the rule's scoring, and how much events of each type add to the rule's score. The header is "Internal Events".
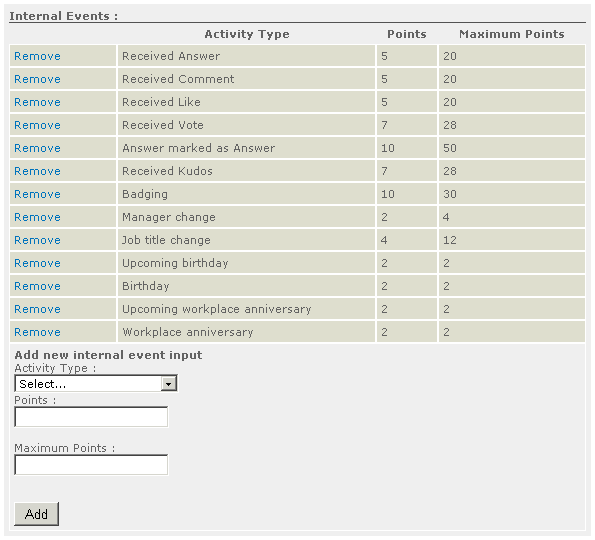
Interface for identifying which events are a part of the rule's scoring
To add a new event,
- Open the Activity Type drop down. You can see all internal event types that can be added to the rule (and that are not already part of it).
- Select the type of event you would like to contribute to the scoring for the badge. For "Points", enter the number of points a user should get each time they perform that event (or have it performed on their content). For "Maximum Points", enter a limit on the number of points that can be accumulated by any one user by doing events of this type, toward awarding a badge by this rule.
- For "Maximum Points", enter a limit on the number of points that can be accumulated by any one user by doing events of this type, toward awarding a badge by this rule. (Note: "Maximum Points" does not play a role in calculating leader board scores). Use the Maximum Points setting when you want to ensure that a user must perform more than one event type to earn the badge by that rule.
- To finish adding the external event input to the rule, click the Add button. The event type should now display with the list of existing event inputs.
In the examples pictured here, the picture shows several event types that have already been added to the rule. These happen to be the "passive" event types, which means that these are events that don't represent a direct action you took, but for which you get points.
The top five (Received Answer, etc.) occur when somebody else takes an action on your content.
- Answer marked as Answer awards points to users whose response to a question gets marked as an answer.
- Received Kudos gets you points when somebody awards you a Kudos.
- A Badging event occurs each time you are awarded a badge.
- Manager change and Job title change, are for changes in your work status.
- Sharing Interests is an alert informing you that someone else shares an interest with you.
- The bottom four (Upcoming birthday, etc.) occur when an anniversary date is about to occur or does occur for you.
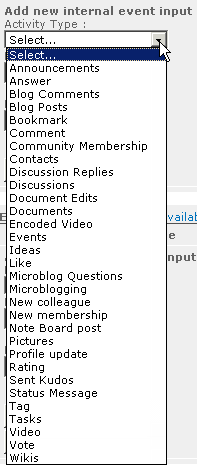
Select and internal event from dropdown
Things to note about the Input Answer Marked as Answer.
One, if after your answer has been marked as a good answer (earning you points for it) someone then clicks the Unmark as Good Answer link on it, you lose the same amount of points that you earned when it was marked as an answer, resulting in no net point gain for that input.
Safeguards prevent you from ending up with negative points for that input for that rule. This is to prevent someone getting too many points should the answer be unmarked and re-marked several times.
Also, this is one of the very few event types that cannot be processed by the job that processes most system events for badge scoring. Points for these events are therefore applied instantly, and not when the Spotlight Processing Job next runs.
To the right is what you'll see for the remaining list of event types, when you open the drop down. All of these are "active" event types. The user performing them gets the points for them.
Most of these are named for a type of list within SharePoint or Aurea Social. The user gets points for adding an item to a list of the named type.
For example, Announcements will give points to a user when that user adds an item to an announcements list. Bookmark refers to any Links list. Others of this type are Blog Posts, Contacts, Discussion Replies, Discussions, Documents, Events, Pictures, Tasks, Wikis.
Document Edits occurs when you either edit a document that already exists in a document library, or you edit a wiki page that already exists. Note Board post, Rating, and Tag each refer to adding a piece of metadata to a list item or other SharePoint object.
Microblog Questions and Microblogging refer to creation of each of these types of events in the activity stream. Ideas refers to creation of an idea. Answer, Comment, Blog Comment, Like, and Vote refer taking one of the possible response actions on one of these. (Ideas and Vote require the Idea Stream module to have been installed.)
Sent Kudos occurs when you go to someone’s profile and give them a Kudos, should the web part for doing so have been deployed there.
Community Membership occurs when you join a community. New Membership, in contrast, occurs when you attain site membership as determined by SharePoint. New Colleague occurs when you add a new colleague.
Status Message occurs when you update the message in the "balloon" on your public profile page. Profile update occurs for any other update to your profile information.
Video and Encoded Video appear as options if you have the Video Stream module installed. Video occurs when a video you upload is successfully posted to the activity stream. Encoded Video occurs when you receive a notification as to the status of a video you uploaded, as attempt is made to encode it for display in the activity stream. As these can be error messages or success messages, Encoded Video is not a good choice for inclusion in a badge rule, and Video will generally be a better alternative.
Knowledge Base and Added to Knowledge Base appear as options if you have the Enrich module installed. Added to Knowledge Base awards points to a user when one of their activity events is added by someone else to a knowledge base. Knowledge Base awards points to a user when they themselves add an item to a knowledge base.
"Maximum Points" does not play a role in calculating leader board scores.
Use the Maximum Points setting when you want to ensure that a user must perform more than one event type to earn the badge by that rule.
To finish adding the internal event in put to the rule, click the Add button. The event type should now display with the list of existing event inputs.
Any internal input can be removed from the rule by clicking the Remove link that is part of its entry in the list of existing event inputs.
Remember to click the Update button for the rule after this and all other edits to the rule are complete, to commit all changes.
External systems (such as CRM systems) can inform Aurea Social of events that occurred in them through the "TriggerInput" API call.
To get this up and running, you must follow the directions in the section Adding a new external input in the topic Defining, modifying, and using inputs for external actions . Once operational, you can include the external events that Recognition knows about in the scoring for a rule.
You can do so when creating or editing a Recognition rule.
- Go to the External Events interface.
- Click the External Events dropdown to see the list of available external inputs that have already been identified to Spotlight. If you don't see the event you need, change the contents of this list by clicking the Define available external events link, and following the instructions in the section Adding a new external input in the topic Defining, modifying, and using inputs for external actions.
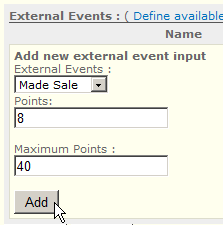
- Select the external event type that you want to make part of the rule, and wait a moment. The Points field will automatically fill in with the default number of points awarded for that event type. You may change this value as desired, for use in this rule; enter the number of points a user should get each time they perform that event.
- For "Maximum Points", enter a limit on the number of points that can be accumulated by any one user by doing events of this type, toward awarding a badge by this rule. (Note: "Maximum Points" does not play a role in calculating leader board scores). Use the Maximum Points setting when you want to ensure that a user must perform more than one event type to earn the badge by that rule.
- To finish adding the external event input to the rule, click the Add button. The event type should now display with the list of existing event inputs.

External Events interface
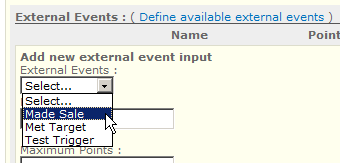
Select an external event
Any internal input can be removed from the rule by clicking the Remove link that is part of its entry in the list of existing event inputs.
Remember to click the Update button for the rule after this and all other edits to the rule are complete, to commit all changes.
If you need to have badge awards display in more than one language, you need to localize the name and description of the rule that awards it. This works the same way it does for localizing a badge.
To do this, when creating or editing a rule, do the following:
- Click the Add new Localization link just above input definition area. A form for entering a new localization appears below the listing of any current localizations of the badge name and description.
- Set the Culture dropdown to the language you are translating into, then add the translated name and description and click Add.
- The new translation should be instantly added to the existing list of localizations, at the top of the Localization Info section.
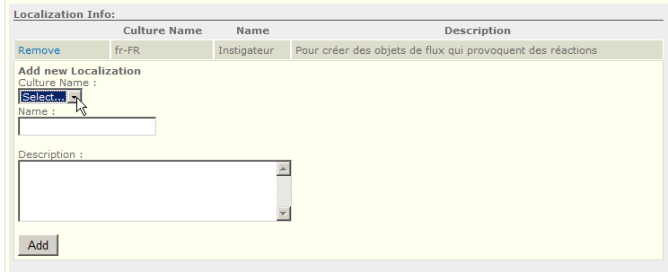
Select a culture name
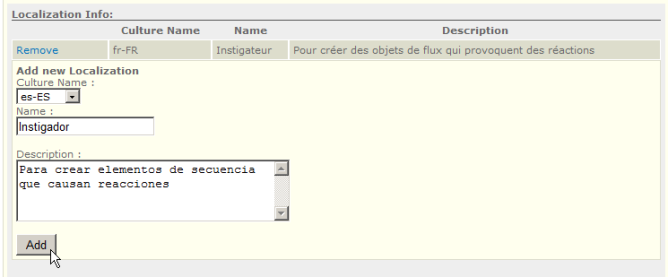
Add the translated name and description

New translation is added
You cannot modify an existing localization, however you can delete one and replace it. To delete, just click the Remove link to the left of its entry in the list of localizations.