Accounts, Persons and Roles
Learn about accounts , persons in the accounts and roles assigned to the persons.
You can store both accounts and persons in Aurea CRM web.
- Persons can be active in various roles at different accounts, e.g. a doctor may work at several clinics or have both a private practice and work at a shared practice.
- Any number of persons can occupy various roles at an account, e.g. as an employee and/or manager.
- When adding an account, enter data such as the account’s name and address.
- When adding a person, enter their personal details and private contact data (e.g. their date of birth, private e-mail address).
- When adding a role at an account, enter the person’s contact data at the company (e.g. their corporate e-mail address and telephone extension).
- Select
 (Master Data) > Accounts to search
for persons.
(Master Data) > Accounts to search
for persons.Open a record (e.g. by double-clicking in the results list) and switch to the Persons node in the tree to display all persons with a role at the account.
- Select
 (Master Data) > Persons to search
for persons.
(Master Data) > Persons to search
for persons.Open a record (e.g. by double-clicking in the results list) and switch to the Roles node in the tree to display all the person’s roles at all accounts.
- Select Open related Account or Open Related Person from the context menu to open the associated account or person record.
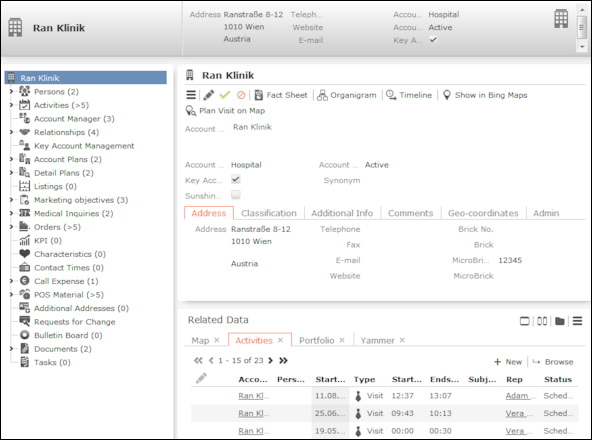
Example: Tree view of an account
When accessing an account (or person), data is displayed in the tree view by default:

This following areas are displayed:
- The header contains an overview of the most important data. The header is always displayed, even when you are displaying or editing data in related records.
- Tree: Child info areas are displayed in the tree. The number of child records of each type is displayed in brackets.
- Details mask: This area displays the data in the selected record. The header contains the context menu and buttons that allow you to edit the data. Move your mouse cursor over a button to display a tooltip containing the button’s function.
Adding Accounts and Assigning Persons
To add a new account:
- Select
 (Master data) > New Account. The
input mask is displayed.
 - Enter the data.
- Save the record.
- You are asked whether you want to assign a person to the account.
- Click on one of the following:
- No: The account is displayed.
- Yes: Select an existing person or add a new one and then specify the person’s role at the account. Enter additional information on the person in the context of the account, e.g. their business e-mail address.
- Save the record.
- You can assign additional persons to the account.
Adding Persons and Assigning Persons to Accounts
To add a new person:
- Select
 (Master Data) > New Person.
 - Enter the person’s data.
- Save the record.
- You are asked whether you want to assign the person to an account.
- Click on one of the following:
- No: The person is displayed
- Yes: Select an existing account or add a new one and then specify the person’s role at the account. Enter additional information on the person in the context of the account, e.g. their business e-mail address.
- Save the record.
- You can assign additional the person to the additional accounts.
Adding a Person’s Roles
To store a person’s role at an account:
- Switch to the desired person.
- Click on the Roles node in the tree.
- Click on
 (New) in the results list.
 - Select the desired account or add a new one.
- Enter person’s role (Function field) at the account, e.g. "Manager".
- Enter additional information on the person in the context of the account, e.g. their business e-mail address.
- Save the record.
- You can assign the person to additional accounts.
Assigning Persons to an Account
To assign a person to an account:
- Switch to the desired account.
- Click on the Persons node in the tree.
- Click on
 (New) in the results list.
 - Search for the desired person or add a new person.
- Enter person’s role (Function field) at the account, e.g. "Manager".
- Enter additional information on the person in the context of the account, e.g. their business e-mail address.
- Save the record.
- You can assign additional persons to the account.