Call Documentation – LSI
Use the Call Documentation process to prepare for and document your customer calls.
The process consists of several phases where you can enter data relating to a visit step by step. By default, you can only start the Call Documentation process from activities of the type "Visit". Your administrator can however determine that the process is available for other types of activities (e.g. phone calls).
You can start the process as follows:
- Your start page displays a list of all Undocumented activities.
Double-click on an activity or select Call Documentation from the activity’s context menu.
The process is started in the Overview phase, see Overview.Note: Only activities whose Type is "Visit" and Status is "Scheduled", where the start date is before or on today’s date and where you are entered are listed.
- Switch to the desired activity in the calendar, using the activity search from the Activities node in the company tree etc. Select Visit Documentation from the context menu of the activity. The process is started in the Overview phase.
- Select
 (Daily
business) > Call Documentation. The process is started
in the Activities phase, see Activities.
 - If you add an activity by selecting
 (Daily Businesss) > New Activity, you can
switch to the call documentation process after saving the record.
Click on an arrow in the header to switch to the corresponding phase. Any data you have entered is saved automatically. The currently selected phase is highlighted in orange.
You can exit the call documentation process at any time and continue at a later date.
Further information on a phase is displayed using icons in the phase arrows. Move your mouse cursor over the arrows or icons to display a tooltip.

Data on the current visit is displayed at the top right next to the phases (e.g. the visited person/company).

Data entered in the quick add area is saved automatically.
The following sections cover all phases delivered by Aurea software. Your administrator is responsible for defining which phases are available to you.
Activities
The "Activities" phase displays a list of the activities scheduled over the past 7 days that have already been documented and those still requiring documentation.
 (Daily Business) > Call
Documentation or click on the Activities phase arrow.
When opening the process from an activity, the Overview phase is
opened.
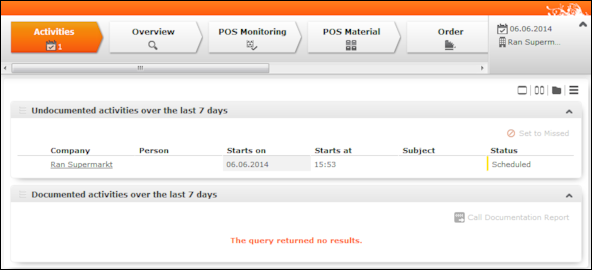
- Double-click on an activity under Undocumented activities over the last 7 days to open the activity in the Overview phase, see Overview. You can now switch between phases in the process by clicking on the arrows in the header.
- Select one of more activities (Ctrl+click) under Undocumented
activities over the last 7 days and click on
 (Set to
Missed) to set the status of the selected activities to "Missed".
 - Click on
 (Call Documentation Report) under Documented
activities over the last 7 days to generate a report containing all
information entered for the visit (e.g. POS monitoring data, orders, visit expenses,
tasks, completed marketing objectives). Click on
  (Print) to print the
report.
Overview
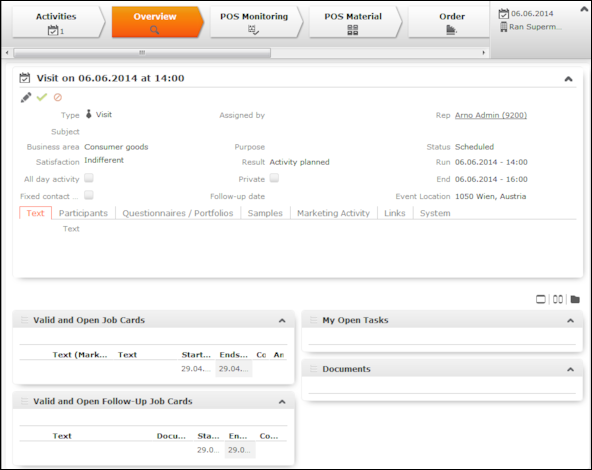
The "Overview" phase provides you with an overview of the information
entered concerning the visit and any marketing objectives and follow-up objectives that
require completion. Any documents added to the activity (e.g. product brochures, product
videos) and open tasks are also displayed. Click on  (Quick View) to display
information on these records in the quick view.
The phase allows you to prepare for upcoming visits. You cannot add or edit any child data in this phase.
POS Monitoring
The "POS Monitoring" phase allows you to enter information on facings at a point of sale, e.g. a pharmacy, see Point of Sale.
Switching to this phase opens the quick add area for POS monitoring items, see Quick Add.
Enter the information on the items at the point of sale. Click on Listing in the quick add area, to display the listings valid for the company, including those inherited from companies higher up the corporate hierarchy, see Relationship Management. Apply the Last POS Monitoring filter to display the POS monitoring items entered in the last POS monitoring. Apply the Special Offer filter to only display items for which a special offer is currently valid.
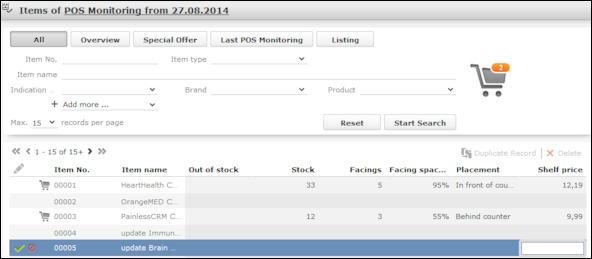
You can flag items as being Out of stock. The number of items that are currently out of stock is displayed under Total out of stock to the right of the search criteria.
POS Material
The "POS Material" phase allows you to enter information on promotional material you have distributed.
Switching to this phase opens the quick add area for POS material items, see Quick Add.
If several POS material records have been added for the activity, an overview is displayed.

- Click on a POS material record in the list to display the POS material items added for the record.
- Click on
 (Today) to display the POS material distributed on the current
date.
 - Double-click on a POS material record to open the quick add area.
- Click on
 (New POS Material) to add a new POS material record. The quick
add area is opened.
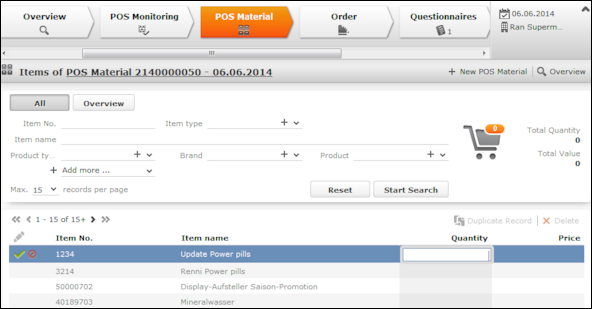
Enter quantities in the quick add area:
- Enter item quantities in the quick add area.
- Click on
 (New POS Material) to add a new POS material record.
 - Click on
 (Overview) in the quick add area to display an overview of all
POS material records.
Order
You can add and edit orders and order items in the "Order" phase. Different delivery dates can be entered for items in the order if the order is split over multiple deliveries. Order items are added using the quick add area, see Quick Add.
When switching to this phase, the new mask for orders is displayed, see Adding Orders. The quick add area for order items is opened once the order has been saved. A delivery date is added automatically for the order and item that is delivered on this date can be entered in the quick add area. If you switch to this phase and only a single order exists on the same date as the activity, the quick add area is opened automatically.
Click on  (Cancel) to switch to the overview without
adding an order.
The overview displays an overview of the orders.
Select an order to display the order items, delivery dates and delivery items.
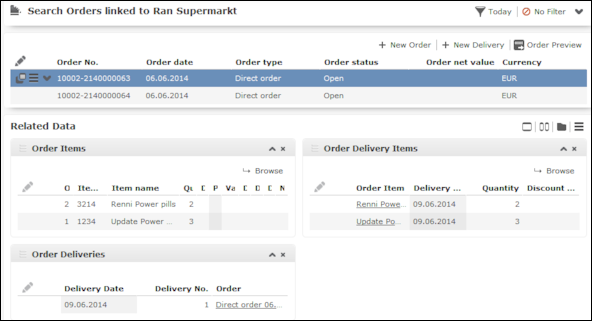
- Click on
 /
/
 (Show/Hide) in the search area at the top of the page to expand
or contract the order search.
 - Click on
 (Today) to display orders with the current date. This filter is
enabled by default.
 - Click on
 (New Order) to add a new order.
 - Double-click on an order to open the quick add area and enter the order items.
- Select an order and click on
 (New Delivery) to add a new delivery on
a new date for the order.
 - Select an order and click on
 (Order Preview) to generate a report
containing information on the order (e.g. the items, deliveries, discount and total
value). Click on
  (Print) to print the report.
The quick add area for order items is opened automatically after adding a new order or when double-clicking on an order in the overview.
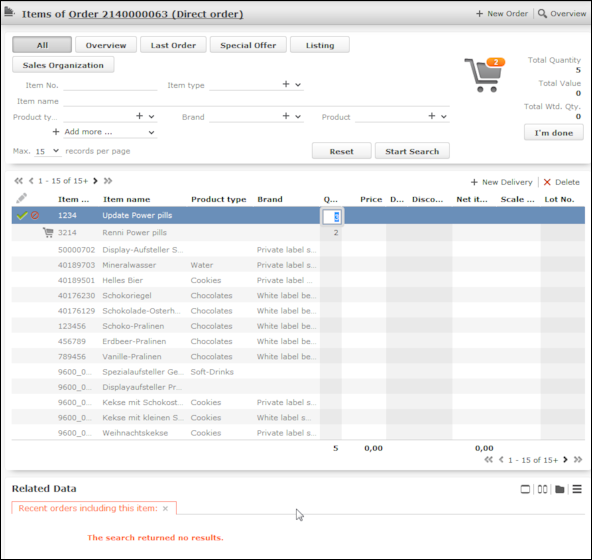
- Click on
 (Overview) in the quick add area to return to the overview.
 - Click on
 (New Order) in the quick add area to add
a new order. Click on
  (New Delivery) to add a new delivery for
the order.
 - Click in the Quantity cell of an item. The dates you have defined
as delivery dates are displayed as separate cells. Enter the quantity that is
delivered on each date in the appropriate cells. Once you switch to another row to confirm
the quantities, the sum total entered for all delivery dates is displayed in the
Quantity cell.
Click on Listing in the quick add area, to display the listings valid for the company, including those inherited from companies higher up the corporate hierarchy, see Relationship Management. Apply the Last Order filter to display the items entered in the last order. Apply the Special Offer filter to only display items for which a special offer is currently valid. Apply the Sales Organization filter to only display those items that have been assigned to a sales organization.
Note: If a Special Offer has been entered in the order, only special offer items added for the special offer are listed in the quick add area. You cannot add other items to the order. - If an item has previously been ordered, the quantity ordered is
displayed under Related Data. Select an order on the left to
display the deliveries on the right. Click on
 (Show Order) to
display information on the order.
Product Detailing
The "Product Detailing" phase allows you enter to information on the products that have been discussed. The number of items requiring discussion is displayed in the phase arrow.
Switching to this phase opens the quick add area for product detailing items, see Quick Add.
All product detailing items valid for this activity are listed, see Product Detailing – LSI. The PD prio and PD standard filters restrict the display to only those items defined as the being of the corresponding type.
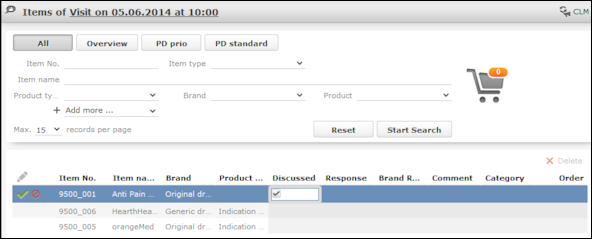
If you are using the closed loop marketing add-on supplied by our partner SKURA, click on
 (CLM) to access your presentation on the SKURA server.
Samples
The "Samples" phase allows you to enter the samples your have distributed and those requested by the customer. Samples can only be distributed to persons; this phase is therefore only available for visits to a person.
Switching to this phase opens the quick add area for samples, see Quick Add. Click on Samples to restrict the display to the items for which a valid sample configuration exists and with an Available Quota, see Sample Configuration. Apply the Special Offer filter to only display items for which a special offer is currently valid.
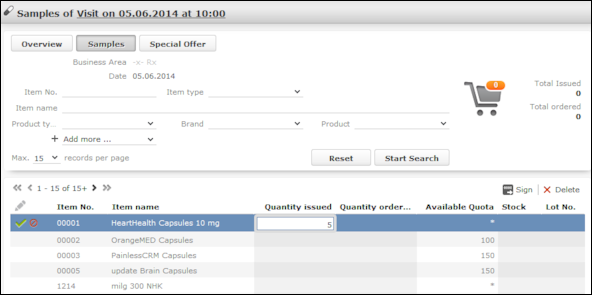
To generate a receipt that can be signed by a doctor receiving samples:
- Click on
 (Sign) and select a template. A Microsoft Word document is
generated containing information on the samples.
 - Click on
 at the end of the document to insert a digital signature.
 - Close the document.
The document is automatically linked to the activity. You can access the document in the Complete phase.
Questionnaires
The "Questionnaires" phase allows you to complete questionnaires that are valid for the current visit. This phase is unavailable if no questionnaires are valid. This number of available questionnaires is displayed in the phase arrow.
When switching to this phase, all questionnaires are listed that have been added for this activity or assigned to the company you are visiting using marketing objectives.
- The status of the questionnaire (finalized or open) is displayed in brackets.
- Double-click on a questionnaire to answer the questions, see Carrying Out a Survey.
- Click on
 (Overview) to return to the overview of
available questionnaires.
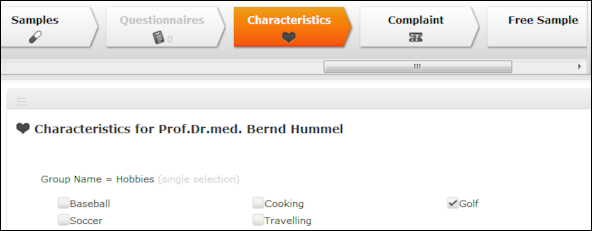
Characteristics
The "Characteristics" phase allows you to enter or change the characteristics defined for the company and/or person you are visiting, see Characteristics.
Medical Inquiry
The "Medical Inquiry" phase allows you to add medical inquiries, see Customer Service – LSI.
Switching to this phase opens the new mask for medical inquiries. If medical inquiries have already been added for this customer, these are listed.
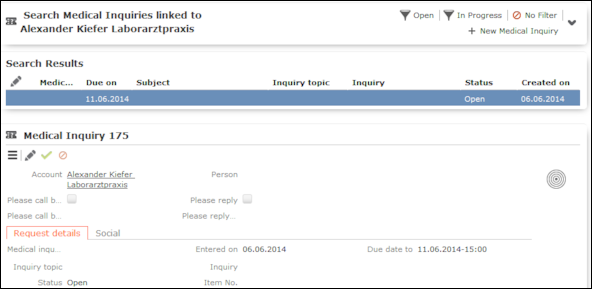
- Click on
 /
/  (Show/Hide) in the search area to expand
or contract the medical inquiries search.
 - Click on
 (New Medical Inquiry) to add a new medical inquiry.
 - Click on
 (Open) or
  (In
Progress) to only display medical inquiries that are open or in
progress.
Complete
The "Complete" phase allows you to enter the costs associated with your visit and complete the call. You can add and edit related records (e.g. add tasks and set marketing objectives to "Completed").
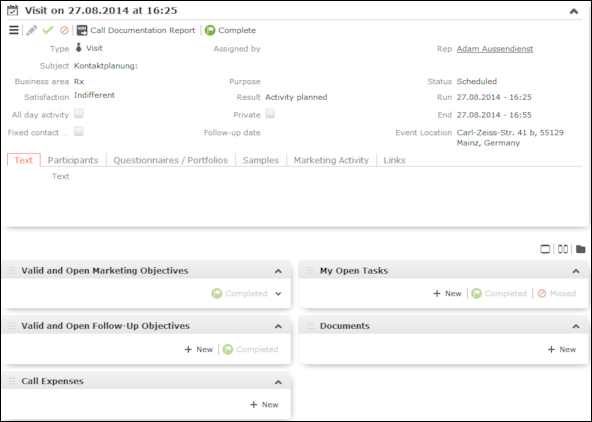
- Click on
 (Call Documentation Report) to generate
a report containing information entered for the visit (e.g. POS monitoring data, orders,
visit expenses, tasks, completed marketing objectives). Click on
  (Print) to print the report.Note: You can only add expenses with the Receipt type "Sponsoring" if the visit was added for a company, not a person.
 - Click on
 (New) under Call
Expenses to enter the costs associated with your visit. When adding new
expenses, an overview of your expenses budget is displayed.
 - To complete the visit, set the Status to "Completed" or click on
 (Complete) to set the status automatically. The "Activities"
phase is opened and you can document the next visit.