Item Master Management
You can enter data on items in the item master in Aurea CRM.
The item master stores all items.
You can:
- Add items, see Item Master
- Enter multi-lingual descriptions of each item, see Item Master
- Automatically transfer item details to other info areas (e.g. offer items, installed base items etc.)
- Group your items within product groups and products
- Add complex price structures in various currencies with sales prices, time-limited offers, and bulk prices and discounts which are used to automatically calculate the sales price, see Price Lists and Bulk Volumes
- Add sales area items for sales management purposes, see Sales Areas
Item Master
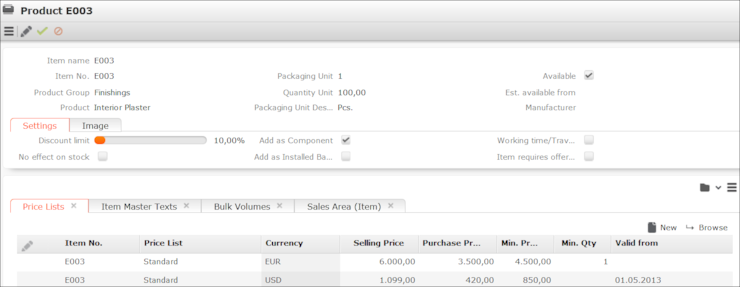
The Item Master info area stores basic information about individual items.
To add a new item, select  (Sales) > Item
Master, start the search and click on
(Sales) > Item
Master, start the search and click on  (New).
The Product Group and Product fields access catalogs. The Product catalog is a child catalog of the Product Group catalog: If you enter a product group in the Product Group field, only the products in that category can be selected in the Product field.
You can define any number of price lists for each item, and enter descriptions in various languages, see Price Lists and Item Master Text.
The following info areas access the item master:
- Offer Item
- Order Item
- Stock
- Stock Control Item
- Installed Base
- Components
- Skill
- Bulk Volumes
- Ticket
- Sales Area (Item)
- Service Contract Item
Click on ![]() (Select) next to the Item
No. field in these info areas to select the desired item. Data from the
item master is transferred to the record (e.g. Item No.,
Item name, Business Area etc.).
(Select) next to the Item
No. field in these info areas to select the desired item. Data from the
item master is transferred to the record (e.g. Item No.,
Item name, Business Area etc.).
Item Master Text
To add a new item master text:
- Switch to the desired item in the Item Master info area.
- Click on
(New) on the Item Master Texts
tab.
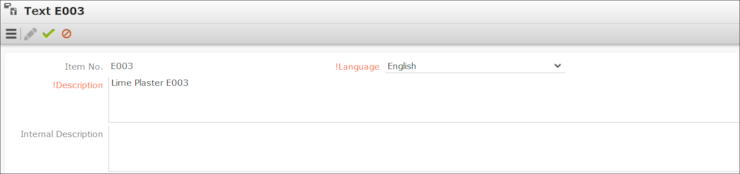
- Select the Language. If you do not select a language, the description applies to all languages for which no description has been entered.
- Enter a Description (for the customer) and, if necessary, an Internal Description.
- Save the record.
If you open an offer or order items that reference this item, the item master text is transferred to the Description field (in the Language entered in the offer or order).
Price Lists
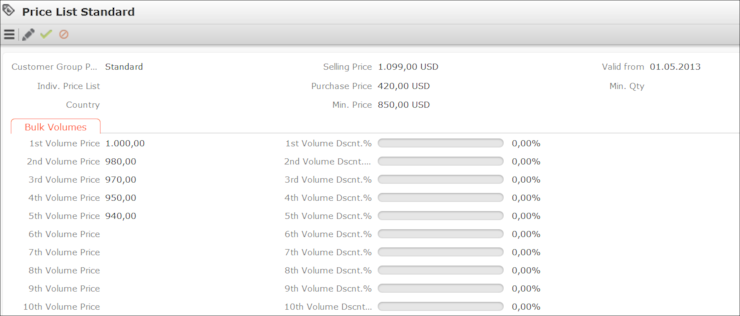
Any number of price lists can be defined per item. The price list is used to determine the sales price of the item in offers, see Offer Management – ISI.
There are three types of price lists:
- Individual Price Lists: Price list for an individual company (Indiv. Price List field)
- Customer Group Price Lists: Price list for a group of companies (Customer Group Price List field)
- Country Price Lists: Price list for a specific country (Country field)
Only one of the three fields may contain an entry in each price list. When determining the price of an item, the individual price list is applied first. If no suitable individual price list is available, a customer group price list is used, and finally the price list for a country is used if no other list is found, see Pricing.
The Currency entered in the Price List and Offer info areas must match, as no currency conversion takes place when adding offers.
To add a price list:
- Switch to the desired item in the Item Master info area.
- Click on
(New) on the Price List tab.
- Enter a price list, prices and a date in the Valid From field.
- Enter further data such as volume prices and volume discounts, see Bulk Volumes.
- Save the record.
Select ![]() (Sales) > Price
Lists to search for price lists.
(Sales) > Price
Lists to search for price lists.
Bulk Volumes
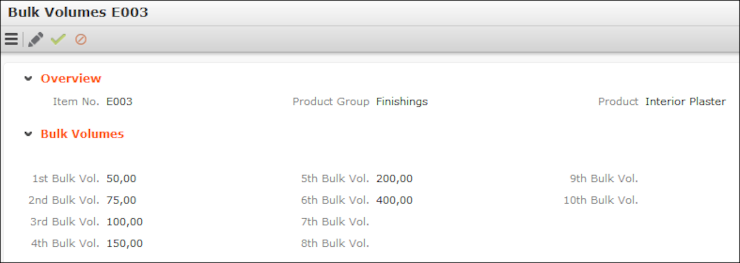
You can define bulk volume ranges for items. The numbers can also include decimal places. These volumes define the quantities for the corresponding bulk prices and discounts that apply to an item. You can define discounts (either as fixed volume prices or as volume discounts) in price lists for items, see Price Lists. If both a bulk discount and a bulk price are entered, the bulk price takes precedence. The quantities defined in the Bulk Volumes info area determine the quantities of the various volumes and thus the quantities up to which the volume price or volume discount applies.
When adding new records, information is transferred from the item master (e.g. Product Group, Product). You can define various quantities used to define volume prices and discounts for each item, for example:
|
1st Volume = 5 |
The 1st volume price and discount apply for 1-5 units |
|
2nd Volume = 10 |
The 2nd volume price and discount apply for 6-10 units |
|
3rd Volume = 20 |
The 3rd volume price and discount apply for 11-20 units |
|
4th Volume = 30 |
The 4th volume price and discount apply for 21-30 units |
The quantity scale applies to all price lists created for this particular item.
To define bulk volumes:
- Switch to the desired item in the Item Master info area.
- Click on
(New) on the Bulk Volumes tab.
- Enter the desired volumes.
- Save the record.
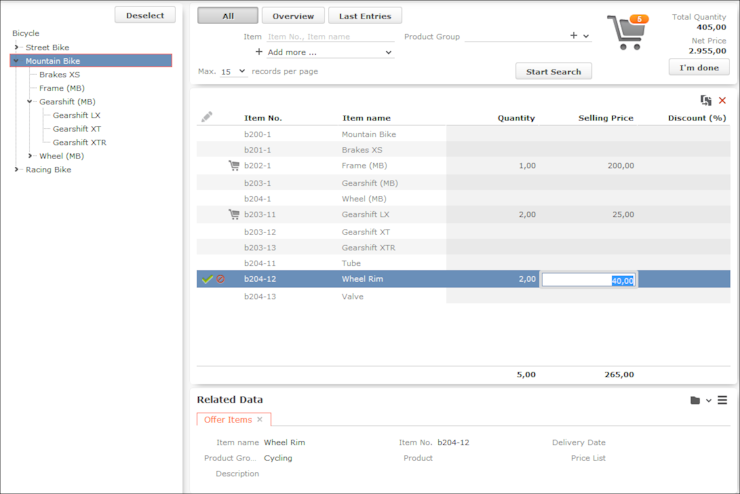
Item Structure in the Quick Add Area
You can define item structures in Aurea CRM in order to depict products in your product catalog, or components in a product consisting of multiple items (e.g. a bicycle composed of a frame, breaks, tires, saddle etc.).
The item structure is defined by linking items in the product master with one another within a hierarchy. Your administrator can determine that the item structure is displayed as a tree in the quick add area, allowing you to select items in the tree. The selected item and all its child items are then displayed in the quick add area.
If you open the quick add area, the tree view is displayed on the left, and the quick add are on the right displays all items, including those not in the item structure, >> Quick Add. All items continue to be listed in the quick add area until an item is selected from the tree.
- Click on
 or
or  in the tree to show/hide items (nodes).
 - Click on an item in the tree to display that item and those items below it in the
hierarchy in the quick add area.Note: Your administrator can however determine that the selected item (node) in the tree is not displayed in the quick add area. Your administrator can also determine the sort order of items in the tree or that only structure nodes (e.g. "Gearshift (MB)") are displayed in the tree, but not items ("Gearshift LX").
- Search criteria and filters (e.g. All) are applied to the
selected item and child items displayed in the list.
For example, enter all or a portion of an item’s number in the Item No. field to restrict the display to only those items with a matching number. For example, if you select the Mountain Bike node in the tree and enter "*04*", only items c204-1, c204-11, c204-12 and c204-13 are displayed in the list.
Note: Click on the Overview filter button to remove the current selection from the tree and display those items in your shopping cart. Clicking on the Last Entries filter button also removes the current selection from the tree. If the Overview or Last Entries filters are enabled and you click on an item in the tree, the All filter is automatically applied. - Click on Deselect to clear the selection in the item tree. Filters and search criteria apply to the display of all items in the quick add area, irrespective of whether they are in the item structure or not.
- Drag the separator between the tree and quick add area to change the width of the tree.