Quick Query (Enterprise CRM)
Quick Query is an enterprise querying tool that provides easy access to Aurea CRM data and information without requiring a deep technical knowledge of the querying tools.
Quick Queries is designed to improve your productivity whether you are a sales, marketing, management, or a service personnel.
Quick Queries are designed to:
- Simplify query composition
- Help you easily complete all relevant steps required to create effective queries, by providing guided process flows.
- Provide the convenience of easy access to key information, required to perform day to day activities, and render decisions.
A few of the many possible user tasks that could benefit from the use of Quick Queries are described below:
- As a marketing specialist responsible for planning and conducting campaigns, you could query for select target groups, for a complete campaign execution.
- As a sales personnel, you could query for potential candidates satisfying several different criteria, to make a sales call.
- As a manager, you want to create queries and analysis to supervise the performance of your sales representatives.
Understanding Quick Queries
Aurea CRM allows customers with enterprise versions to allow their users to create Quick Queries. Users can then share their queries with others or save them as private queries. Searching for a quick query is similar to searching for the standard queries as explained in the previous chapter Queries.
A Quick Query definition process generally consists of the following stages:
- Composing a query
- Enhancing the query
- Query Execution
- Finalizing the Query
Each of these stages can be accessed without any pre-conditions. You can move between the stages as you work on defining your query. For example, it is not necessary to enhance a query that you composed. You can execute the query, and finalize it. Later you can open the query, enhance it, and save it again. Quick Queries can also be enhanced with standard queries to improve their capabilities.
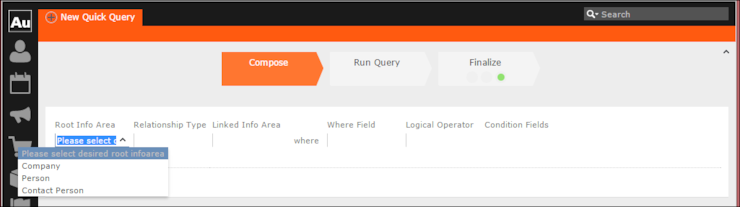
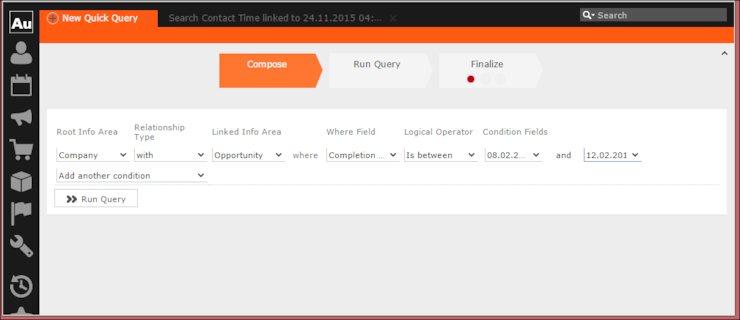
The following screenshot shows the New Quick Query window, displaying the Compose tab of a quick query definition.

During the composition stage, a Quick Query starts with some preconditions and allows some functions as listed below:
- A quick query can be composed with the base info areas of Company (FI), Person (PE), and Contact Person (CP). Hence a Quick Query always returns a list of customers. It is mandatory to select one of the info areas.
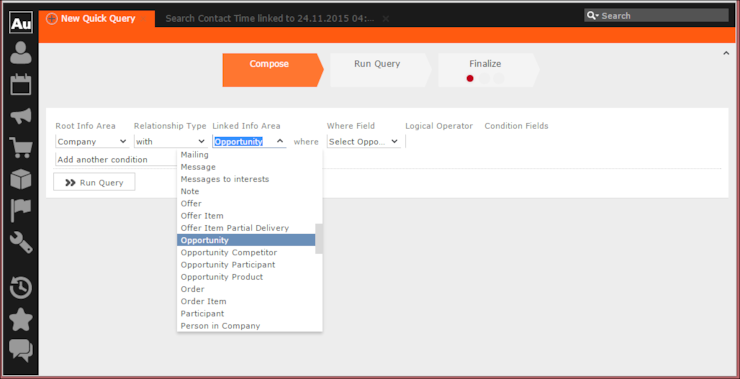
- You are allowed the relationship type of “With” or “Without” when selecting a related or linked info area.
- Allows enhancement of the standard query with addition or subtraction of other queries (Quick Queries as well as standard queries.
- Allows you to execute the query immediately to test the query.
In the Enhance stage, you can enhance your composed query with additional statements already composed. The preconditions and allowed functions at this stage are listed below:
- All queries that refer to the root info areas Company (FI), Person (PE), and Contact Person (CP) are available for enhancement.
- Queries defined by you and public queries are made available.
- You can delete expendable conditions.
- You can execute the enhanced query to test the results.
The query execution stage allows you to run the query composed and/or enhanced so far.
The Finalize stage allows you save the query and define the rights restrictions on the query. You can make it a public query in which case it is available to other users. As a private query it is available only to you.
Creating a Quick Query
To create a quick query, perform the following steps:
- From the Queries and Analysis menu select
Queries. The Queries window displays.
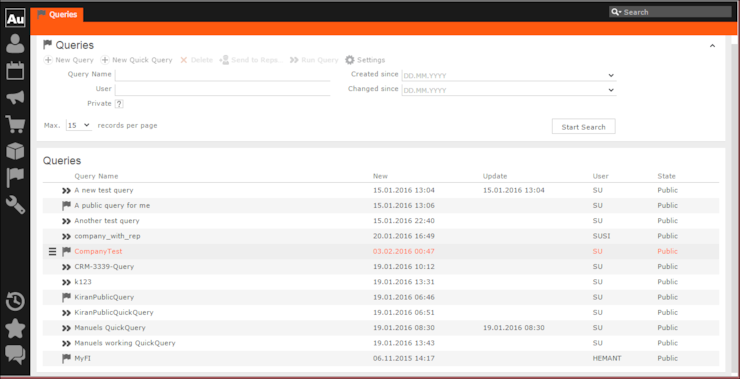 Note: The list of queries displayed contains both Quick Queries and standard queries. The Quick Queries in the Queries list are tagged with the
 icon.
icon. - Click New Quick Query to open the window at the Compose tab.
- Select the Root Info Area of the query you want to create
from the drop down list. You have the following choices: Company; Person, Contact
Person. The Relationship Type column is activated.
- Select the Relationship Type from the drop down list for the
linked info area.
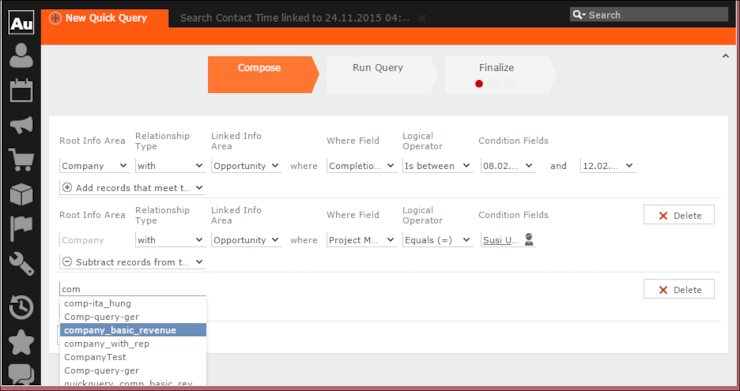
The Where Field activates and is populated with applicable fields for the linked info area. In the screenshot example, the root info area is company, and the relationship type With for the Linked Info Area Opportunities.
 Note: It is not necessary to add a Relationship Type to another info area. You can directly create conditions on the root info area. In such case, you can directly select a Where Field and ignore the Relationship Field and Linked Info Area fields.
 - After that select the Linked Info area from the drop down list. The following
screenshot shows the Company info area, and the relationship
type With for the Linked Info Area
Opportunities. The Where Field drop down list is populated
with fields from the linked info area.
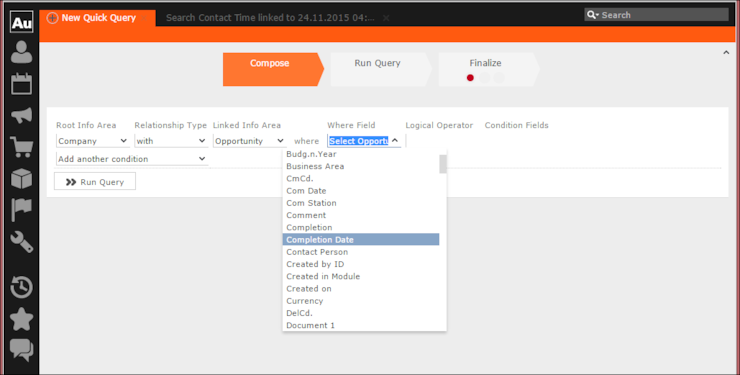 Note: The Where Field column gets activated and shows the fields from the linked info area, in this case the Company fields.
 - Scroll down and select the required info area field from the Where Field drop down list. The Logical Operator field column activates. In this example screenshot, Completion Date is selected.
- Select the applicable Logical Operator from the drop down
list. You have the following options: Equals (=); Not equals; Is empty; Is not empty;
Is true; Is not true; Is smaller than; Is greater than; Is between; Is current
date.Note: The options populated in the Logical Operator depends on the data type of the Where Field. For example, a Boolean field type gets the operators: Is true; Is not true.
The Condition Fields column activates and the drop down list is populated with the available values. In this case it displays the available country names. In this example screenshot, the Logical Operator Is between is selected and in the Condition Fields the start and end dates between which the completion dates for opportunities are set is selected.
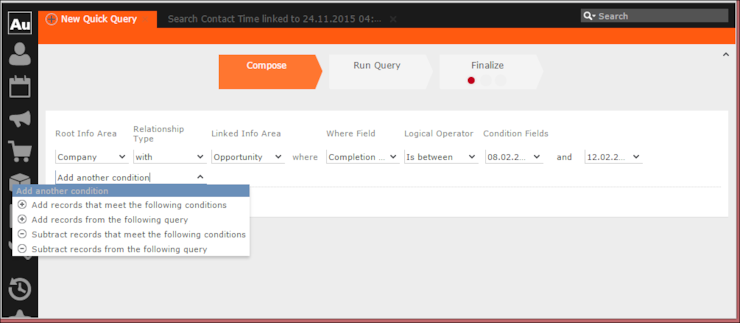
- To Add Another Condition, select one of the following from the drop down list:
- Add records that meet the following conditions
- Add records from the following query
- Subtract records that meet the following conditions
- Subtract records from the following query
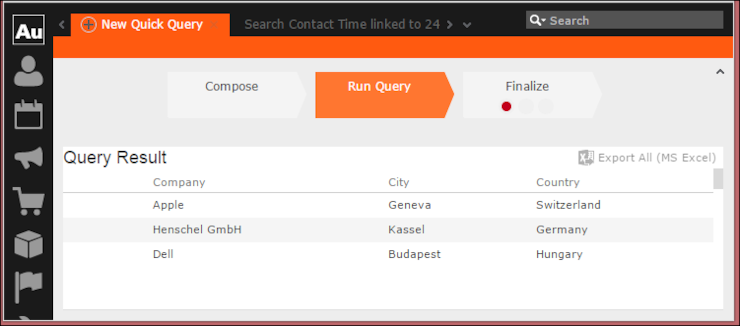
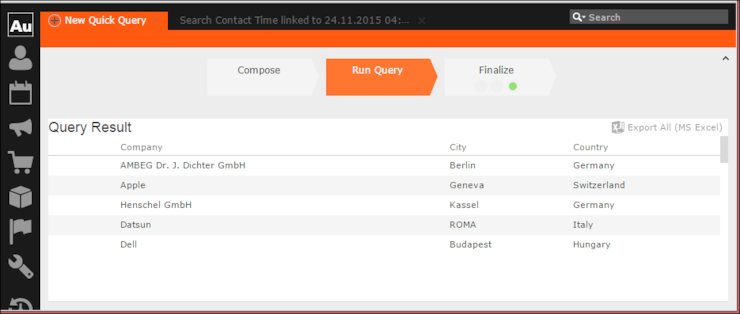
- Click Run Query to test the results.
- Depending on your choice, perform the following sub-steps.Note: At this point you move into the enhance stage of a query definition, adding or subtracting records from another query. You can add the standard queries or quick queries to enhance your base query you are composing. You can also continue with composition by adding or subtracting records with more conditions.
- For the options to Add records that meet the following
conditions or Subtract records that meet the
following conditions, repeat the instructions in steps 3 to 7
above. The example screenshot shows the Add records that meet the
following conditions. Companies with Opportunities and Where the
Project Manager is a specific person.
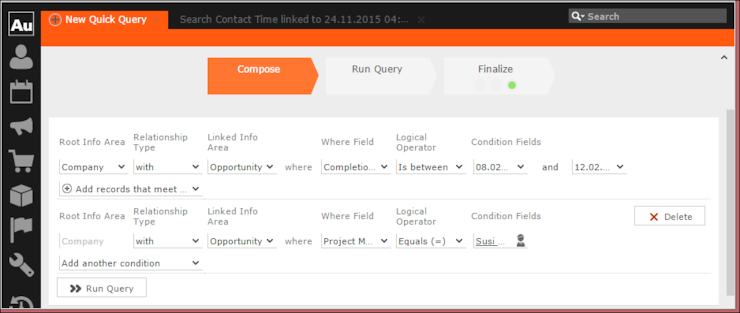 Note: The above screenshot shows the Finalize tab with a green dot. This demonstrates that you can move between different stages of a Quick Query independently. In this case, the Quick Query was finalized after adding the above records. Now we can move to the Enhance stage of a Quick Query definition, and use the remaining two options of adding or subtracting records from other queries.
 - Click Run Query to evaluate the results of your quick query.
 Note: In this run additional records are added to the run on the base query run in step 9 above.
 - To Add a record from the following query or
Subtract a record from the following query perform
the following:
- Select Subtract records from the following query.
A search box is displayed. Start typing the name of the query and list of possible matches are displayed as you type, as shown in the screenshot below. For this example, we select the query company_basic_revenue. This query removes the records for companies that have a revenue of less than 100,000 from the base Quick Query.
- Click Run Query to view the results of the new enhancement.

- To Add a record from the following query type the name of the query in the search box.
- Select Subtract records from the following query.
- For the options to Add records that meet the following
conditions or Subtract records that meet the
following conditions, repeat the instructions in steps 3 to 7
above. The example screenshot shows the Add records that meet the
following conditions. Companies with Opportunities and Where the
Project Manager is a specific person.
- To finalize a Quick Query, click the Finalize tab.Note: You can finalize a quick query at any stage of the query definition.
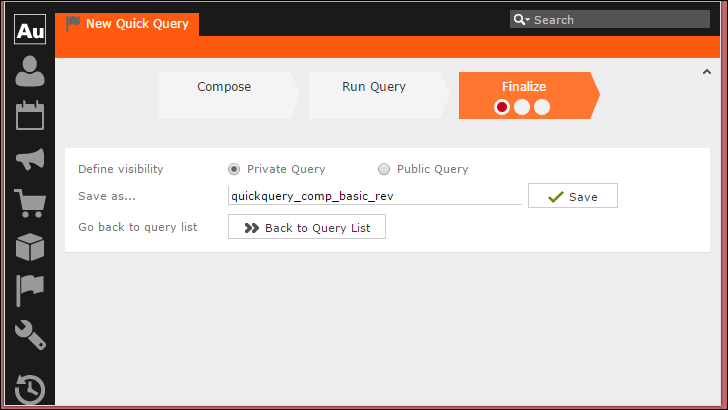
- Check Private Key to save the Quick query for your personal use or check Public Query to share the Quick Query with others.
- Enter a name for the Quick Query in the Save as… text field.
- Click Save to finalize the Quick Query.
Note: Click Back to Query List to show a list of queries with the finalized quick query highlighted.