Queries
You can define, load and execute complex queries in Aurea CRM web and define queries for other users.
Queries can be applied to data across multiple info areas. Your administrator can determine that fields in other info areas are displayed as links. You can click on a link to switch to the default view of the associated record.
Rights
Global and private queries are available. Your administrator defines which ones you are allowed to execute.
Query Structure
A query can consist of the following elements:
- A main info area
- Conditions applied to the main info area's fields (e.g. Country = Austria and Lead Status = Customer)
- Several related info areas, each of which is linked to the main info area or other related tables
- Various options for linking info areas (e.g. show companies with / without persons)
- Conditions applied to the fields in these info areas
Aurea Query Language (AQL)
The Aurea Query Language (AQL) allows you to define queries in the AQL Syntax field and is similar in syntax to SQL (which is commonly used to define database queries). AQL uses a specific syntax which is described in detail in the Aurea CRM web Administrator Guide, >> AQL (Aurea Query Language) in the Aurea CRM web Administrator Guide.
For example, consider the following multi-conditions on a fields and how they are interpreted:
F1 = 1 AND F1 = 2 AND F1 = 3was interpreted before asF1 = 1 OR F1 =2 OR F1 = 3 ➔ F1 IN(1,2,3).F1 != 1 OR F1 != 2 OR F1 != 3was interpreted before asF1 !=1 AND F1 != 2 AND F1 != 3 ➔ F1 NOT IN (1,2,3).
The input field for AQL statements is located at the top of the query window.
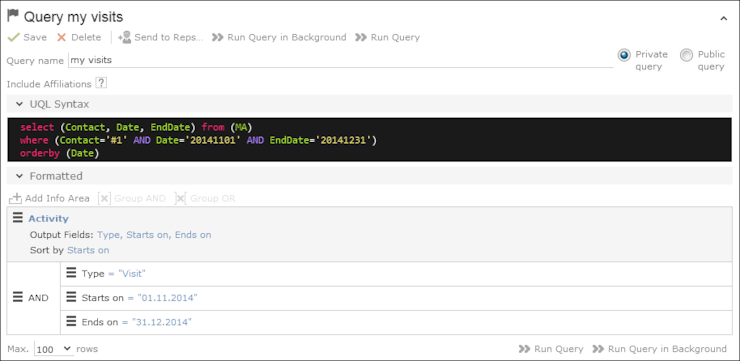
The lower area allows you to define conditions using the Aurea CRM web GUI. When defining conditions using the UI, The corresponding AQL statement is displayed in the AQL Syntax area. This helps you familiarize yourself with AQL.
Defining a New Query
You can define queries in two ways:
- Using AQL (update Query Language), entered in the AQL Syntax field. For more information on the AQL syntax, refer to the Aurea CRM web Administrator Guide.
- Using Aurea CRM web's GUI, which allows you to select the desired filter criteria. This is the method described in this manual.
To define a new query:
- Select
 (Queries & Analyses) >
Queries.
(Queries & Analyses) >
Queries. - Click on
 (New). The input mask is displayed.
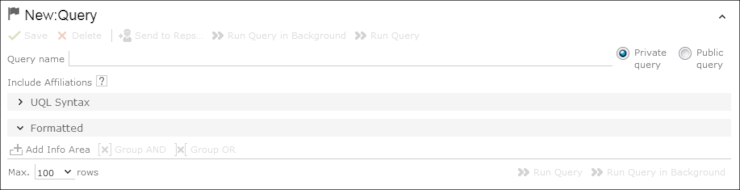
- Enter a name for the query in the Query name field. Define
the query as either a Private query or a Public
query. Private queries can only be accessed by the rep that created
the query.Note: You can however provide other users with private queries. For further details, see Sending a Query Definition to another Rep.
- Enable the Include Affiliations option (if configured) to return records added for affiliates in the results. For more information, see Affiliation View in your product-specific manual that can be downloaded from https://support.aurea.com.
- Click on
 (Add Info Area) to open
the Select Info Area dialog box.Note: All info areas that you can access are listed.
(Add Info Area) to open
the Select Info Area dialog box.Note: All info areas that you can access are listed. - Select an info area. The Select Fields dialog box is
opened.
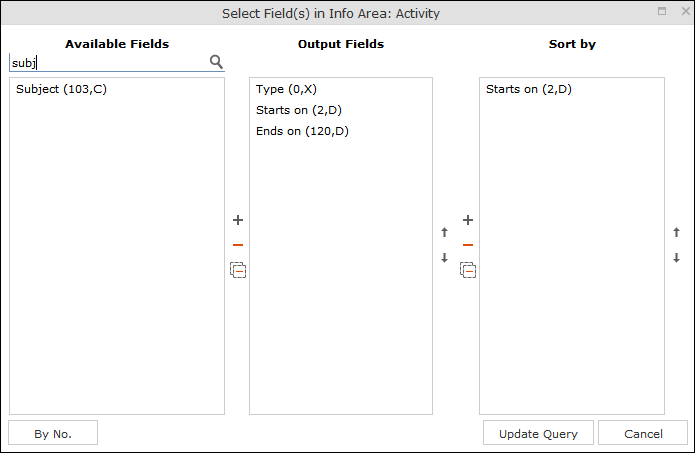
- Select the fields from this info area that you want to display.
- Available Fields: This box lists all fields in this info you can access. Your administrator is responsible for defining access to fields. You can also enter a portion of the desired name in the Field name field. The field number and type is displayed in parentheses following the field name. For further details, see Field Data Types.
- Use the By No. and Alph. button
to sort the field names alphabetically or by field number. Select the desired
fields by clicking on them and click on the
 button to transfer the field to
the list of Output Fields.
button to transfer the field to
the list of Output Fields. -
Output Fields: This area lists the fields that are
displayed in the list of results. Each field is displayed in a separate
column.
Select the desired fields in the list of output fields and click on the
 button to remove the fields from the list of
output fields. The
button to remove the fields from the list of
output fields. The  button removes all of the fields from the
Output Fields list. Use the
button removes all of the fields from the
Output Fields list. Use the  and
and
 buttons, to change the order of the
fields.
buttons, to change the order of the
fields. -
Sort Fields: Select a field in the list of
Output Fields and click on to add
the field to the Sort Fields list. These fields are used
to automatically sort the results. Double-click on a field to change the sort
order (ascending or descending)
Click
to
remove the selected field. Click to remove all the sort fields
from the list. Use the and buttons, to change the sort
order of the fields.
Note: You can select multiple fields by pressing the Ctrl key. For further details, see Selecting Multiple Records. - Click the Add to Query button to add your selection to the query.
- Define the conditions in the query. For further details, see Conditions.
- Save the query.
Editing Queries
If you edit an existing query (e.g. add info areas, fields or conditions), an asterisk (*) is displayed following the name of the query in the header. The asterisk continues to be displayed until you save the changes.
If you save an edited query under the same name, the query is overwritten immediately. If you change the name of the query and another query with the same name exists, you are asked whether you wish to overwrite the existing query.
Loading Queries
To load an existing query:
- Select
(Queries & Analyses)
> Queries. The Queries page
opens. The State column indicates whether the query is private
or public. Select Run from the context menu to run a query
directly from the list.
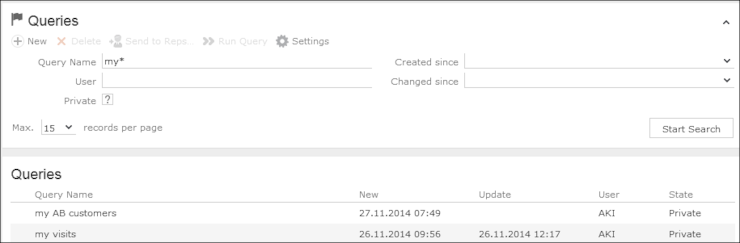
- Enter search criteria to restrict the queries displayed.
- Use the context menu or double-click on a query to open it. The query is loaded.
- Edit the query by adding or removing info areas and conditions.
- Define the maximum number of rows displayed by the query.
- Click Run Query to run the query.
The results are listed at the bottom of the page. The number of results displayed per page depends on your settings. For further details, see Handling Tab. The default value is 50 hits per page. If more results are returned than are displayed per page, use the navigation arrows to switch between pages.
- Click on Save as Query Snapshot to save the results list. Define the maximum number of rows to be saved and whether the result should be saved as public or private.
- Click
 (Export (MS Excel)) to export your
query to an Excel file. For further details, see Exporting.
(Export (MS Excel)) to export your
query to an Excel file. For further details, see Exporting.
Executing Queries
You can execute queries in two ways: immediately or in the background. When executing a query immediately, you need to wait until the query has executed before you can continue working. You should therefore only execute a query if you are sure that you have defined a query that returns the desired results or is quick to execute.
To execute a query:
- Load the desired query, see Loading Queries.
- You can execute the query in two ways:
- Click
 (Run Query). The query is
executed immediately and you can only continue working once it has finished
executing.
(Run Query). The query is
executed immediately and you can only continue working once it has finished
executing. - Click on (Run Query in Background).
You can continue working with the application and the query is scheduled for
execution in the background. You receive a message when the query is executed.
For further details, see Background Queries.
If the query is executed immediately, the results are listed at the bottom of the page. The number of results displayed per page depends on your settings. For further details, see Handling Tab. If more results are returned than are displayed per page, use the navigation arrows (
 ) to switch
between pages.
) to switch
between pages.Default: 50 hits per page.
- Click
Deleting Queries
You can delete queries in two ways:
- Select Delete from the context menu in the results list
- Click on
 (Delete) in tab view when viewing the query.
To prevent the deleted query from being displayed, you need to reopen the view or invalidate your cache.