Occupation Reporting – LSI
The occupation reporting process allows you to document the work you have performed and submit your report for approval.
You can enter expenses per day for traveling and enter receipts as well as document the work that was performed (visit, conference etc.). Your superior (or an office rep) monitors and approves the reports you have submitted for each month.
Click on (Occupation Report) to generate an report containing all
relevant information. Click on  (Print) to print the report.
Occupation Reporting Process
The opportunity reporting process consists of three phases and is available to all employees.
Select  (Daily business) >
Occupation Report to start the process. The process is opened in
phase 1 (Add).
|
Phase |
Phase Tasks |
|---|---|
|
1) Add |
|
|
2) Edit |
|
|
3) Check |
|
Click on the arrows in the header to switch between the various phases. Double-click on a record in phase 1 (Add) to open the record in phase 2 (Edit).
Further information on a phase is displayed using icons in the phase arrows. Move your mouse cursor over the arrows or icons to display a tooltip.
Phase 1 - Add
In this phase, you can:
- Display all work requiring submission or which has been rejected (Approval status = "New" or "Rejected").
- Add new records
- Edit rejected reports and resubmit them
To add a new record:
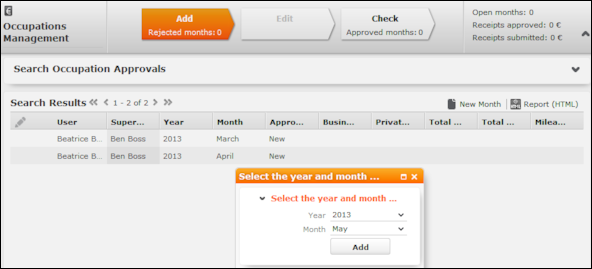
- Click on New Month.
- Select the year and month you want to add a record for.

An approval record is added and default values are entered in some of the fields, e.g. User, Superior, Cost Center, Currency and Approval status. A record used to store expenses is also added for each day of the month, and default values are also entered in these records, e.g. User, Currency, Weekday, Workday.
To edit a record:
- Select the desired and record and select Open from the context
menu. The record is opened in edit mode.

- Enter other details, e.g. enter a Comment.
- Save.
Phase 2 - Edit
During this phase, you can enter details concerning the work you performed, and associated expenses and receipts.
Your work hours are entered automatically, however you can edit them. You administrator can define individual work hours for each user.
To edit the details of your work and expenses:
- While in phase 1 (Add), double-click on a record to switch to
phase 2.
The records for all days in the month are displayed. Click on
 to
display the search area and define additional search criteria.
- Enter the details of the work you have performed for each applicable day.
If you enter a value in the Occupation 1/4 cell, the same value is entered in all the Occupation cells. If you enter a value in the Occupation 2/4 cell, the same value is entered in Occupation 3/4 and Occupation 4/4 cells etc. If you edit an existing value, only that value is changed.
- Enable the check box in the Overnight stay cell should be taken into account (from the previous day to this day).
To enter expenses and receipts for a day:
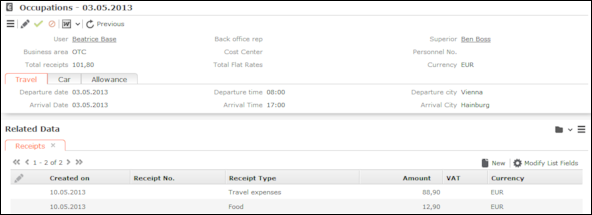
- Double-click on a the day or select Select from the record’s
context menu. Flat rates (e.g. for meals etc.) are entered automatically.

- Enter additional data such as the Departure city, whether a Company car or Hired car was used etc.
- Click on
 (New) on the Receipts tab to add a new
receipt. Enter the desired data.
(New) on the Receipts tab to add a new
receipt. Enter the desired data.The Total Flat Rates and Total receipts fields in the occupation record are calculated automatically and track the total expenses of each type.
- Save the record.Note: Click on Previous to exit edit mode and close the record without saving.
Click on  (Submit) in the list of days to submit
your entries for the month. Phase 3 (Check) is opened. The
Approval status is automatically set to "Submitted". Your superior
is informed on their start page that they need to approve your submission.
 (Update) in the list of days to transfer
activities entered in your calendar and receipts added during the call documentation process
to the report.
(Update) in the list of days to transfer
activities entered in your calendar and receipts added during the call documentation process
to the report.Phase 3 - Check
In this phase, only those records whose Approval status is "Approved" or "Submitted" are displayed.

Select Open from a record’s context menu to open it. You cannot edit submitted or approved records.
The approval status is also color-coded: green = approved, yellow = submitted, red = rejected.
Approval
Work that needs to be approved by you (as sales manager) is displayed on your start page. Double-click on a record to edit display it; the record is opened in phase 2 (Edit). You cannot edit the record.
Work requiring approval are also displayed in phase 3 if you have the necessary rights. You cannot edit records that require approval.
Click on  (Approve) or
  (Reject) to approve or reject a work report. The
Approval status is set to either "Approved" or "Rejected"
accordingly.
You can subsequently approve records you have rejected, but cannot approve ones that have already been rejected.