Timeline
The timeline allows you to display an overview of your contact with customers chronologically, e.g. activities, offers etc.
The selected records are displayed along a time axis in so-called "bubbles". You can configure the overview to display different types of records using different colors, icons and text.
By default, timelines are available from the following areas:
- In the Company, Opportunity and Property info areas.
- The Marketing Timeline if available from the Company info area.
You can add comments from timelines.
To display a timeline:
- Switch to the desired company or person, see Searching.
- Select Timeline from the context menu or click
on
 (Timeline) in the record's header. The timeline is
displayed.
(Timeline) in the record's header. The timeline is
displayed.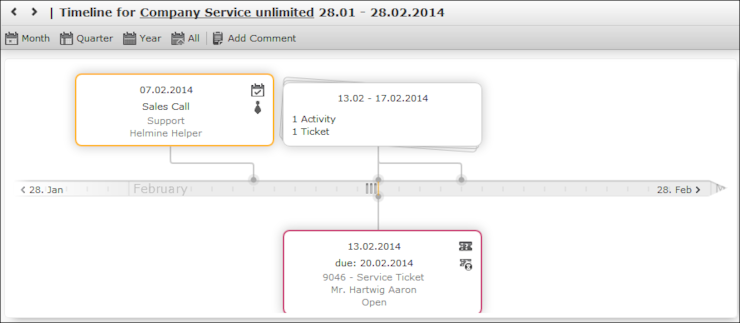
- Click on Month, Quarter, Year or All to select the time period to display.
- You can navigate forwards and backwards in time as follows:
- Click on
 (Previous) or
  (Next) to switch to the previous or
next time period.
(Next) to switch to the previous or
next time period. - Click on the gray bar to change the time period:
- If you are displaying the entire time period (All) or the yearly view, the display switches to the quarterly view.
- If you are displaying the quarterly of monthly view, the view switches to the previous quarter or month.
- Drag the
 icon in the scroll bar to the left or right.
 - Click on the date at the far left or right of the scroll bar to move to the previous or next time period.
- Click on
- Click on a bubble to display the details of the record beneath the timeline. If a
bubble contains multiple records, a list of all records in the bubble is displayed on
the left beneath the timeline. The currently selected record’s details are displayed on
the right.Note: Your administrator can determine that bubbles containing only a single record are color-coded by info area. Example: All bubbles containing data from marketing-related info areas are displayed with a blue border.
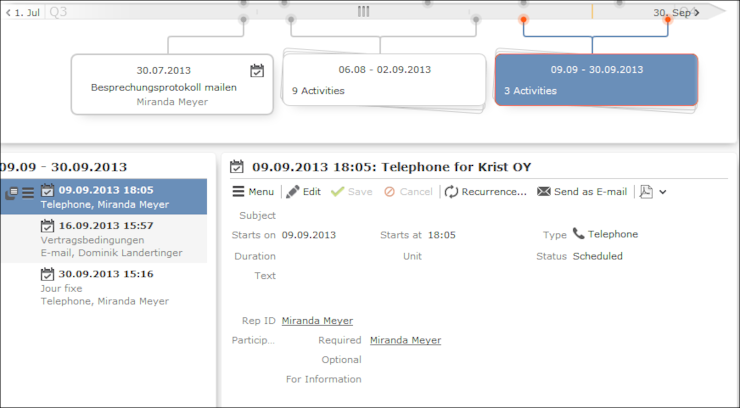
- Click on a bubble containing multiple records to display all the records in the bubble in the weekly view.
Adding Notes
You can add notes concerning any insights gleaned from the timeline.
To add a note:
- Open the timeline.
- Click on
 (Add Comment) and enter the text.
Click Save.
(Add Comment) and enter the text.
Click Save.
Note: Notes can be linked to company records within the scope of your Aurea CRM
solution.
Timeline Notes
To display timeline notes:
- Switch to the desired record.
- Select Timeline > Timeline Comments from the context menu. The notes are displayed.
- Click on a note to edit it.