Quick Add
The quick add function allows you to easily enter items (e.g. in offers or orders) without needing to add item records individually.
To use the quick add function, you first need to add the parent record (e.g. an order) and then add the items. Items can be selected from the item master.
Depending on the info area, various items are listed. You can restrict the number of items listed.
Each time you enter an item using the quick add function, a corresponding item record is added to the parent record.
The quick add function is available by default in a number of areas in Aurea CRM web, e.g. offers and orders. If the quick add function is available for an area, the Quick Add option is available from the parent record's context menu.
Switching to Edit Mode
Depending on your product version you can switch to edit mode as follows:
- Select Quick Add (Item) from the header record's context menu.
- Click on
 (Quick Add)
Duplicating Records
You can duplicate rows in the quick add area.
To duplicate a row:
- Open the desired quick add area.
- Select the desired row.
- Click on
 . The duplicated record is inserted below the selected
record.
. The duplicated record is inserted below the selected
record.
Viewing Item Details in the Related Data
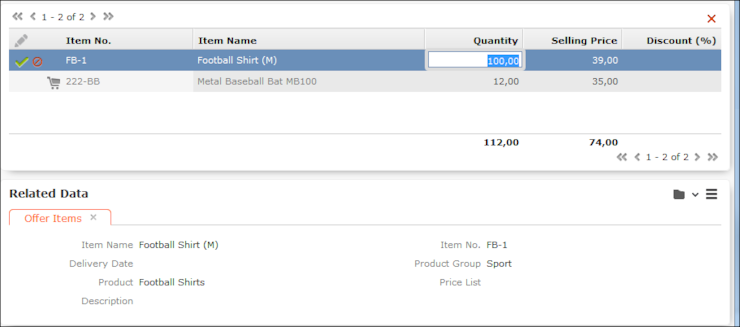
Information on individual item records is displayed under Related Data below the quick add area.
In addition to displaying details on the selected item, information can also be displayed e. g. on when the company/person was last offered or last ordered the item and what the conditions were.
Special Filters
You can restrict the items displayed in the quick add areas using predefined filters. These filters are displayed in the upper search area as buttons. Click on the desired button to apply the filter.

You can further restrict the items listed by entering additional criteria in the search mask.
Which filters are available depend on:
- The vertical you are using
- The current info area
- The configuration defined by your administrator
The following special filters are available by default, additional filters can be available depending on your configuration:
|
All |
All items in the item master. |
|
Overview |
The items for which data has been entered. |
|
Last Entries |
All items entered for the last three records in the parent info area. |
- Your administrator can define that no special filters are available.
- Your administrator can define filters that are applied automatically when using the quick add function.
- Your administrator can restrict the number of records displayed when selecting Last Entries.
Entering Data using Quick Add
The quick add function is similar for all info areas. The following describes entering items for an order.
To enter data using the quick add function (e.g. for an order):
- Select
 (Sales)
> Orders from the menu.
(Sales)
> Orders from the menu. - Search for the desired order.
- Switch to edit mode, see Switching to Edit Mode.
- The item master is listed.
- Restrict the items that are listed:
- Enter search criteria in the search mask.
- Click on one of the buttons to apply the corresponding filter, see Special Filters.
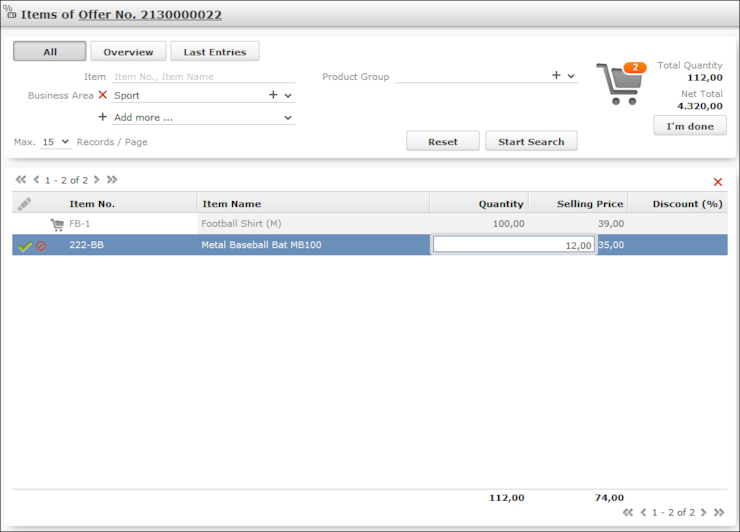
- Click on an item in the results list, and enter the desired values (e.g. quantity
and end price) in the list.Note: If you enter a quantity of '0' (zero) for an existing item, you are asked whether you want to delete it or save the item with a quantity of zero.
The shopping cart symbol (upper right corner) displays the number of items for which a quantity has been entered. The total quantity and net price of the order are displayed next to the cart.
- If you switch between items, your settings are saved automatically.
You can also click on
 (Cancel) and
  (Save). Rows in the list where a corresponding item record
have been added are indicated with a small shopping cart icon.
(Save). Rows in the list where a corresponding item record
have been added are indicated with a small shopping cart icon. - Additional information on the selected items is displayed beneath the list of
items:
- Once you have entered all the items, click on I'm done.
Shopping Cart
The number of items that you have entered data for in the quick add area is displayed on the shopping cart icon:

Key values regarding the items are displayed to the right of the shopping cart.
Click on the shopping cart to display the items in the cart:
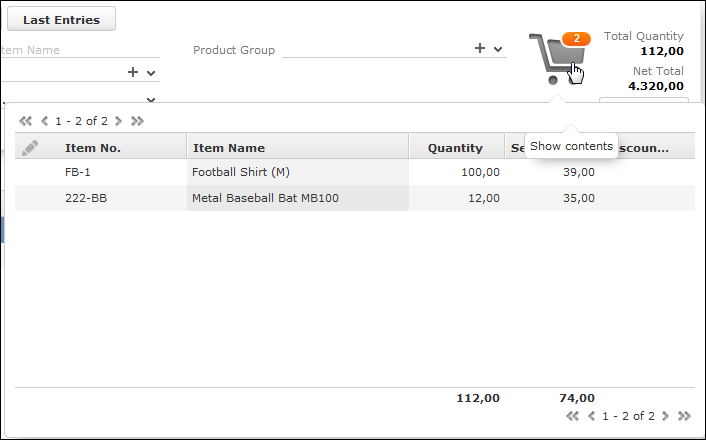
You cannot edit data in this overview, but you can access the quick view or display the mini details.
Deleting Data in the Quick Add Area
To delete data in the quick add area:
- Click on Overview. The items for which data has been entered are displayed.
- Select the item you wish to delete and click on
 (Delete).