Creating a Trigger: Some Examples
In this tutorial, you will assume the role of a musical instrument dealer selling your products on the web. You will practice creating both a simple trigger and a more complex one. The demographics you will use must first be created using the Creating a Demographic: Some Examples tutorial.
Scenario #1
You want to send a message to customers two weeks after they join your list asking them about your product selection.
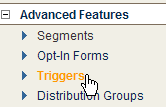
- In the left navigation bar, click Triggers.
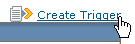
- Click Create Trigger.
- In the Trigger Name box, type the name Product Questions
- Click ADD NEW ACTION.
- Under Select Action, select Joins this mailing list and click SAVE & NEXT.
- Under Action Options, select Joins at any time and click SAVE & NEXT.
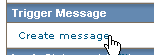
- Click Create message.
Follow the usual steps to create a regular message. After you save and finish your message, the main Triggers edit page appears again.
- Click Edit Scheduling & Delivery.

- Under According to this schedule, selectAfter, and then in the After box, type 14
- Click the at box and select Noon PST.
- Click CONTINUE (you may have to scroll down to see the CONTINUE button). In the Trigger Message section, the Scheduling note says “Message is sent 14 days later.”
- Click SAVE & FINISH.
Scenario #2
You want to send a message containing a discount coupon to customers in New York and New Jersey a week before their birthday. You want to restrict this to customers who have opened a previous message.
- In the left navigation bar, click Triggers.
- Click Create Trigger.
- In the Trigger Name box, type the name Birthday offer
- Click ADD NEW ACTION.
- Under Select Action, select Opens an email and click SAVE & NEXT.
- Under Action Options, click specified.
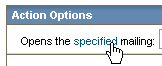
- In the Clickthru Selection window, click the message you want and click SAVE & NEXTtwice. (For the purpose of this tutorial, you can use any message.)
- Click ADD NEW ACTION.
- Under Select Action, select Whose demographic is a specific value and click SAVE & NEXT.
- Click the Whose demographic box. The Demographic Selection window appears.
- In the Demographic Selection window, click the Demographic box and select State/Province.
- Click the Demographic Value box, select NY and click CONTINUE.
- Click SAVE & NEXT,.
- Click ADD NEW ACTION.
- Under Select Action, select Whose demographic is a specific value and click SAVE & NEXT.
- Click the Whose demographic box.
- In the Demographic Selection window, click the Demographic box and select State/Province.
- Click the Demographic Value box, select NJ and click CONTINUE.
- Click SAVE & NEXT.
We have added the actions we want, but there’s a problem: when you add two or more actions, the application automatically inserts the AND operator between each one. So right now, this segment ensures that the message you attach it to goes only to customers who:
Opens an email
AND
Lives in NY
AND
Lives in NJ
The database only accommodates one state of residence for each customer; we need to change the logic statement so that the trigger applies to customers who live in NY or NJ.
- Click Edit (located next to Logic Statement).
- In the Edit Logic window, click Clear Statement.
- Click When a user opens an email.
- Click the
 operator.
 - Click When a user whose demographic is a specific value: State/Province is NY.
- Click the
 operator.
 - Click When a user whose demographic is a specific value: State/Province is NJ.
- Click Save.
- Click Create message. Follow the usual steps to create a regular message. After you save and finish your message, the main Triggers edit page appears again.
- Click Edit Scheduling & Delivery.
- In the Scheduled Trigger Message window under According to this schedule, click the second option, and then type 14 in the days box.
- Click the box that says 1 am PST, and then click Noon PST.
- Click CONTINUE.
You now have your actions and logic statement chosen.