Scheduling a Trigger for Delivery
You can edit the scheduling and delivery of your trigger message during the creation process or any time after. The default setting for when to send a trigger message is “immediately.”
You can choose to send it at a particular date and time in the future or before or after your customers’ birthdays.
You can have the message sent to the customer who activated the trigger or any other email address.
Unlike a regular message, a trigger message is sent only after all the actions in its logic statement take place.
- A setting of “Immediately” means “Send as soon as all the actions have taken place.”
- A setting of “After 7 days” means “Send 7 days after all the actions have taken place.”
- Create your trigger (See steps 1 through 7 in the Creating a Trigger topic).
- If desired, change the logic statement for your trigger.
- Under Trigger Message, click Edit scheduling & delivery.

Sending the Trigger Message Immediately
Leave the schedule setting as is. “Immediately” is the default setting.

Sending the Trigger Message After a Certain Time Period
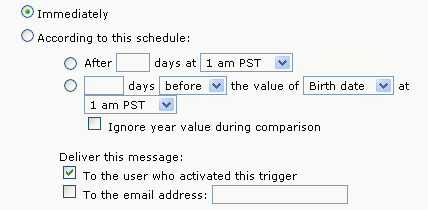
- Under According to this schedule, click After.
- Click the After box and type the number of days between the time all trigger actions have been met and the time the message should be sent.
- Click the 1 am PST box, and then click the time you want the message sent.

- Click CONTINUE (you may have to scroll down to see the CONTINUE button).
Send the Trigger Message Based on the Customers’ Birthdays or Date
To send the trigger message based on the customers’ birthdays or date they were added to the mailing list:
- Click the second option under According to this schedule.

- In the box to the left of days, type a number. This determines how many days before or after the target date the message is sent.
- Do one of the following:
- To send the message before the birthday or add date, leave the before setting as is.
- To send the message after the birthday or add date, click before, and then click after.
- Do one of the following:
- To send the message based on the birth date demographic, leave the Birth date setting as is.
- To send the message based on the dateadded demographic, click Birth Date and select dateadded.

Choosing Who to Send the Trigger Message to

Do one of the following:
- To send the message to the user who activated the trigger, leave the default setting as is.
- To send the message to another email address, select the To the email address check-box and type an address in the text box. For example, create a trigger message to your sales department to inform them that someone opened a specific link requesting information.
You can choose both of the options above.
Trigger Response Behavior
You can change how many trigger messages a customer receives, and how often. The default behavior is:
- Update Profile trigger: send a message every time a profile is updated.
- All other triggers: send a message only once.
To choose the default setting, make no changes.
Sending the Message Only Once to All Customers
Under Trigger Response Behavior, click Only once per individual.

Sending the Message Every Time Actions in the Logic Statement Take Place
- Click Every time the trigger condition(s) are satisfied.
- To limit message sending to a certain time period, click But only once every, and then click the days box and select a number.
Sending the Message More Than Once, But not Every Time Actions are Met
- Click Apply Proportional Limiter.
- Click the Send to every box and type the desired number.
For example, if you type 3, the message will be sent every third time the actions in the trigger’s logic statement are met.
Limiting the Number of Responses and Time Period They are Sent in
- Click the check-box to the left of the Limit Total Trigger Response option.
- Click the first box in the option and type the number of desired messages.
- Click the second box in the option and type the number of desired days.
Enabling or Disabling Clickthru Tracking for TEXT Version
Select or clear Enable for TEXT version.
Changing the HTML Encoding
Under HTMLHypertext Markup Language. A set of tags used to mark the structural elements of text files. HTML files include tags that create hyperlinks to other documents on the Internet. Encoding, click the desired encoding.
NOTES
- HTML Encoding handles the character recognition as your message is encoded and sent out.
- For US English emails, text or HTML, select 7-bit encoding.
- For special characters or languages other than US English, select Quoted-Printable.
- Delivery is much slower when Quoted-Printable is applied.
Changing the Character Set
Click the box below Character Set and choose the desired set.
Other character sets EmailLabs system recognizes are:
- Traditional Chinese (Big5)
- Simplified Chinese (gb2312),
- Japanese (euc-jp)
- Korean (euc-kr)
- Cyrillic (koi8-r)
- Cyrillic (windows-1251)
- Central European (windows-1250),
- Western European (ISO and Windows)
If you need a character set that is not available in the software, contact EmailLabs Customer Support.
- You can enable or disable a trigger.
- You can clear a list member’s trigger history, enabling them to continue receiving messages.