Creating a Trigger Part 2: Choosing a Trigger Type
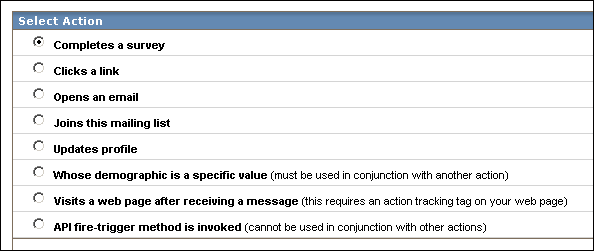
After you click the ADD NEW ACTION button, you arrive at the page where you can select the type of action you want for your trigger. There are eight different types:

Select the action, and then click the SAVE & NEXT button. This takes you to the Action Options page for the option. Each action has a unique set of options, explained in detail below.
Completes a Survey
To activate the trigger when customer submits any survey:
- In the Action Options section, click Trigger for any completed surveys.
- To exit the main Triggers edit page, click SAVE & FINISH.

To activate the trigger when the customer completes a specific survey:
- Click Trigger for the specified survey.
- Click the text box or the specified command.
- In the Surveys window, click a survey, and then click CONTINUE.
- To exit to the main Triggers edit page, click SAVE & NEXT.
Clicks a Link
- In the Action Options section, click the text box or the specified command.
- In the Messages window, select the message that contains the desired link and click SAVE & NEXT.
- Follow the instructions to insert the desired link into the Selected link box and click SAVE & NEXT.
- To exit to the main Triggers edit page, click SAVE & NEXT.
The Clicks a Link trigger is based on a specific link in a specific message. You may have the same link in multiple messages; however, the trigger activates only when the customer clicks the link in the message you select.
Opens an Email
- In the Action Options section, click the text box or the specified command.
- In the Messages window, select the message you want, and then click SAVE & NEXT.
- To exit to the main Triggers edit page, click SAVE & NEXT.
Joins This Mailing List
To activate the trigger when the customer joins at any time:
- In the Action Options section, select Joins at any time.
- To exit to the main Triggers edit page, click SAVE & NEXT.
To activate the trigger when the customer joins on or after a specific date:
- In the Action Options section, select Joins on or after this date and click the date boxes and select the dates you want.
- To exit to the main Triggers edit page, click SAVE & NEXT.
Updates Profile
In the Action Options section, Any Time is already selected. To exit to the main Triggers edit page, click SAVE & NEXT.
Demographic Value
The sixth item in the list, Whose demographic is a specific value, is slightly different from the other items. It is really more of a "condition" than an "action." If you choose this item and no others, EmailLabs requires that you also choose at least one other action. If you do not select one other action, an error message appears when you attempt to save the trigger and the trigger will not be saved.

- In the Action Options section, select the Whose demographic text box.
- In the Demographic Selection window, click the Demographic box and select the desired demographic. The Demographic Value item changes to offer the appropriate values for the demographic you chose.
- Click the Demographic Value box, select the desired value and click CONTINUE.
- To change how the demographic relates to its value (for example, “is greater than”), click the is box and select the desired value.
- To exit to the main Triggers edit page, click SAVE & NEXT.
Visits a Web Page After Receiving a Message
To activate the trigger when the customer visits a web page after receiving any message:
- In the Action Options section, select Any message.
- To exit to the main Triggers edit page, click SAVE & NEXT.
To activate the trigger when the customer visits a web page after receiving any message:
- Click the Specific command.
- In the Messages window, select the desired message and click CONTINUE.
- To exit to the main Triggers edit page, click SAVE & NEXT.
API Fire-Trigger Method is Invoked
This option is more complex than the others. You can learn more about it here.
Next: Part III: Final Steps