Asset Library Overview
You can use the Asset Library to:
- Store images and other types of files. You can add multiple assets to the Asset Library at a time.
- Drag and drop images into messages. For more information about adding images to messages, see Adding images from the Asset Library.
- Tag assets with keywords and find them quickly using the Library's Search feature and Keyword list.
NOTE
- Assets that you previously stored using the Content Library are available in the Asset Library. The names of the Content Library folders are automatically converted to keywords.
- The size limit for an asset in the Asset Library is 50 MB.
- Each organization can store up to 500 MB of data.
For information on how to insert images in messages and landing pages, refer to Adding images and Editing a Landing Page.
Opening the Asset Library
On the navigation bar, click Content Management > Asset Library.
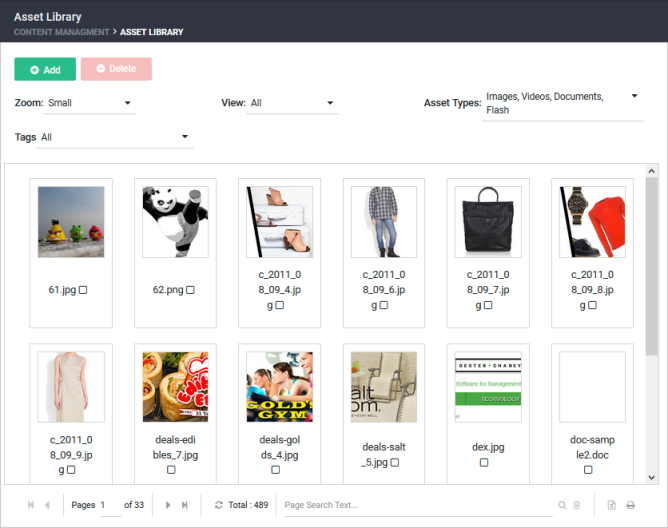
The Asset Library list is displayed as shown in the following illustration.

| Component | Description |
|---|---|
| Add and Delete | Use these buttons to add and delete assets. For more information, see Adding and Deleting Assets to the Asset Library. |
| Zoom |
Select a size to change the size of the thumbnails, such small, medium or large. Point at a thumbnail to see the following information about the asset:
NOTE
This field also provides an option to view images as a list with all the details. In the List mode, click on |
| View | You can view all images or view only recently added images. |
| Asset Types | The types of assets currently displayed. To show a type of an asset, select it from the drop-down list. |
| Tags | All existing tags. For more information about tags, see Assigning Tags and Searching for Assets in the Asset Library. |
| Search | Search for an asset. For more information, see Assigning Tags and Searching for Assets in the Asset Library. |
 icon beside the desired image for a preview.