Setting up and administering the Expertise feature
Specifying weights for expertise scores
To change the impact an action type or profile property has on user-tag expertise scores, do the following:
- Go to the Expertise - Inputs and Weights section in the Spotlight Management page,
- Click Manage Expertise inputs and weights. You should see a screen like the one pictured here.
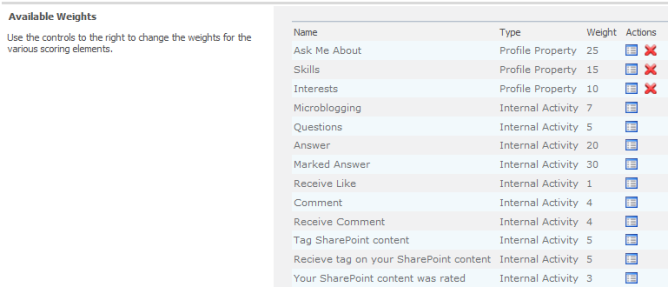
Manage Expertise inputs and weights screen
All profile properties and actions that contribute to expertise scores are listed here, by their name and type of input.
The Weight column shows the amount by which each occurrence of the associated action in connection with a tag increases the user’s expertise score for that tag, or how many points the user gets for having the tag in their profile. To change this, do the following:
- Click the Edit icon in the Actions column.
- Change the score using the dialog that pops up.
Your SharePoint content was rated is scored a little differently than the others. Contributions that ratings on your tagged item makes to your score for that tag do not accumulate.
Instead the ratings are averaged, and this average is multiplied by the weight to give the overall contribution that all the ratings on that item collectively make to your score for that tag.
For example, you create a document and tag it with "Analysis". Somebody then rates that document with a rating of 5.
Your expertise score for the tag "Analysis" is therefore increase by the average rating, 5, times the weight, 3, or 5*3=15.
Now someone else rates it a 3. The average rating drops to 4 for this document, and the contribution of 15 is reduced to 4*3=12. So your expertise score for "Analysis" actually drops because of the second rating.
Disabling an input
Any input can be effectively disabled by setting its weight to zero. When this is done, the expertise engine still counts the events that occur for that input, so that if you later decide the input should be included after all, it is as if you never disabled it and the scores were counted the whole time.
To disable a profile property, you can also click the ![]() icon to the far right of its listing in the Expertise Inputs and Weights page. Its listing goes away, but can later be brought back by following the instructions in the Defining new inputs – profile properties section, below. Since profile properties’ contributions to expertise scores are not history-dependent, it is as if these were never disabled.
icon to the far right of its listing in the Expertise Inputs and Weights page. Its listing goes away, but can later be brought back by following the instructions in the Defining new inputs – profile properties section, below. Since profile properties’ contributions to expertise scores are not history-dependent, it is as if these were never disabled.
Recalculate every time you change the weights
Anytime you change the weights of inputs, these weights can be applied retroactively to all events that were counted in the past (not just applying to future events).
To do so, click the Recalculate button at the bottom of the Expertise Inputs and Weights page.
Before you do so, make sure of two things:
- You must be a farm administrator.
- The Social Sites Managed Service Application has write permissions (via the application pool identity) to the SharePoint configuration database
If either of these things are not true when you click Recalculate, the recalculation fails.
Defining new inputs – profile properties
Only profile properties of a certain type can contribute to an expertise score – they must consist of a text item or a list of text items. Each text item in the list is treated as a tag connected to the user.
Examples of such properties that are not by default part of the expertise engine include “Past Projects”. To have one of these become a contributor to expertise scores, do the following:
- Go to the Expertise - Inputs and Weights section in the Spotlight Management page,
- Click Manage Expertise inputs and weights.
- In the Add Expertise Scoring Input section, click Add Expertise Scoring Input.
- Set Type to Profile Property. Provide the internal name of the property. To discover the internal name of the property, do the following:
- In the Central Administration go to Manage Service Applications > User Profile Service application > Manage User Properties.
- Find the name of the property you want to in the list and click on it.
- Choose Edit from the context menu that appears. At the top are Name and Display Name. (Name is the internal name).
- Provide a default weight, and optionally translate into other languages.
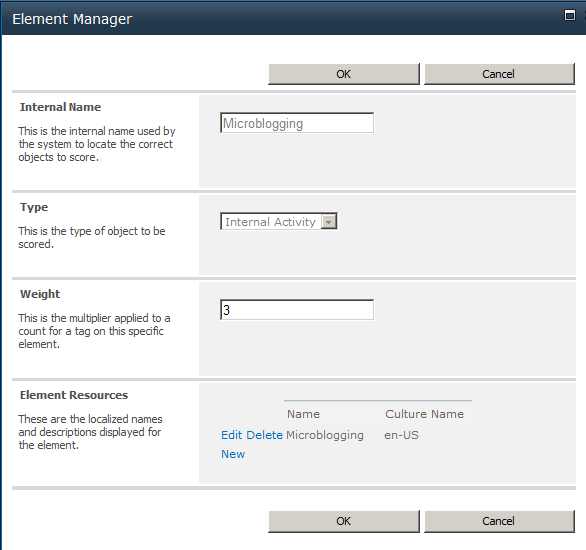
Element manager
Defining new inputs – external actions
One cannot add to the list of internal actions (actions within SharePoint) that can contribute to expertise scores. All the internal actions available for scoring are already listed on the “Manage Expertise inputs and weights” page.
One can, however, call Aurea Social from an external system to have actions occurring there counted toward expertise scores.
Before you can make the call from the external system, you need to identify in Aurea Social the types of actions that can occur in the external system.
This amounts to providing an identifier, a descriptive name, a description, and a scoring weight.
To provide these, do the following:
- Go to the Expertise - Inputs and Weights section in the Spotlight Management page.
- Click Manage Expertise inputs and weights.
- In the Add Expertise Scoring Input section, click Add Expertise Scoring Input. Set Type to External Activity.
Provide an internal name of the property – this can be anything you like. Provide a default weight, and optionally translate into other languages.
Spotlight is now prepared for an external system to tell it when this event has occurred on the external system, who should get points for it, and what tag they should get points for.
This is done on the external system by making a call to the AddUserScore method of a SocialSpotlightClient object.
A sample call:
In this:
accountNameidentifies the user who should be scoredelementInternalNameidentifies the event type (as defined by you earlier in this section) that occurred on the external systemtagindicates the associated tagitemUrlis an object that was acted on in this event- actual takes the value TRUE to indicate the next parameter should become the actual total count for this person-event pair, and takes the value FALSE to indicate the count for this person-event pair should only be incremented
countis the new amount or increment amount, depending on the value of the previous parameter.
Below is a sample .Net application that uses this API, and can be run from the console to allow testing of the external input functionality with Expertise.