Uploading an existing mailing lists (EmailLabs Interface)
This topic applies to the classic EmailLabs interface. You can also perform this operation in the Aurea Campaign Manager interface .
For further details, see Uploading an Existing Mailing List (Aurea Campaign Manager).
Setting up a mailing list is one of the most basic things you can do in Aurea Campaign Manager. We find that most of our customers have an existing mailing list that they wish to make use of. Uploading an existing list is a much faster way of adding contacts to a Aurea Campaign Manager mailing list than typing them individually.
If you have duplicate contacts in an existing mailing list and a Aurea Campaign Manager mailing list, but the information in your existing list is more current, you can use the existing list to update the records of the contacts in your Aurea Campaign Manager list.
Uploading your existing list to Aurea Campaign Manager is not difficult, but there are a number of steps involved, and the more thorough your understanding of the process, the better your chances of the smoothest upload possible.
Your existing mailing list must be in the CSV or TXT file formats. If the mailing list is in Word, Excel, or Access, you can easily save it in one of these formats.
The process of preparing and uploading your existing list can be summarized as follows:
- Review your existing list and, if necessary, make minor changes to facilitate uploading.
- Make sure the demographics in your Aurea Campaign Manager mailing list match the column names in your existing list.
- Upload your existing mailing list.
Step 1: Reviewing your existing mailing list
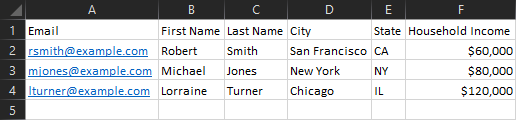
Here is our example list in an Excel spreadsheet. When saved in .CSV format, this mailing list is well-prepared for uploading:
Here is the same mailing list saved as a .TXT file:
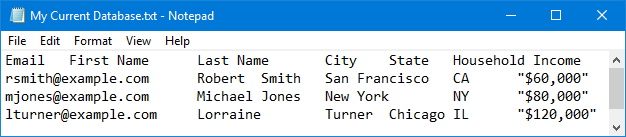
The label for the first column in your mailing list must be Email, with a capital "E." If it is not, your mailing list will not load.
In the text file, there should be no delimiter (such as a comma) at the end of a line. This would indicate an extra, empty data field which you do not want.
Step 2: Ensuring demographics match the column names in your mailing list
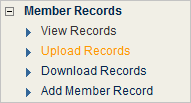
- In the left navigation bar of the EmailLabs interface, click Upload Records.
- Compare the demographics in the Enabled Graphics section to the column headings in your existing mailing list.
- If necessary, change the column headings in the your existing mailing list to match the demographics in your Aurea Campaign Manager mailing list.
Example: If a column heading in the data file is “firstname,” change it to “First name,” which is the corresponding demographic in your mailing list.
If an imported column header does not exactly match a demographic, EmailLabs asks you to map the header to the proper demographic. However, it is preferable that you have corresponding terms match before importing.
Step 3: Upload your mailing list
- In the left navigation bar, click Upload Records.
- In the Upload file box, type the name of the file containing the database.
- In the Delimiter box, type the delimiter you used in your database.
- In the Upload Type section, click the list you want to add the members to. Your options are Active Mailing List, Proof List, Unsubscribed List, Bounced List, and Trashed by Admin list.
- In the Upload Options, select the check box for the options you want:
| Option | Description |
|---|---|
| Update information for addresses that already exist: |
To learn about this option and its three sub-options, see the next topic, Updating Your Lists Using an Existing Mailing List. |
| Only upload entries with valid email addresses: |
An example of an invalid address is one that is missing the @ character. |
| Check addresses against enabled triggers |
If there is a match between an uploaded address and an enabled trigger, the address receives the trigger. |
| Upload this file as a background process: |
Uploads all records while your session continues. This is useful if you do not want to wait while a large data file is uploaded. You are asked to type your email address; a notification email is sent when the upload is complete. If your file is larger than 500 KB, this option is selected automatically. |
| Fix common spelling mistakes. |
Checks your file for common domain names that are misspelled. The current list contains AOL, Yahoo, Google, and Hotmail. To view the list, click View types of fixes. |
- Click Save & Next.
A page appears that shows your upload options and a preview of the imported data.
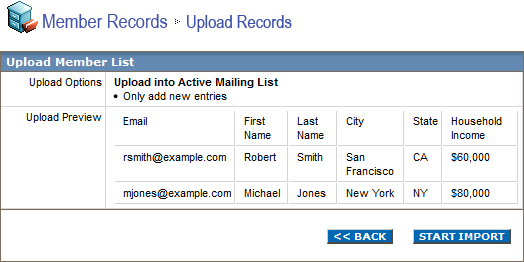
- Click Start Import.
- After the upload finishes, you can view any duplicate members by clicking View duplicate emails.
- Close the Upload Progress window and view your uploaded members in the Active Members List table.
NOTE
- You cannot upload a database file larger than 4 MB. If your database exceeds that limit, divide it into several smaller files and then upload each one individually.
- For the Check addresses against enabled Triggers to work, triggers must be enabled in your account. To enable triggers, contact your Account Representative.