Creating Segments: Some examples
This tutorial allows you to practice creating different kinds of segments. You will add demographic restrictions segments, change the logic of the restrictions, and add an activity restriction. The demographics you will use are created in the Creating a Demographic: Some Examples tutorial.
In the tutorial, assume the role of a dealer selling musical instruments on the web.
Scenario #1:
You just received a good deal on high-end guitar cases. So, you want to offer them at a special price to your guitar-playing customers.
- In the left navigation bar, click Segments.
- Click Create Segment.
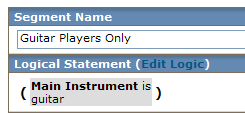
- In the Segment Name box, type Guitar Players Only.
- Click ADD DEMOGRAPHIC RESTRICTION.
- Under Select Demographic, click Main Instrument, and then click NEXT.
- In the Specify Restriction section, click guitar, and then click NEXT.
- Click SAVE & FINISH.
Scenario #2:
You are having a sale on acoustic guitars. You want to target your mailing to guitar players, bass players, and anyone thinking about buying an instrument for someone else (for example, a parent getting a gift for a child).
- In the left navigation bar, click Segments.
- Click Create Segment.
- In the Segment Name box, type Guitar, bass and gift buyers.
- Click ADD DEMOGRAPHIC RESTRICTION.
- Under Select Demographic, click Main Instrument, and then click NEXT.
- In the Specify Restriction section, click guitar, and then click NEXT.
- Click ADD DEMOGRAPHIC RESTRICTION.
- Under Select Demographic, click Main Instrument, and then click NEXT.
- In the Specify Restriction section, click bass, and then click NEXT.
NOTE
The restrictions you are adding are listed in the Restrictions section.

- Click ADD DEMOGRAPHIC RESTRICTION.
- Under Select Demographic, click Are you planning to buy an instrument?, and then click NEXT.
- In the Specify Restriction section, click Yes, and then click NEXT.
- Click ADD DEMOGRAPHIC RESTRICTION.
- Under Select Demographic, click Which instrument?, and then click NEXT.
- Click the first box under Specify Restriction, and then type guitar,bass
- Click NEXT.

As you can see, there are four demographics that make up this segment.
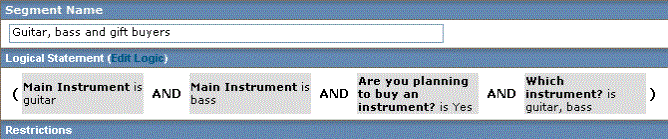
However, there is a problem. When you add two or more restrictions, the application automatically inserts the AND operator between each one. So right now, this segment ensures that the message you attach it to goes only to customers who:
play guitar
AND
play bass
AND
are planning to buy an instrument
AND
the instrument they are planning to buy is guitar or bass
As you can imagine, the number of customers meeting all those conditions will be quite small. Let us fix this logic, so that the message goes to customers who:
play guitar
OR
play bass
OR
are planning to buy an instrument AND that instrument is guitar or bass
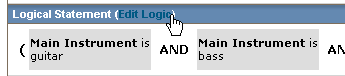
- Click Edit Logic (located next to Logical Statement).
- Click Clear Statement.
- Click Main Instrument is guitar.
- Click the
 operator.
 - Click Main instrument is bass.
- Click the
 operator.
 - Click the operator.
- Click Are you planning to buy an instrument? is Yes.
- Click the
 operator.
 - Click Which instrument? is guitar,bass.
- Click the operator.
You have successfully replaced the AND operator with the OR operator between the first three restrictions. We left the AND operator between restrictions three and four because we want both conditions to be met. You did not insert the
operator between restrictions 1 and 2 or restrictions 3 and 4, so the application automatically grouped
them together.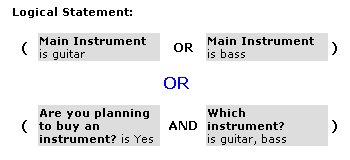
- Click Save.
- Click SAVE & FINISH.
![]()
Scenario #3
It is a few days before your guitar sale, and you want to send out a reminder message. You want to target only customers who opened your last email.
- In the left navigation bar, click Segments.
- Click Create Segment.
- In the Segment Name box, type Second notice about guitar sale.
- Click ADD ACTIVITY RESTRICTION.
- Under Individual Message Activity, click Regular Message or Distribution Group Message.
- Click SAVE & NEXT.
- Under Available Messages, click the message that was previously sent, and then click SAVE & NEXT. (For the purpose of this tutorial, you can use any message).
- Under Action, click Opened this message at least 1 times, and then click NEXT.

- Click SAVE & FINISH.