Defining a Basic Quick Add
Learn how to define a basic quick add.
To define a basic quick add:
- You need to assign the
SerialEntryaction to either a button or context menu action, see SerialEntry. - You need to define at least the following input arguments for the
SerialEntryaction call:-
EditType -
RecordId -
SourceConfigName -
DestinationConfigName
-
Source Field Group
Define the source field group that is referenced in the SourceConfigName
input argument of the SerialEntry action call.
Example: The List control of the default ARSerialEntry field group:
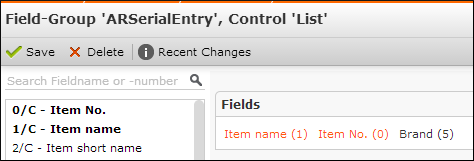
The fields are displayed in the quick add on the left of each row of the list.
You can define that these values are handed over to the destination record by assigning the following Function names:
|
Field |
Function |
|---|---|
|
Item Name |
|
|
Item No. |
|
All functions starting with Copy are copied to a field in the
destination field group that needs the same function assigned.
Destination Field Group
The default configuration contains the UPSerialEntry field group that defines the destination records. Its Edit control defines the fields that users can enter when they switch to the quick add's Edit mode and the given data is stored in this info area.
Ensure that the following Functions are assigned to the following fields:
| Field | Function |
|---|---|
|
Quantity |
|
|
Value |
|
|
Item No. |
|
|
Item Description |
|
|
End Price |
|
|
Currency |
|
|
Discount |
|
|
Discount vol. in kind |
|
Available Functions in the Standard Quick Add
The following Functions can be assigned to fields in field groups:
| Function | Description |
|---|---|
|
|
Data from the source field group is copied to the destination field group from and to the fields that have these functions assigned. Note: If you do not use the copy functions, the Item Number field needs to
be entered manually for the UP records, as the AR link does not work
correctly in the order entry quick add.
|
|
|
Allows to specify a fixed value, e.g. |
|
|
Defines that the specified step size for the items quantity is applied. |
|
|
Defines that a Boolean value can be edited in lists. If not set (for each field), they can only be edited in the Details view. |
|
|
Defines the quantity field needed for pricing, step size and more. |
|
|
Defines the field for the free goods (needed for pricing). |
|
|
|
|
|
Base price of an item. |
|
|
|
|
|
Defines the currency field. |
|
|
If this field is not set to |
The fields that have the Quantity, Discount, and
FreeGoods functions assigned are the fields where the user can enter
data.
The EndPrice, UnitPrice, NetPrice,
Currency,
ServerApproved,and StepSize functions define functions
that are specific to the order's quick add.
Functions required for entering data in a PDF file:
| Function | Description |
|---|---|
|
|
Defines that an image from the source's root info area is displayed. |
|
|
This field is used to match-up the records from the PDF with the database. |
Functions required for the quota calculation:
| Function | Description |
|---|---|
|
|
Optional. Defines the quota for a specific time period for an item and
overrides the default settings specified for the
|
|
|
Defines the number of items of the current time period that are still available |
|
|
Defines the time period's end. |
|
|
Defines the time period as calendar year (if the field with
|
|
|
Optional. If the |
|
|
If a field has this function assigned and its value is either empty or 0, samples can be issued without limit. If its value is < 0, the maximum number of issued samples is limited to the field's value. |
Field Attributes for the Quick Add
The following field attributes apply to the quick add:
-
Hide Field: If set, the field is not displayed in the application. -
Don't save: The field is only stored locally (i.e. it is not transferred to the server). For example: If no server connection is available, you may still want to display the result of a pricing calculation. If transferred to the server, this result can influence the business logic applied on the server. -
Don't save offline: The field is not stored at all, neither on- nor offline. -
Empty line: Defines whether a destination record can be deleted. If at least one field has theEmpty lineattribute assigned and all fields that have theEmpty lineattribute assigned are empty (or 0 - if it is a numeric field), the record is deleted. -
Image: If set (in the source's root info area), the field's content is displayed as an image in the quick add.
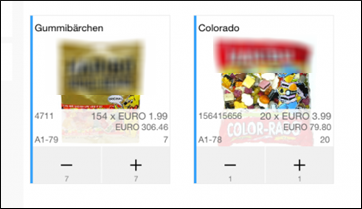
Adding Images to the Quick Add
If a field in the source info area's List control has the Image field
attribute set or the SourceImage
Function assigned, the field's content is displayed as an
image.
Adding PDF Files to the Quick Add
You can also use PDF files to select items from the quick add. If defined accordingly, the items can be selected with the following icon:

To define that PDF files are "clickable":
- Open the desired PDF file in Acrobat Reader.
- Switch to the
Commentstab. - Select the "clickable" area.Note: Always select a rectangle as "clickable" area. You can use different shapes, but only rectangles within these shapes can be defined for input.
- Enter one of the following commands in the comment:
Command Description <ItemNumber> or{"ItemNumber":<ItemNumber>} or{"ItemNumber":<ItemNumber>,"StepMode":"imc"}Opens the Details view and increases the quantity by the specified step size. {"ItemNumber":<ItemNumber>,"StepMode":"noop"}Opens the Details view without changing the quantity. {"ItemNumber":<ItemNumber>,"StepMode":"inc", "StepSize":"10"}Opens the Details view and increases the quantity by 10. {"ItemNumber":<ItemNumber>,"StepMode":"set", "StepSize":"10"}Opens the Details view and sets the quantity to 10. {"ItemNumber":<ItemNumber>,"StepMode":"delete"}Removes the item from the shopping cart. {"ItemNumber":<ItemNumber>, "pdfHIColor":"#00FF0045"}The barcode that is "clickable" is highlighted with the color given in hex format. Replace
<ItemNumber>by the value that you want to hand over to the field that has the CopyItemNumber function assigned (usually the item number).Example:
{"ItemNumber":
                     "11203","StepMode":"inc"}
Note: Always enter a string value as item number. Therefore, the above example does not work if you enter{"ItemNumber":11203,"StepMode":"inc"}, even if an integer field is referenced. - Enter the name of a Search&List configuration (defined in the D1 info area) in
the
ProductCatalogSourceinput argument of theSerialEntryaction call. This Search&List configuration defines the icon of the button that is displayed in the quick add and the filter applied to limit the number of available documents.
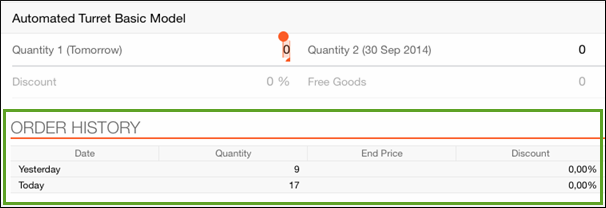
Info Panel
You can define that additional information is displayed for the current record in the quick add:
Define the InfoPanelDefinition input argument in the
SerialEntry action call if you want to add an info panel, , see
SerialEntry.
Info Panel Search&List Configuration
You can define a Search&List configuration that determines
- the filter that limits the number of displayed records.
- the info panel's display text.
- the info panel's header.
Enter this Search&List configuration's name in the
SourceCopyFieldGroup input argument of the SerialEntry
action call.
Example:
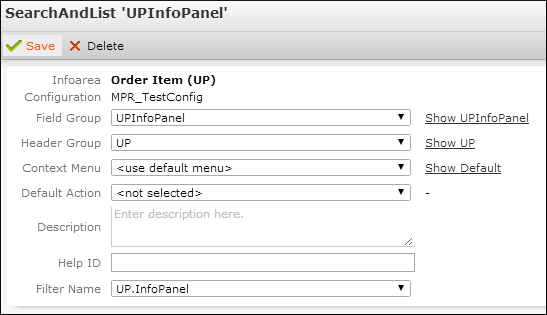
This Search&List configuration references the following configuration units:
- List Control of the
UPInfoPanelfield group: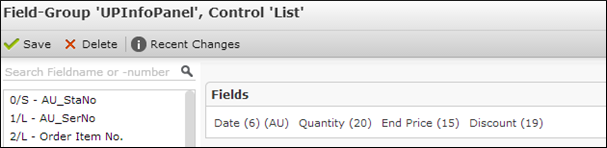
-
UP.InfoPanelfilter: The following example defines that order items are only listed for the current company if the order has the current or an earlier date assigned.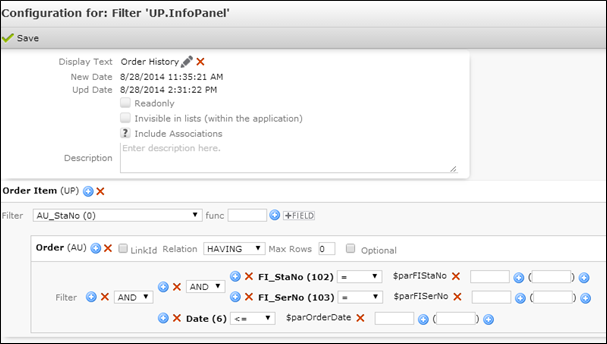
The filter's Display Text (in this example "Order History") is displayed in CRM.pad as the info panel's header.
The filter's parameters must exist in the List control of the referenced field group (specified in the
SourceCopyFieldGroupinput argument of theSerialEntryaction call) and must have the required Functions assigned, e. g. in theAUCopyFields' List control:Field Function FI-StatNo (0) FIStaNo FI-SerNo (1) FISerNo Date (6) OrderDate
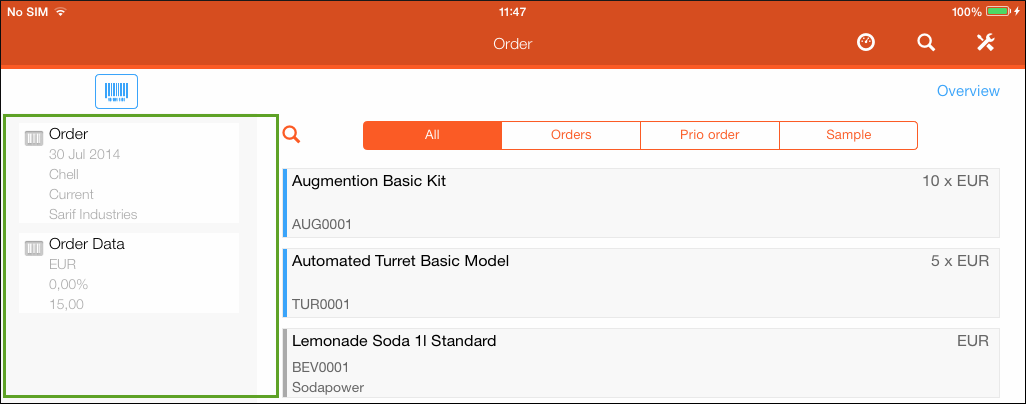
Quick Add Overview
In landscape mode, the quick add overview is also be displayed.
You can define whether it is displayed on the left or right side, see Show Quick Add Overview on the left option in the iPad Settings, see Overruling Default Log Settings in the iPad Settings.
The fields displayed are defined in Details control of the field group that is
referenced in the Search&List configuration specified in the SerialEntry
action call's DestinationRootConfig input argument. If this
field group does not exist, the Details control of the info area with the same name than
the info area is applied.
Only the fields (without field labels) are displayed, empty fields are
ignored. The displayed icon is the defined info area icon (of the first field). You can
override the defined image with the ParenInfoImage control attribute,
see ParentInfoImage.
Filtering Items
You can define filters that limit the number of displayed items by specifying the
available filters in the following input arguments in the SerialEntry
action call, see SerialEntry:
-
Filter1toFilter6(only for fixed filters without parameters). -
PositionFilter1toPositionFilter4: Filters requiring parameter input can be given. -
PositionAdditionalFilters: Max. four filters can be entered, separated by semicolon. Filters requiring parameter input can be given. -
HierarchicalPositionFilter:The provided filters are hierarchically combined from the left to the right. If a filter is set by the user, all filters to the right are reset.
If one of the PositionFilter/PositionAdditionalFilters arguments is
specified, filters entered in Filter1 to Filter6 are
available in a pop-up.
Ensure that fields used as parameter criteria in filters exist in the List control of
the specified SourceConfigName input argument. They must also have the
required functions assigned. You can define the Hidden field attribute
to prevent them from being displayed in the application.
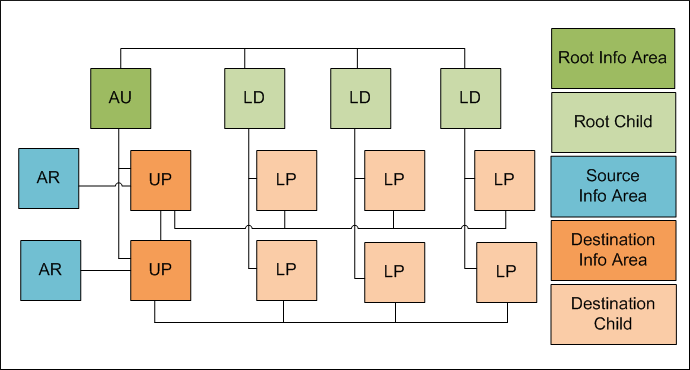
Destination Child Records
In addition to create a record in the defined destination info area, you can also create several child records for this destination record (i.e. 1:n links).
Example: An order in CRM.pad LSI can have several delivery dates (LD, 1:n links to AU). When the user enters data in the quick add, a delivery date item (LP, 1:n links to LD and UP) is created.
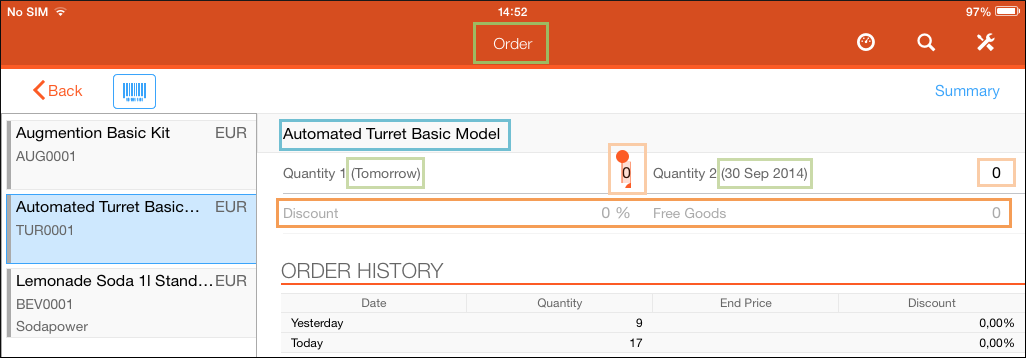
The following example shows how the data is displayed:
Define the following input arguments in the SerialEntry action call to
enable this feature, see SerialEntry:
-
SourceChildConfigName:Name of a Search&List configuration referencing the root's record's child info area. -
DestinationChildConfigName:Name of the field group that contains the Edit control used by the quick add.
Example: Destination Child Record Field Group
he following example shows a destination child field group:
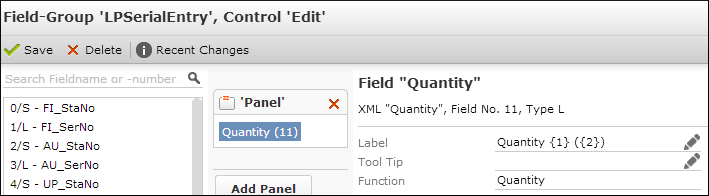
Add the Quantity field and assign the Quantity
Function. This function hands the total of all destination child
values over to the Quantity field in the destination info area.
Define the Label field by entering Quantity {1}
{2}:
-
{1}numbers all the fields of the child's field group controls. -
{2}is replaced with the value of the (first) field from the root's child record.
The following image shows two (numbered) Quantity fields. The delivery date displayed in
brackets (as defined in the field group's label in the image above) shows the delivery
dates. This data is read from the List control of the field group specified in
the SourceChildConfigName input argument of the
SerialEntry action call (in this example, the delivery dates):

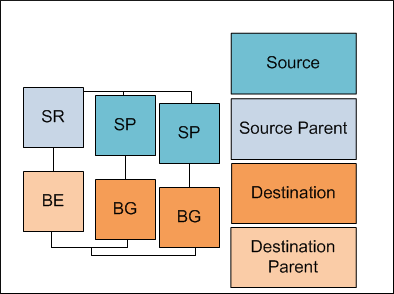
Destination Parent Records
Source parent records are used for product detailing definition (SR). A product detailing record consists of several product detailing items (SP). Each SP record references an item master (AR) record.
Example: Several product detailing records were assigned to a rep. When the rep opens the quick add, not only a product detailing item (BG) record is created per item, but also a product detailing (BE) record.
Define the following input arguments in the SerialEntry action call,
see SerialEntry:
-
SourceParentInfoAreaId -
DestinationParentConfigName
Adding POS Items Automatically
You can define that POS items are automatically added specifying the
Options input argument for the SerialEntry action
template by entering the following JSON string:
{"autoCreatePositions"
:true
}
The following additional options are available:
-
"autoCreateDoNotAsk":true:No message box is displayed; the records are created without delay -
"autoCreateMessage:"mytexts:0":Message box text (you can use the%dparameter to display the number of created records). -
"autoCreateMessageHeadline":"mytexts:1": Message box headline
The format for referencing texts is <clientTextgroupsuffix
>:
<Text Index>. The text group must be named in CRM.designer as
follows: smartbook:<clientTextgroupsuffix>
Example:
{"autoCreatePositions"
:true
, "autoCreateMessage":"mytexts:0",
               "autoCreateMessageHeadline":"mytexts:1"}