Buttons
You can define buttons to pages that allow the user to call the assigned page.
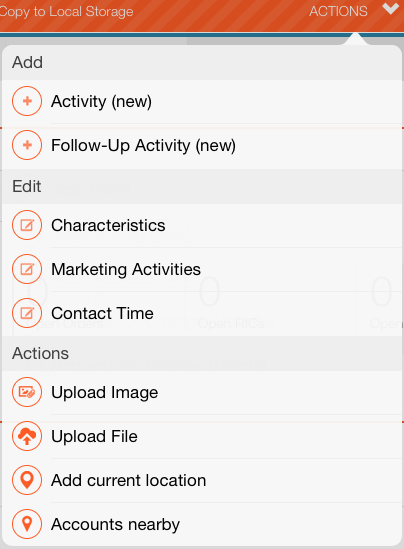
You can add the following buttons to the Details (or any other) view:
-
Edit: CallsOrganizerActionaction template, see OrganizerAction. -
EditWithSerialEntryButton: Call the quick add, see SerialEntryEdit and SerialEntryNew. -
DownloadRecord: Calls theSyncRecordaction template, see SyncRecord. -
Modify(not included in theupdate.tablet): You can add this button if you want to change records based on an existing Template filter by assigning theModifyRecordaction call, see Template Filter and ModifyRecord.To add a modify button, configure the
ModifyRecordpage (which actually is a function) to hand over the record and to apply aTemplateFilter. -
Delete: Calls theDeleteorganizer action to delete the current record, see OrganizerAction.
Adding a Button
Buttons are added to the header group of the desired info area for each view.
To add a button to the Details (or any other) view:
- Switch to the header group (e. g. Expand) of the desired info area (e. g. Person).
- Select a button in the drop-down list at the end of the existing buttons and click
on
 (Add).
 - Click on the button's name to open the button's details.
- Click on Copy to this configuration to switch to the Edit
mode, then click on
 (Edit) besides Action
to assign the action that is executed when the user clicks on this
button.
(Edit) besides Action
to assign the action that is executed when the user clicks on this
button. - Define the action's parameters. The mandatory parameters depend on the selected button.
Adding a Button Group
You can also define that one or more buttons are grouped and that the options are displayed in a drop-down list when the user clicks the Actions menu in the record's header:
To add a button group:
- Switch to the header group for the desired info area, e. g. Company.
- Add the desired buttons to the Buttons area:
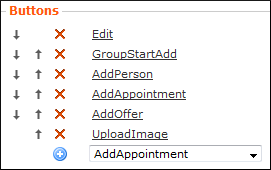
- Add the
GroupStartbutton (or any button with a name starting withGroupStart). The image defined for this button is used as icon for the button group. The GroupStartAdd button in the example above already has the icon
assigned.
icon
assigned. - Add the
GroupEndbutton to mark the end of a group. TheGroupEndbutton is only required if you want to add further buttons at the right side of a group.
Adding a Toggle Favorites Button
You can add a toggle button to companies or persons that toggles the Favorites state of a record.
To add the toggle button:
- Add a button called
ToggleFavoritesto the Buttons area.Label and image are automatically assigned.
- Assign
OrganizerActionas Action and entertoggleFavoritein theActioninput argument.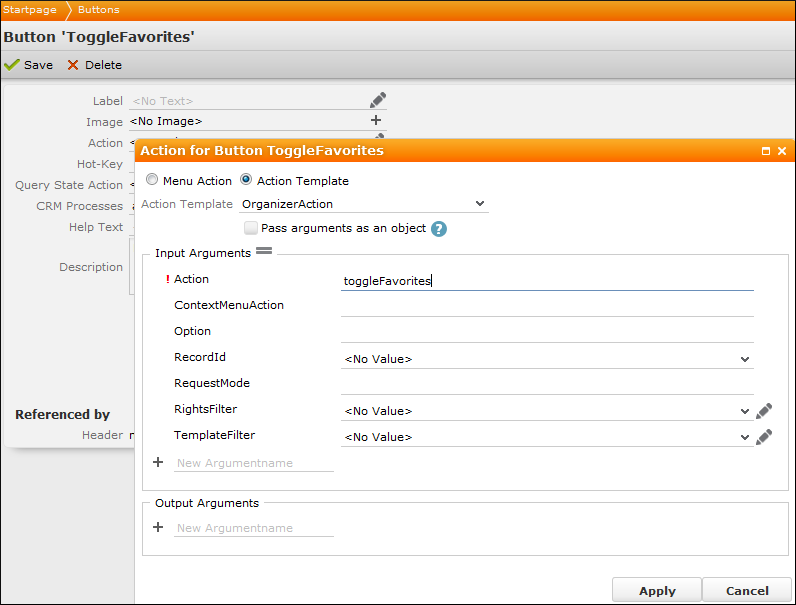
You can ignore the other parameters.
- Add this button to the desired expand header.
- Define the following two filters. Use the given names, other names are not
recognized by the system.
-
FV.new: Defines how the FV record is created, when a user adds a record as a favorite, for example: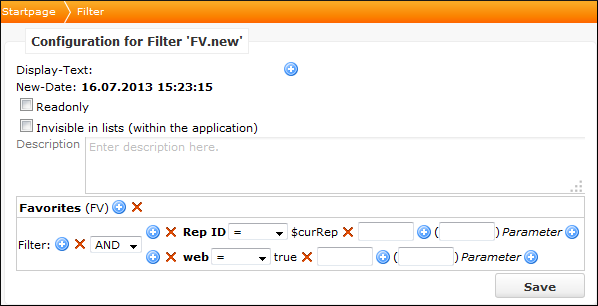
This example defines that the field
Rep-IDis set to the current rep and the favorite is marked as web favorite. -
FV.currentRep: Defines which of the existing FV records are displayed.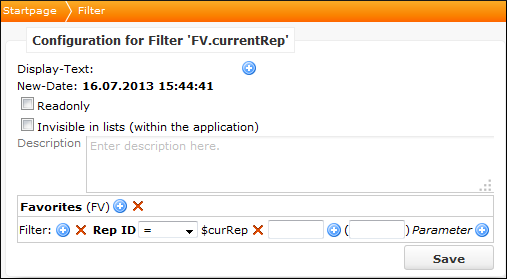
Note: If a record is a favorite but is not marked as Aurea CRM web favorite, it is deleted even if it is marked as another applications favorite, e.g. connector, etc.
-