Search
Learn how to configure search on CRM.pad.
The user can open the Search area by tapping on the  button. The Search button is available throughout the application. The Search area contains the global search as well as all available info area-related searches from the SMARTBOOK menu by default.
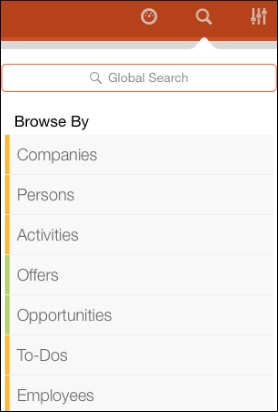
Find as you type is activated for all searches by default. The user can tap on the desired record in the search result to switch to the record's details view.
Configuring the Search Menu
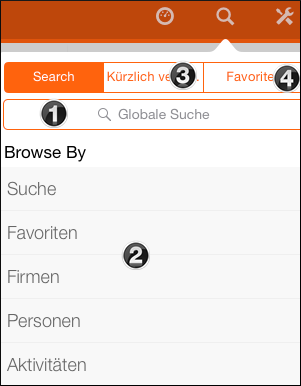
If desired, you can replace the SMARTBOOK application menu with a self-defined search menu.
In this case you need to define the info area-related searches in an application menu
named $AppSearchMenu.
A self-defined menu can consist of the following items:

|
The global search: Data is searched in all info areas on the device (offline mode). |

|
Info area-related searches: You must create a context menu action with
the RecordListView action template assigned for each info
area. All other action templates are ignored. |

|
History search: The recently viewed records are listed. |

|
Favorites: The records you defined as Favorites are listed. |
To define your own search menu:
- Add an application menu named
$AppSearchMenu.Add the desired items and assign the following action templates:
|
Application Menu Action Name |
Action Template |
|---|---|
|
|
see GlobalSearch. |
|
Note: In addition, you need to add another application menu action named
HistoryView having the same content structure as
$HistorySearch. |
see HistoryListView. |
|
|
see MultiSearch. |
|
For each info area an application menu action |
see RecordListView. |
Vicinity Search
Use the GeoSearch action template to configure the
Vicinity Search, see GeoSearch.
The Vicinity Search is a location-based search. Max. three different info areas can be searched. The search starts at the current location by default, however, the user can enter a different starting point.
You need to define the following:
- Application Menu Action: Create a new Application Menu
Action and assign the
GeoSearchaction. - Search&List: Ensure that the GPS coordinate fields were added to the List control that is referenced by the assigned Search&List. The GPS coordinate fields must be defined as described in Adding a Map.
- Filter: The Location filter is applied, see Location Filters.
- Details control: If you want to start the Vicinity Search from a company or
person record (i. e. the position of that record is used as the starting point for
the search), define a button and assign the GeoSearch action.
- Enter the following JSON in the AdditionalParameters
input argument:
{"GPSX":"$GPSX$","GPSY":"$GPSY$"}If no GPS coordinates are available for your current location, you can define that the address is used as fallback:
{"GPSX":"$GPSX$","GPSY":"$GPSY$","GpsCity":"$GpsCity$", "GpsStreet":"$GpsStreet$", "GpsCountry":"$GpsCountry$"} - You must also define the following Extended Options for
the corresponding fields in the List control (otherwise they cannot be
applied):
-
{"GPS":"City"} -
{"GPS":"Street"} -
{"GPS":"Country"}.
-
- Make sure that the MAP field configured in CRM Designer for the Company
details also has the extended options set for the following fields:
Latitude:{"GPS":"Y"}Longitude:{"GPS":"X"}Street:{"GPS": "Street"}City:{"GPS": "City"}Country:{"GPS": "Country"}
- Enter the following JSON in the AdditionalParameters
input argument:
- Further settings:
- The user can define the radius of the search area with a slider. You can
define the max. radius with the
DistanceFilter.MaxValueWeb Configuration parameter, see DistanceFilter.MaxValue. - The label displayed are taken from the filter's Display text.
- If multiple info areas are used, the user can de-select certain filters by clicking on them. The display text of the filter is used as label.
- The user can define the radius of the search area with a slider. You can
define the max. radius with the
Searching Several Info Areas (Global Search)
The Global Search is included in the default configuration. This search includes more than one info area. You can define the info areas to be searched in the Quick Search area. The user can access the Global Search from the application menu.
To define the Global Search:
- Click on Quick Search on the CRM.designer start page:
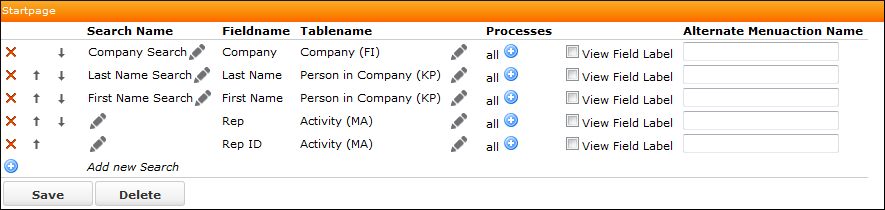
- Define the fields in the info areas to be searched:
- Click on
 (Edit) besides an item to
change the existing setting.
(Edit) besides an item to
change the existing setting. - Click on
 (Add) at the end of the list
to add a new info area, and then define the settings for the search.
(Add) at the end of the list
to add a new info area, and then define the settings for the search.
- Click on
FullTextSearch web configuration parameter does not apply to
the global search for performance reasons.Configuring the Search&List Page for Info Area Searches
After searching for data, the hits are listed in the Search&List page. For the Search&List page define the following configuration units for the desired info areas in CRM.designer:
- Search control: Defines the fields that are searched in the database. These fields
are shown in the application's search field as ghost text.

- List control: Defines the data displayed in lists.
You can also define that an icon is displayed for the info area. Assign an image with the same name as the info area ID (e.g. FI for company) in the Expand Page configuration:

- MiniDetails control: Defines the layout of the box that is displayed
after the user clicks on
 .
.
- Search header: The header is defined in the header group and then assigned in the
Search&List configuration. You can add to a header group:
- The page's title (header text, defined in the Text field).
- Buttons: If you add buttons, the first three buttons are displayed as quick
actions on the left side of the header, the other buttons can be accessed by
the Actions menu on the right side.

Further tabs shown (Info Areas). The data of these (sub-)info areas can be accessed using the tabs, see Displaying Data in Additional Tabs.
