Using the External API
External API messages (transactional) are used to send trigger messages to contacts based on events external to Aurea Campaign Manager. An example of using the External API is when you are tracking a transaction occurring on your Web site. The External API enables you to use the API to initiate a trigger message send.
Setting up an External API Trigger Message
First you need to define your trigger message as one that can be used with an External API.
- Navigate to the Define Triggers screen.
- In the Triggering Action box, click on the Add Condition text link under Change Order.
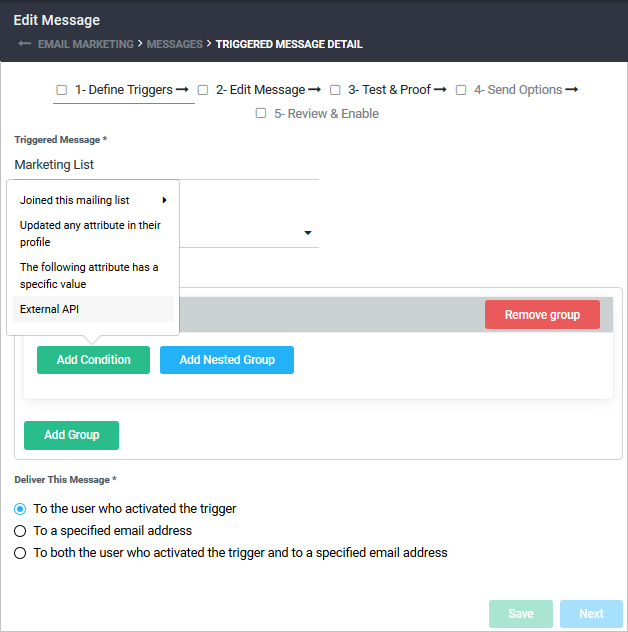
- Pick External API on the drop-down menu.
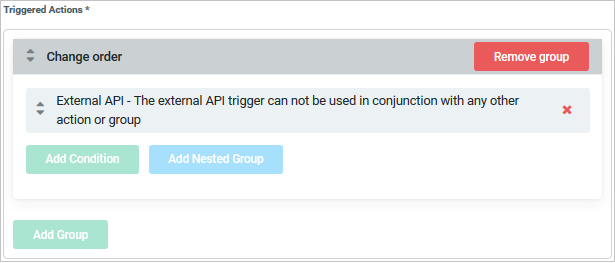
You cannot add any conditions to the External API trigger message. These will be in the external system.
Identifying the Trigger ID, List ID, and Message ID
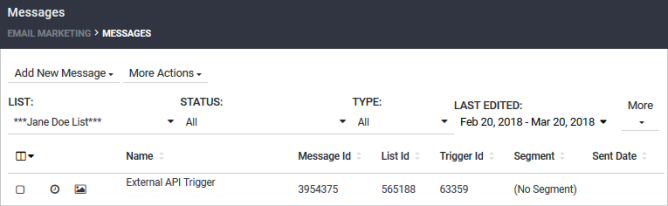
To use the External API to send a triggered message, you must first identify the Message Id, List Id, and Trigger Id to use in the API.
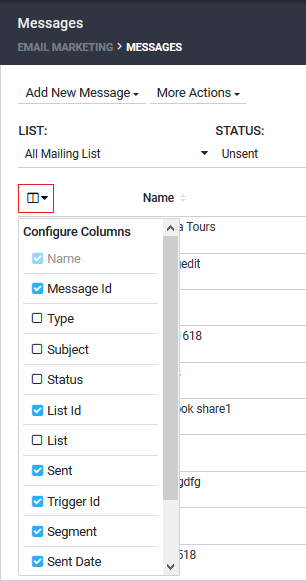
- Click on the Configure Columns icon in the upper left hand corner of the Email Marketing > Messages screen.
- Select List Id and Trigger Id in the drop-down menu. This displays the List Id and Trigger Id in the new corresponding columns. The Trigger Id and List Id are used by the External API to identify which message you want to send, along with the Message Id.
Using the External API
Generate a script to utilize the API call. The API call data is below:
Activity: FIRE-TRIGGER: Transfers data to enable a transactional message to be sent from an external system.Trigger_id[required]: Informs the system which trigger stub to be used for reporting and default message (if using). The Trigger Id can be obtained from the Email Marketing > Messages > Trigger Id column in Aurea Campaign Manager.Recipients[required]: Comma delimited list of email address to receive email. Can be one address or many.Recipients_data[optional]: Location of CSV or TXT file with large list of recipients. Must be in URLUniform Resource Locator. An Internet address, as well as a standard method of naming files on the Web. A URL begins with a protocol name (such as http), followed by a colon and two forward slashes(//). Next comes the name of the internet server that the file is stored on, followed by directories that hold the file, separated by forward slashes(/). The filename comes last, as shown in the following example: http://www.mycompany.com/whatsnew.htm format (http://example.com/data.csv)Subject[optional]: Subject of the message if not using the default specified in the user interface.From_email[optional]: From email address to use in the message envelope if not using the default specified in the user interface.From_name[optional]: From name to be used in the message.YYYY-MM-DD: Limits the results to this end dateTracking[optional]: Enables open and click tracking for the message (if not using the default message specified in the user interface)Message[optional]: URL of location to fetch HTMLHypertext Markup Language. A set of tags used to mark the structural elements of text files. HTML files include tags that create hyperlinks to other documents on the Internet. content or actual raw HTML (URL encoded).
| Parameter | Req? | Type | ID | Value |
|---|---|---|---|---|
Site_ID
|
Yes | N/A | N/A | (Site ID of account) |
MLID
|
Yes | N/A | N/A | (Mailing list ID of trigger) |
trigger_ID
|
Yes | Extra | trigger_ID | (id of trigger) |
recipients
|
No | Extra | recipients | (single or comma delimited list of recipients) |
recipient_data
|
No | Extra | recipient_data | (URL location of CSV file with recipients) |
subject
|
No | Extra | subject | (Subject Line) |
from_email
|
No | Extra | from_email | (From Email Address) |
from_name
|
No | Extra | from_name | (From Name) |
tracking
|
No | Extra | tracking | on |
message content
|
Yes | Extra | message | URL of location to fetch html or full HTML |
Example: skip_blacklisted set, some blacklisted recipients
This example shows that if the parameter skip_blacklisted is set, no messages are sent to the blacklisted recipients and they will not appear in the sent list.
Input:
<DATASET>
<SITE_ID>3</SITE_ID>
<MLID>8</MLID>
<DATA TYPE="EXTRA" ID="TRIGGER_ID">4</DATA>
<DATA TYPE="EXTRA" ID=" SKIP_BLACKLISTED ">ON</DATA>
<DATA TYPE="EXTRA" ID="RECIPIENTS">jdoe-1@im.example.com,jdoe-2@im.example.com,jdoe-black1@im.example.com,jdoe-black2@im.example.com</DATA>
</DATASET>
Output:
<DATASET>
<TYPE>success</TYPE>
<DATA type="sent">jdoe-1@im.example.com,jdoe-2@im.example.com</DATA>
<DATA type="not sent" />
<DATA type="blacklisted">jdoe-black1@im.example.com, jdoe-black2@im.example.com</DATA>
</DATASET>
- You can utilize the default message in the trigger if you choose. Simply send only the trigger ID and the recipient information.
- You can send a single recipient or a comma delimited list of recipients. You can also send a CSV file of recipients via a web location.
- You can use personalization inside the message being sent along; simply use the existing mail merge tags or dynamic content.
Click here to go to back to the Triggers Overview.