Step 1 - Defining Triggered Messages
When you select Add New Message > Triggered Message, you are automatically taken to the first step to define a triggered message.
To complete this first step, perform the following:
- Type in the name of your message in the text box titled Triggered Messages: Enter the Message Name. This is an internal name for your triggered message and is not visible to your contacts. You can edit the name of the Triggered Message in this step (or any other step in the workflow) by clicking on the pencil icon and typing in it.
- Select a Mailing List from the Mailing List drop-down menu. The mailing list you choose is comprised of the group of contacts that you will assign the triggered message to. The options for defining the Trigger conditions are dependent upon the attributes available within the mailing list.
Trigger Logic
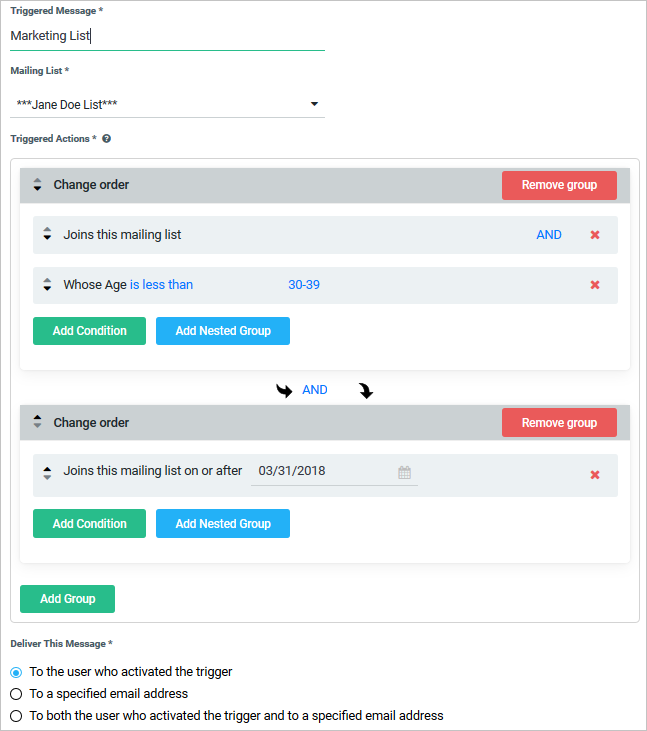
Under Triggering Action, you set up your criteria for triggering a message. You do this by setting up triggered actions within groups and groups within groups (also known as nested groups).
Example 1: Welcome Newsletter Message
As an example, you may want to send out a message if the customer signs up to receive the cruise line newsletter. If the customer is added to the Cruise Line mailing list either via upload, API or opt-in form, the trigger action is fired and the customer receives a welcome message.
- Under Triggered Actions, within the group, select Add Condition.
- From the pop-up menu, select the Joined this mailing list > Joins this mailing list.
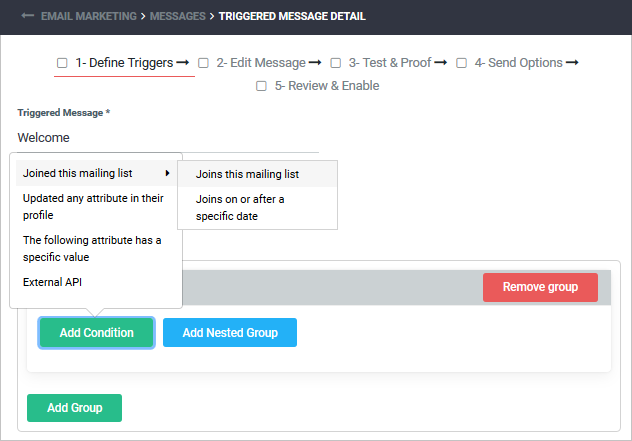
Whenever a new contact is added to the list, they will receive a welcome message
Example 2: Nested Group Message
As another example, you might want to send out a message to anyone that joins the mailing list at any time and is either in an Executive/Senior Management or Professional/Managerial occupation. Anyone that matches that condition will receive a message that is intended for senior management contacts. By using a nested group, you can combine two occupations into a secondary group, as shown in the following example.
- Under Triggering Action, click on Add Group.
- Within the group, select Add Trigger Action or condition.
- From the pop-up menu, select Joined this mailing list > Joins at any time.
At this point you have the same condition set up as in the first example. Now, we are going to add a nested group for the secondary condition.
- In the same group, click on Add Nested Group.
- In this nested group, click on Add Trigger Action or condition > The following attribute has a specific value > Occupation.

- At the top of the group, select equal to.
- Click on the this value drop down and select Executive /Senior Management.
- Now repeat the same steps as above, but instead, select Professional/Management.
- Change the operator between the two attributes to OR, as shown in the figure below.
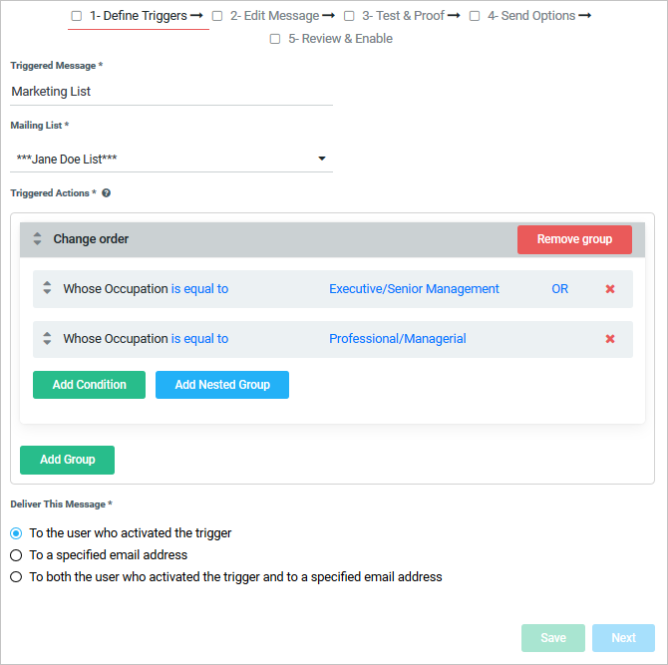
By using the nested group, you have now set up a condition for anyone that joins the mailing list who is either an Executive/Senior Management OR in Professional/Managerial status. A way to think of a nested group is basically two conditions within a parenthesis, as in:
Anyone who joins this mailing list AND whose occupation equals (Executive/Senior Management OR Professional/Management).
Delivering This Message
You have three choices for who your message is going to be sent to. These are the set recipients for delivery.
- To the user who activated the triggered message.
- To a specified email address.
- To both the user who activated the triggered message and to a specified email address.
These choices are available so that you can have the messages automatically go to the user, or be received at a specified email address (such as a sales team’s lead), or both. This gives you the ability to monitor the messages as they are sent.
Click on the Next button or the Edit Message text link to navigate to the Edit Message screen upon selecting Trigger Actions and Groups
Click here to go to Step 2: Edit Message.