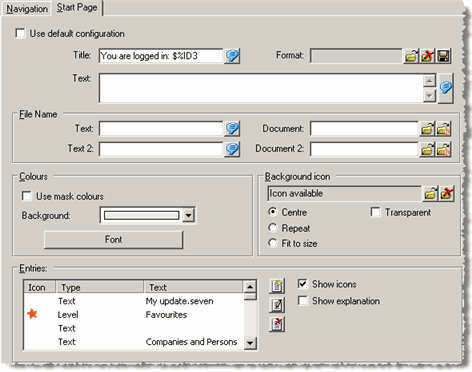
Start Page Tab
Use the Start Page tab to configure the Aurea CRM win start page. You can add links to independent levels, workflows, dashboards, analyses, reports, search areas, documents and web pages to the start page.

Depending on your vertical version, several start page levels are available. You can also define additional levels as start pages, see Defining New Levels. Integrate the start level in the icon bar or configure it as a start page, see Fixed Icon bar and Start Levels.
To define a start page:
- Double-click on the desired start level in the Define Desktop window.
- Switch to the Start Page tab.
- Enter the Title.
You can include data from the current rep's record. Use "$%IDx" to include a field ("x" = field number).
Example: "You are logged in as $%ID3." > "You are logged in as John Smith."
- Enter a Text to be displayed on the start page. You can also include rep data in the Text.
- Determine whether any documents can be accessed from the start page
(Document and Document 2 fields).
- Text/Text 2: Enter a description for the document here
-
Document/Document 2: Click on
 (Load) to
load a document or click on
  (Select Document) to select a document from the Aurea
CRM win database. The first document is displayed as a hyperlink above the main
area; the second document is displayed below.
- Configure the Background color and Font
on the start page under Colors.
Enable the Use mask colors check box to apply the interface settings.
- Select a background for the start page under Wallpaper:
- Click on
 (Load).
 - Choose a predefined icon from the list of Available
Icons or click on
 (Load) to load a bitmap.
 - Click on OK.
- Determine how the image should be displayed:
- Center: The image is centered on the start page.
- Repeat: The image is tiled.
- Fit to size: The image is resized to fill the entire start page.
- Transparent: Enable this option to display the image with a transparent background.
- Click on
- Configure the links displayed on the start page under
Entries, >> Defining Entries.
- Show icons: Determines whether the corresponding icons are displayed next to links.
- Show explanation: Determines whether a descriptive text is displayed next to links.
- Click on
 (Save) next to the Format field to save
the start page as a separate format, see Saving, Loading and Deleting Formats in the
User Manual.
 - Click on OK.
- Save the desktop format.
Defining Entries
To add an entry to the main area of the start page:
- Click on
 (New) under Entries on the
Start Page tab.
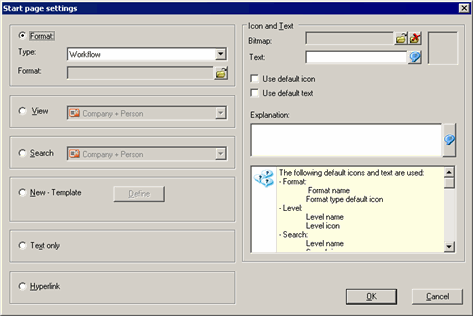
- Select the type of entry:
-
Format: Select Format and choose
the desired Type to add a link to a workflow, dashboard,
analysis or XML report to the start page.
Click on
 (Load) to select the desired format.
 -
View: Enable the View option and
select the level to add a link to the level to the start page. All independent
levels are available.Note: If you add an entry for a level that is locked, the entry is not displayed on the start page.
- Search: Select Search and choose the desired level to add a link to the search mask to the start page.
- New - Template: Select New - Template and click on Define to create a new template, see New - Template.
-
Text only: Select Text only and
enter the Text under Icon and
Text to add a text entry. This allows you to divide the start
page into several sub-sections.
If you select the Text Only option without entering any text, an empty line is added.
- Hyperlink: Select Hyperlink and enter a URL in the Text field under Icon and Text (e.g. www.aurea.com).
-
Format: Select Format and choose
the desired Type to add a link to a workflow, dashboard,
analysis or XML report to the start page.
- Click on
 (Load) next to the Bitmap field
under Text and Icon and select the icon to be displayed next
to the link. If you select icons of different sizes, all icons are resized to the
size of the first icon (maximum size: 24x24 pixels).
(Load) next to the Bitmap field
under Text and Icon and select the icon to be displayed next
to the link. If you select icons of different sizes, all icons are resized to the
size of the first icon (maximum size: 24x24 pixels).Enter a Text for the entry.
Enable the Use default icon or Use default text check boxes to use the default text or icon.
- You can enter an Explanation of the entry.
- Click on OK.
The entry is listed under Entries and can be edited and deleted using the
 (Edit) and
  (Delete)
buttons.
(Delete)
buttons.Edit the order by dragging entries with the mouse.