New - Template
Global new templates allow users to add new records without needing to switch to the corresponding level.
For example, you could define new templates for different types of companies (customers, partners etc.) that open a mask with suitable default values.
New template buttons can only be added to the general toolbar for independent levels. (For details on defining level-dependent new templates, see New - Templates Tab.)
You can also use new template buttons to initiate triggers and workflows.
To define a new template button:
- Click on
 (New) under New - Templates in the
General Toolbar window.
(New) under New - Templates in the
General Toolbar window.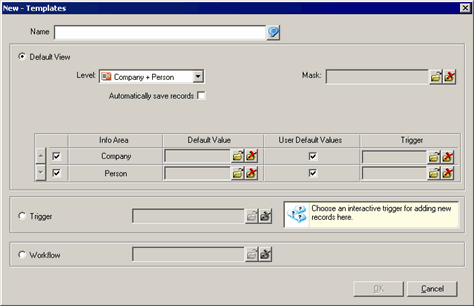
- Enter a Name.
- Select the Level the new record should be added in. You can only select independent levels.
- Enable the Automatically save records check box to determine
that records are added using the default values and saved automatically.
Example: Certain standard tasks (e.g. writing minutes for a meeting) can easily be created and saved with just a single click.
- Select the Mask to be displayed when adding the record. If you do not choose a mask, the standard mask is used.
- The info areas that new records can be added to are listed in the Info Area
column. The available info areas depend on the selected
Level. Enable the corresponding check boxes next to the info
areas.
For example, the Company and Person in Company info areas are available in the Company+Person level. If you enable both Company and Person in Company,a new company with a new person is added. If you only enable Person in Company, only a new person is added (to the current company).
- Load a set of Default Values for the new record or enable the
User Default Values check box to apply the default values
defined by the user, see Defining Default Values in the User
Manual.
All default values are applied to the new record in the following order:
- user-defined defaults,
- default values defined in the Rights module,
- default values of triggers defined in the access rights, if no trigger is selected under Trigger (see below),
- the default values selected in the Default Value field or the default values assigned to the trigger selected under Trigger (see below).
- You can choose a non-interactive trigger to be executed in the mask, see Defining Triggers in the CRM.core
Administrator Guide.Note: You can only select triggers defined for the corresponding info area. Alternatively, enable the Trigger radio button and select a non-interactive new template trigger.
- Click on OK.
- Save the desktop format.
To start interactive triggers or workflows using a new template button:
- Click on
(New) under New - Templates in the
General Toolbar window.
- Enter a Name.
- Enable either the Trigger or Workflow radio button.
- Load the desired format.Note: You can only load interactive triggers that contain the Action "Add new", see Add New in the CRM.core Administrator Guide.
- Click on OK.
- Save the desktop format.