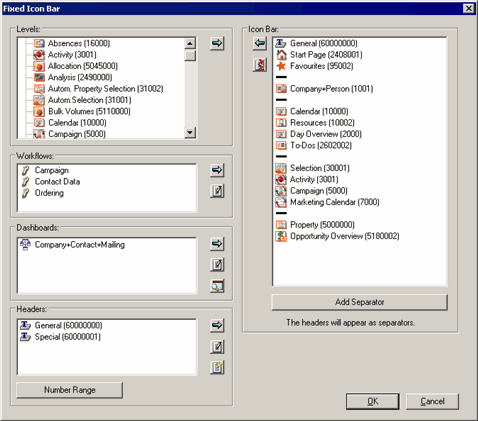
Fixed Icon bar
The icon bar contains a fixed section (top) and a level-dependent section (bottom). The fixed section is displayed on every level.
The following options are available from the Navigation section in the Define Desktop window:
- No fixed icon bar: Enable this option to restrict the icon bar to the level-dependent section.
- No variable icon bar: Enable this option to restrict the icon bar to the fixed section.
- Transfer from root level: Enable this option to determine that the level-dependent section is always transferred from the top-most level in the hierarchy (e.g. from the Company+Person level to the Notes level). If no level-dependent icon bar has been defined, the predefined Aurea CRM icon bar is used.
To configure the fixed section of the icon bar:
- Select Extras > Define Desktop from the menu.
- Load the desktop format you wish to configure.
- Click the Fixed Icon Bar button under
Navigation.

- All independent levels that are accessible based on the desktop's settings are listed under Levels.
- All available Workflows, Dashboards
and Headers are listed.
Select a dashboard in the Dashboard list and click on
 (View)
to display a preview, >> Dashboards in the User Manual.
 - The current icons in the fixed section of the icon bar are listed under Icon Bar.
- Click on
 (Properties) next to the Workflows, Dashboards
and Headers lists to edit the name and icon used by
the entry, see Element Properties.
(Properties) next to the Workflows, Dashboards
and Headers lists to edit the name and icon used by
the entry, see Element Properties.The name and icon used by levels are defined in the level properties, see Navigation Tab.
- To define additional headers:
- Click on
 (New) to the right Headers
list.
 - Enter the desired text in the Text field.
- Click on OK.
- Click on
- Click the Number Range button to define a range of IDs for headers in this desktop, to prevent overlaps in IDs between hierarchic desktops. Existing header IDs are adjusted accordingly, see Extended Desktops.
- You can determine that the headers (i.e. the individual menu groups) in the icon bars
are minimized when Aurea CRM is started:
- Select the desired entry under Headers.
- Click on
 (Properties).
 - Enable the Contracted check box.Note: This setting is applied globally, irrespective of whether you enable the Contracted check box in the fixed icon bar settings, the fixed Info menu or level properties, see Navigation Tab.
- Click on OK.
- Select an item in the Levels, Workflows, Dashboards
or Headers list and click on
 (Add) to add
the entry to the icon bar. You can also double click on an item to add it to the icon
bar.Note: Workflows and dashboards are not displayed as active levels for technical reasons.
(Add) to add
the entry to the icon bar. You can also double click on an item to add it to the icon
bar.Note: Workflows and dashboards are not displayed as active levels for technical reasons.- Select an item in the Icon Bar list and
click on
 (Delete) to remove the entry.
 - Click on
 (Delete all)to delete all entries.
 - Drag entries in the Icon Bar list to the desired position to change the order of the entries.
- Click on Add Separator to add a separator to the menu.
- Select an item in the Icon Bar list and
click on
- Click on OK.
- Save the desktop format.
The level-dependent section of the icon bar is defined in the level properties, see Navigation Tab.