Defining New Levels
You can define new info areas in the Data Model in the Maintenance module.
For further details, see Adding New Info Areas in the CRM.core Administrator Guide.
You need to include new info areas in a level to access the info area in Aurea CRM win.
Level definitions are automatically saved in a format of the type "Defined levels", see Formats in the User Manual.
To define a new level:
- Select Extras > Define Desktop from the menu.
- Click the Define Levels button.
The Select User Group window is displayed.
- Specify whether you are an Aurea employee, a Partner
of Aurea, or a Customer. Level IDs are assigned from
different number ranges depending on your choice.Note: You require a password for the Aurea and Partner options.
- Click on OK.
The Define Levels window is displayed.
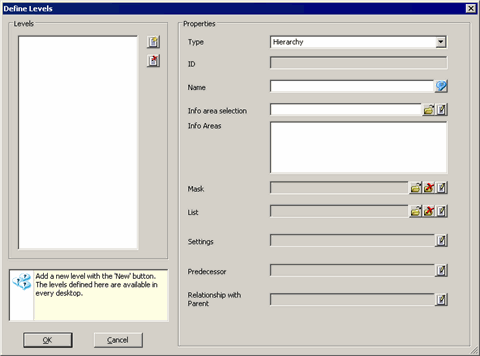
- Click on
 (New) to the right of the Levels
list.
(New) to the right of the Levels
list.The Edit ID window opens.
The level ID is generated automatically. To change the ID, select the User Settings option and enter the desired number. Any number divisible by 1,000 in the applicable number range is allowed (e.g. 200,000,000 - 299,999,000 for customers).
- Click on OK.
The Edit text window is displayed.
- Enter the name of the level.
- Click on OK.
The new level is listed under Levels.
Select a level from the list and click on
 (Delete) to delete the
level.Note: The
(New) and (Delete) buttons are only available on
the main station. If a level no longer exists, all links to the level are deleted
when the desktop is loaded. The IDs of deleted levels are not reused.
(Delete) to delete the
level.Note: The
(New) and (Delete) buttons are only available on
the main station. If a level no longer exists, all links to the level are deleted
when the desktop is loaded. The IDs of deleted levels are not reused. - Select the Type of level (Standard Level, Start
Page or Hierarchy).Note: You do not need to define a mask or list for start pages. The level commands (e.g. navigation buttons etc.) are unavailable in the level settings for start pages, and the corresponding flags are also unavailable.
For details on defining hierarchic levels, see Defining Hierarchic Levels.
- Click on
 (Edit) next to the Info area selection
field to define a transfer fields format. Alternatively, click on
(Edit) next to the Info area selection
field to define a transfer fields format. Alternatively, click on  (Load) to load
an existing format.
(Load) to load
an existing format.The transfer field format must contain all info areas to be displayed in the level, >> Transfer Fields in the User Manual. Only one info area in the transfer format may be defined as a root info area. All other info areas need to be dependent on the root info area.
The following settings in the transfer fields format are used to display data: info areas, index relationships, conditions, sort order and the maximum number of records. You do not need to select any fields.
Note: If you wish to access the level using a custom link, you need to select the corresponding Index in the transfer field format (link IDs 126 or 127).The info areas in the transfer format are listed under Info areas.
- Click on
(Edit) next to the Mask or
List fields to define a list to be used by the level,
see Mask Generator. Alternatively,
click on
(Load) to load an existing format.
Click on
 (Delete) to remove the selected format.
 - Click on
(Edit) next to the Settings field to
configure the general settings for the level, see Level Settings.
- If you are defining a dependent level:
- Click on
(Edit) next to the Predecessor
field to configure the parent level, see Defining Parent Levels.
- Alternatively, click on
(Edit) next to the Relationship with
Parent to define valid parent levels based on the info areas in the
parent level, see Defining the Relationship with the Parent Level.
- Click on
- Click on OK.
The new level is listed under Available Levels as a child of the parent level. The level can be configured in all desktop formats, see Accessing the Level in the CRM.core Administrator Guide and Level Properties.