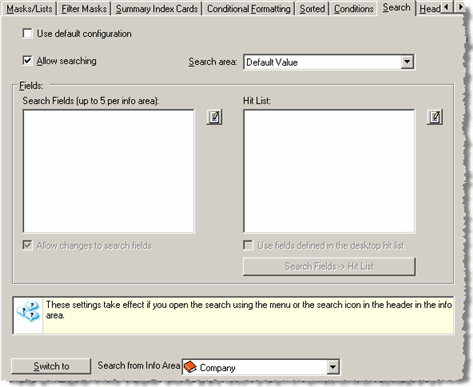
Search Tab
Use the Search tab to configure the search for a level.
For further details, see Searching in the User Manual. Users can load these
settings using the  (Predefined search fields) button in the search mask.
To configure the search for a level:
- Enable the Allow searching check box. If this
option is disabled, users cannot access the Data > Search menu
entry or the
 (Search) button in the level header.
 - Determine the Search area:
- Default Value: The default search area defined for the search mask is used.
- Current context: The search is executed in the context of the current parent record. For example, the search is only applied to activities linked to the current person.
- Entire database: The search is executed across the entire database.
Changes made to the search area by users are not saved in the pro1.cfg file, i.e. the level settings are reloaded each time Aurea CRM win is started.
- Click on
 (Edit) to the right of the Search Fields
list.
(Edit) to the right of the Search Fields
list. - Select up to 5 fields in the Field Selection window or load an
existing format. These fields are entered in the search mask by default.
The number to the left of the selected field shows the order in which the fields have been selected and are displayed in the search mask.
- Click on OK.
The selected fields are listed under Search Fields.
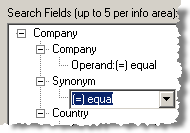
- Double-click on an operator to change it.
- Enable the Allow changes to search fields check box to allow users to choose other fields in the search.
- Define the Hit List:
- Click on Search Fields -> Hit List to transfer the search fields to the hit list. Any existing fields in the hit list are removed in the process.
- Click on
(Edit) to the right of the Hit
List and select the fields that should be added to the hit list, or
load an existing format. Click on OK.
The hit list is loaded when the user first opens the search. If the user changes the hit list, the user settings are loaded in the search from then on.
- Enable the Use fields defined in the desktop hit list check box to load this hit list each time the search is started. In this case, user-specific hit lists are not saved.
- Click on OK.
- Save the desktop format.
Search settings can also be defined per info area, see Search Tab. Select an info area from the Search from Info Area drop-down list and click on Switch to to open the Search tab of the info area's properties.
If you have defined both level-specific and info area-specific search settings, the level settings are used (in addition to any search criteria defined for the info area).
If the search is accessed from a link field using , the info area settings are
applied.
, the info area settings are
applied.Special search masks (Select Person, Search Activity) are defined in the user interface settings, see Dialog Boxes Tab. You can edit the special search masks used by the Company, Person in Company and Property (BTB only) info areas in the Mask Generator, see Mask Generator.
Use the Links tab define which data in source levels should be used as search criteria when searching for records to link to, see Using Field Contents as Search Criteria. These settings take precedence over the search fields defined for the info area in the info area settings.