Level Properties
Levels display data from one or more info areas (e.g. Company+Person).
You can customize levels in the Aurea CRM win main module:
- Switch to the level you wish to configure.
- Select Extras > Define Desktop from the menu, see Defining a Desktop.
- Load the desktop format you wish to configure.
If a level's properties have been configured, a small red tick is displayed below the level icon.
- Click the Level Properties button or double-click on the desired
level in the list of Available Levels. (You can also right-click
on the level and select Properties from the popup menu.)
The Properties - <Level (ID)> window is opened.
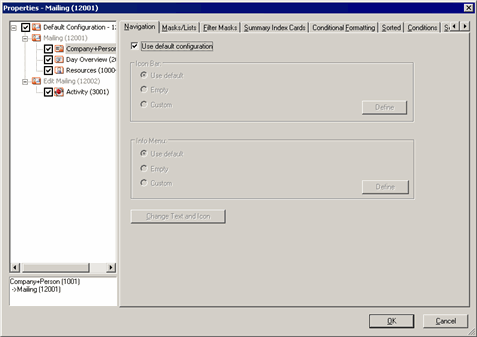
- All "variations" of the selected level are displayed to the left:
- The level class as "Default Configuration" (in this case with ID "12000" for Mailing).
- The levels included in this level class (in gray): in this case Mailing and Edit Mailing (IDs "12001" and "12002").
- The parent levels: The Mailing level can be opened from the Company+Person , Day Overview and Resources levels; the Edit Mailing level can be opened from the Marketing Activity level.
The currently active combination of parent levels and levels is displayed below the tree.
- Select the desired entry:
- Click on the Default configuration entry to change common settings for all variations of the selected level.
- Click on one of the available parent levels to change the settings (e.g. buttons) for that combination of parent level and level only.
- You need to disable the Use default configuration check box before you can configure settings for a specific combination of level and parent level.
- Configure the desired settings. The individual tabs are described in the following
sections.Note: Not all tabs are available for all levels. For example, you cannot access the Search tab for levels without a search function (e.g. Appointment Overview, Calendar, etc.).
- Click on OK in the Properties - <Level (ID)> window.
- Save the desktop format.