Defining an Import Format for an External Database
Learn to Define an Import Format for an External Database.
To define an import format for an external database:
- Start the Import module, see Starting Modules.
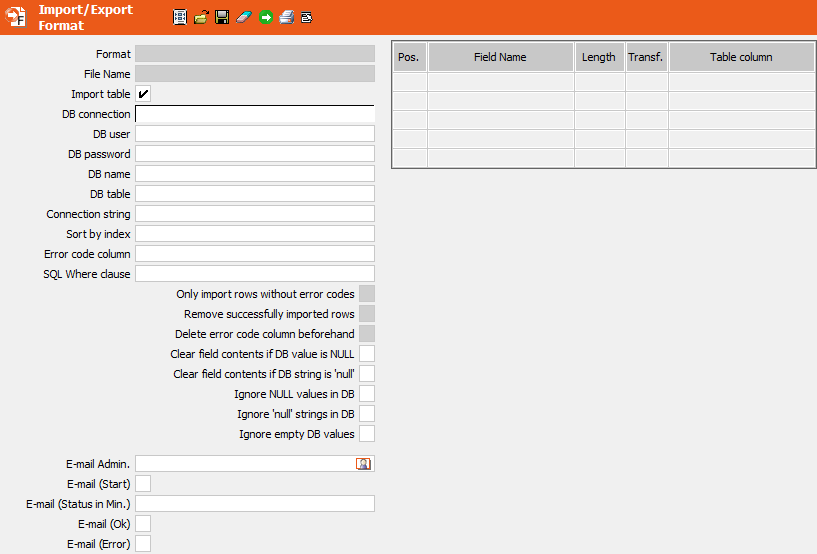
- Enable the Import table check box.
- Enter the database connection settings in the following fields:
- DB connection: Database connection (e.g. ODBC or Oracle)
- DB user and DB password: Login details for the database
-
DB name: Name of the databaseNote: This option has no function for Oracle databases.
Note: If you do not enter any details, the current Aurea CRM database is used. -
MS SQL only: Alternatively, you can specify the database connection in the
Connection string field. Use the following
syntax:
Driver=SQL Server;Server=mmdb;Database=UPDATE7;UID=mm;PWD=MM;orDriver=SQL Server;Server=mmdb;Database=UPDATE7;Trusted_Connection=Yes;Any installed ODBC driver can be specified as the driver, e.g.
Driver=SQL Server Native Client 11.0.Note: If Connection string is undefined, the values in DB connection, DB user, DB password and DB name are used. - Enter the name of the table in the DB table field (max. 64 characters).Note: MS SQL: If the DB connection or DB name fields are left empty, enter the table using the following syntax:
Oracle: Enter the name of the table in upper case.For information on the external database's requirements, see Import File/Import Database.[database].[schema].tableWhen you leave the field (using either Enter or Tab), Aurea CRM verifies that it can access the external database.
- Other optional settings:
-
Sort by index: Select a unique index for the selected
table.Note: If you do not select an index, the first unique index in the table is used.If no unique indices exist, error codes cannot be output.
-
Error code column: Column in the database to which error
codes are written.Note: Aurea recommends using a column of the type "int nullable" to store error codes. You can also use columns of the type string (char, nchar), with a minimum length of 32 characters and a recommended length of 64 characters. No other data types are supported.
Existing error codes are not deleted following a successful import.
For more information on error codes, see General Error Codes and Import/Export Error Codes in the CRM.core Administrator Guide.
-
SQL Where clause: Enter the SQL code (the portion of the
statement following "WHERE") to restrict the imported data using a condition. You
can also use the command line parameter
--sqlwhere.Note: External tables are imported with packet size = 32 by default. To change the import packet size, add a comment after the WHERE clause:/*packetSize=500*/changes the packet size to 500,/*packetSize=-1*/imports all data with one statement.The maximum packet size is 1000. If there is not enough memory for this value, half of the requested value is used.
-
Only import rows without error codes: Only applies to
tables with a unique index. Rows that could not previously be imported and
therefore contain an entry in the error code column are not imported.
Depending on the error code column's data type, an error code corresponds to the following:
- type INT NULL (numeric): If the import is successful, the NULL value is replaced by 0 (zero). Only records with a value of NULL in the error code column are interpreted as being without errors and imported.
- type INT NOT NULL (numeric): Only records with error code 0 are interpreted as being without errors and imported.
- type NCHAR NULL (string): If the import is successful, the NULL value is replaced by 0 (zero). Only records with a value of NULL, space character or empty in the error code column are interpreted as being without errors and imported.
-
Remove successfully imported rows: Only applies to tables
with a unique index. Successfully imported rows are deleted in the external
database.
If the error code column is not empty before, the successfully imported rows are not deleted. To also delete successfully imported rows with an error code you can override this behavior with the Delete error code column beforehand option.
- Clear field contents if DB value is NULL: If a database value NULL is imported, the field becomes empty.
- Clear field contents if DB value is 'null': If a database string value 'null' is imported, the field becomes empty.
- Ignore NULL values in DB: The database value NULL is ignored during import, the field remains unchanged.
- Ignore 'null' strings in DB: The database string value 'null' is ignored during import, the field remains unchanged.
- Ignore empty DB values: The empty value is ignored during import, the field remains unchanged.
-
Sort by index: Select a unique index for the selected
table.
- Select File Format from the context menu to define further
settings, see File Format.Note: The settings entered in the Character Set, Field Length, Separator and Log Files sections are ignored when importing data from an external database.
- Select the import fields, see Selecting Fields.
The selected fields are listed in the Field Name column.
- Click in the Table Column column to select the fields you wish to import from the external database.
- You can adapt the length of fields in the import format to the length in the external database, see Changing the Field Length.
- If you wish to transform field contents when importing, define the transformations, see Transforming Field Contents.
- Select Info area properties and Field
Properties from the context menu to configure the impact of the import on
data in Aurea CRM, see Info area properties and Field Properties.Note: The log settings defined in the info area properties (Log columns) are ignored when importing from an external database. No logs are created.
- You can define conditions that need to be met by records for the records to be imported, see Defining Import/Export Conditions on Records. You can define match-up conditions that need to be met by the Aurea CRM records for them to be matched up, see Match-up Conditions.
- Define or verify the match-up settings, see Match-up.
- Select Test from the context menu to test the mapping of external fields to internal fields and the effect of transformations and upper/lower case, see Testing the Import. Import conditions, links between fields and match-up options cannot be tested using this option.
- To send e-mail containing a status report or error message during/after the import
process, select one or more of the following options:
- E-mail Admin.: E-mails are sent to the selected rep (provided an e-mail address is entered in either the E-mail 1 or E-mail 2 fields in the corresponding rep record). If you do not select a rep, the e-mails are sent to the current rep.
- E-mail (Start): An e-mail is sent when the import beings.
- E-mail (Status in Min.): Enter the interval (in minutes) in which e-mails should be sent containing status reports.
- E-mail (OK): An e-mail is sent when the import is successfully completed.
- E-mail (Error): An e-mail containing the error number is sent if an error occurs, see Import/Export Error Codes in the CRM.core Administrator Guide.
- Click
 (Save), see Saving, Loading and Deleting Formats in
the Aurea CRM win User Manual.
(Save), see Saving, Loading and Deleting Formats in
the Aurea CRM win User Manual.
 (Load) to load an existing format for editing. Click on
  (Delete) to clear
the current settings in the mask.
(Delete) to clear
the current settings in the mask.