Defining an Export Format for an External Database
To export data to an external database you have to define a format and specify the data you want to export.
To export to external database, follow the below steps:
- Start the Export module in one of the following ways:
- From the Start menu
- From other Aurea CRM win modules by selecting Window > Modules from the menu
- From the command line, see Aurea CRM Commands and Parameters.

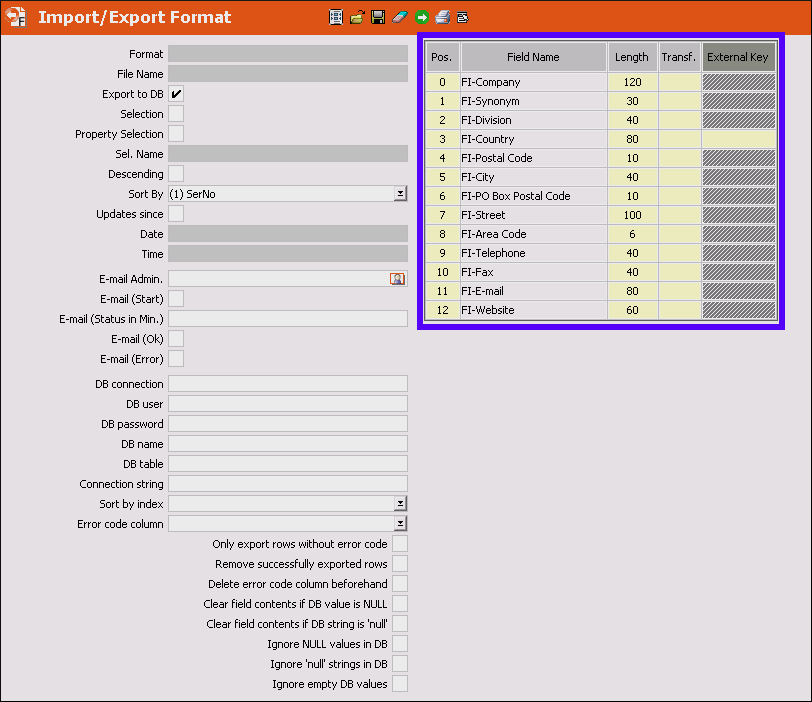
- Select the Export to DB checkbox.
- Enter the database connection settings as described below:
Any database:
- DB connection: Database connection (e.g. ODBC or Oracle)
- DB user and DB password: Login details for the database
-
DB name: Name of the databaseNote: This option has no function for Oracle databases.
Connection string (MSSQL Server only):
Alternatively, you can specify the database connection in the Connection string field. Use the following syntax:Driver=SQL Server;Server=DBserverNAme;Database=DBname;UID=mm;PWD=MM;orDriver=SQL Server;Server=DBserverNAme;Database=DBname;Trusted_Connection=Yes;Any installed ODBC driver can be specified as the driver, e.g.
Driver=SQL Server Native Client 11.0.Note: If Connection string is undefined, the values in DB connection, DB user, DB password and DB name are used. - Enter the name of the table in the DB table field (max. 64
characters).Note: MS SQL: If the DB connection or DB name fields are left empty, enter the table using the following syntax:
Oracle: Enter the name of the table in upper case.[database].[schema].tableFor information on the external database requirements, see Export to External Database.
When you exit the field, the connection details are verified to ensure that a connection can be established.
- Provide the following optional details:
-
Sort by index: Select a unique index for the specified table.Note: If you do not select an index, the first unique index in the table is used. If no unique indices exist, error codes cannot be output.
-
Error code column: Name of the Column created in the external
database table to which error codes are written.Note: Aurea recommends using a column of the type "int nullable" to store error codes. You can also use columns of the type string (char, nchar), with a minimum length of 32 characters and a recommended length of 64 characters. No other data types are supported.
Error codes generated during a previous export are not deleted.
For more information on error codes, see General Error Codes and Import/Export Error Codes in the CRM.core Administrator Guide.
- Only Export rows without error code: Select this checkbox to ensure that rows that
could not previously be exported and contain error codes in the Error code column are
ignored.The type of the error code column determines the error codes rendered. The error codes for each column type and their interpretation are listed below:
- type INT NULL (numeric): If the export is successful, the NULL value is replaced by 0 (zero). Only records with a value of NULL in the error code column are interpreted as being without errors and exported.
- type INT NOT NULL (numeric): Only records with error code 0 are interpreted as being without errors and exported.
- type NCHAR NULL (string): If the export is successful, the NULL value is replaced by 0 (zero). Only records with a value of NULL, space character or empty in the error code column are interpreted as being without errors and exported.
- Remove successfully exported rows: Successfully exported rows are
deleted in the internal database. This works only if the table has a unique index.
If a successfully exported row contains an error code from a previous unsuccessful attempt then it is not deleted. To delete such rows select the Delete error code column beforehand option to ensure that the error code columns are cleared before the exported rows are considered for deletion.
- Clear field contents if DB value is NULL: If a database field with a value NULL is exported, the field in the exported table is rendered empty.
- Clear field contents if DB value is 'null': If a database field with a string value 'null' is exported, the field in the exported table is rendered empty.
- Ignore NULL values in DB: If a database field with a value NULL is exported, the field in the exported table is left unchanged.
- Ignore 'null' strings in DB: If a database field with a string value 'null' is exported, the field in the exported table is left unchanged.
- Ignore empty DB values: Any field with an empty value is ignored during export, the field in the exported database remains unchanged.
-
Sort by index: Select a unique index for the specified table.
- To configure some additional settings in the File Format window, perform the following:
- Select .

- You can configure the following options:
- Export documents (in the Export section): Documents in
document records (Document and Customer Document
info areas) are exported.Note: Existing documents with the same name are overwritten if you repeat the export, and a warning is written to the log file.
- Log export results: Select this option to enable logging of the export results.
- Log Files: Log files contain records that are matched up, added,
identified as similar or rejected by the export process, Logging is enabled in the
info area properties (Log* options), see Info area properties.
Enter the path and name of the log files (e.g. C:\import\log.dat):
- Matched up: This log file contains records for which corresponding external records are found and which are merged (or would have been merged, if you do not have the right to update records).
- New: This log file contains all new records added by the export process.
- Similar: This log file contains those records for which similar (but not identical) records are found in the external database. These records are either not similar enough to be updated automatically, or more than one similar record is found.
- False: This log file contains those records that did not meet the export criteria (e.g. a mandatory field is missing, user access rights are insufficient, import conditions are not met, supplementary information cannot be assigned to a company, etc).
Depending on the settings under Info Area Properties, the log files store the following information:
- Information on export processes that have been completed.
- Suggestions on how Aurea CRM would export individual records.
In this case, you can use the log file as the source for a further export with other settings. To preserve the log files, perform the following:
- Copy the log file (as it might otherwise be overwritten by a new log file).
- Import the copied file.
- Export documents (in the Export section): Documents in
document records (Document and Customer Document
info areas) are exported.
- Select .
- Select the fields you want to export, perform the following steps:
- Click
 in the
level header. The Select Fields dialog box displays.
in the
level header. The Select Fields dialog box displays.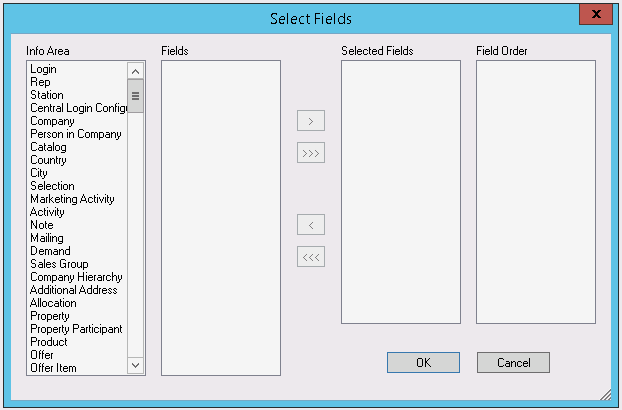
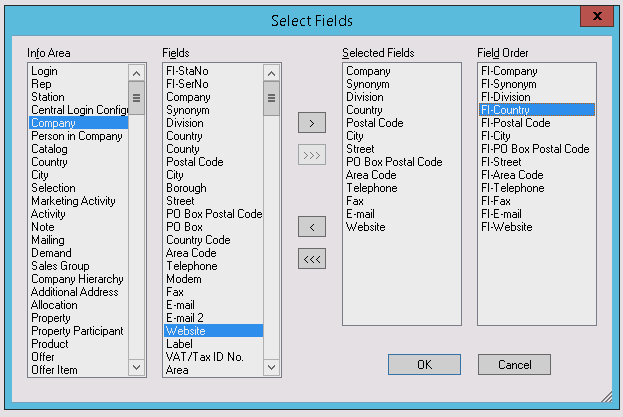
- Select an info area under Info Area.
All the fields available in the info area are displayed under Fields.
- Double-click on a field or select it and use the
 button to select
the field.
button to select
the field.The field is displayed under Selected Fields.
- Use the
 button to add all fields in the info area.
 - Double-click on a field or select it and click on the
 button to
remove it from the list.
button to
remove it from the list. - Click on
 to remove all fields from the list.
- Use the
- Continue until you have selected all the desired fields and info areas.
The fields you have selected are displayed under Field Order in the order you selected them. You can change the order, see Changing the Field Order.
- Click OK. The fields are loaded to the table on the Export page.
- Click
- To change the length of a field, click on the Length column and
enter the new value.Note: If the field to export is longer than the field in the external database (e.g. Company field: 120 characters in Aurea CRM; 130 characters externally) enter the external length nonetheless. The characters that exceed the maximum field length are not exported.
- To apply transformations on fields before exporting follow the steps described in Transforming Field Contents.
- To define the conditions that apply before a record is exported follow the steps described in Defining Import/Export Conditions on Records.
- To export records that have been deleted, select .
- To send e-mail containing a status report or error message during/after the import
process, select one or more of the following options:
- E-mail Admin.: E-mails are sent to the selected rep (provided an e-mail address is entered in either the E-mail 1 or E-mail 2 fields in the corresponding rep record). If you do not select a rep, the e-mails are sent to the current rep.
- E-mail (Start): An e-mail is sent when the import beings.
- E-mail (Status in Min.): Enter the interval (in minutes) in which e-mails should be sent containing status reports.
- E-mail (OK): An e-mail is sent when the import is successfully completed.
- E-mail (Error): An e-mail containing the error number is sent if an error occurs, see Import/Export Error Codes in the CRM.core Administrator Guide.
- Click
 (Save). The Save dialog box displays. Enter a name for the format and click OK. The name is displayed in the Format field.
Note: Click on (Load) to load an
existing format for editing. Click on
(Load) to load an
existing format for editing. Click on  (Delete) to clear the current settings
in the mask.
(Delete) to clear the current settings
in the mask.For more information, see Saving, Loading and Deleting Formats in the Aurea CRM win User Manual.