Email Routing: Configure Mail Routing
The system allows you to designate a series of next hops for inbound (forwarded) mail destined for your organization’s mail system, and outbound mail during an activation of Email Continuity. Before changing these settings, see the sections on mail routing: For more information refer to Inbound Mail Routing Requirements for Email Continuity. and For more information refer to Mail Routing — Outbound During Activation..
NOTE
An audit trail is provided for all changes made to mail routing, including event, actor and day/time information.
By default, Continuity will resolve the email it receives using public MX records. However, if your organization would like to have Continuity send the email it receives to specific destination MTAs, you can specify those MTAs within the Continuity Admin Console. Additionally, if your organization uses a third-party gateway to filter your email prior to being relayed to your primary mail system, it is required that you identify specific destination MTAs within your onsite messaging solution in order to prevent mail looping.
If the destination MTA defined within the Continuity Admin Console is unavailable to accept email from Continuity, our systems are designed to hold and retry delivery for up to 30 days, or until the defined host resume accepting email.
NOTE
When you configure the system to use hostnames instead of MX records, it can take up to 10 minutes for the changes to take effect.
TIP
Though the routing features accept both IP addresses and hostnames, hostnames provide greater flexibility and are preferred.
CAUTION
After making changes to routing for inbound or outbound mail routing or delivery, verify the changes by performing a test activation. Incorrect or invalid settings can result in delayed, bounced or lost messages.
 Routing Policies for Forwarded Mail
NOTES
- The
Default Policydefines the routing policy for all customer domains that are not defined in other policies. This policy can be edited, but not renamed. - Changing, adding or removing customer domains requires Support’s assistance. Please, contact Support if the listed domains are incorrect.
To configure the routing path for forwarded mail:
- From the AMS Admin Console, as a Super Admin user, click System Settings >> Email Routing.
- The Forwarding of Inbound Email to Your Mail System section displays the current forwarding setting, which is either:
Forward email using MX records for your email domains.Forward email via mail routing policies.
- To change the routing, click the Edit under the current forwarding setting.
- The Routing Policy table lists all the mail routing policies currently in use.
- Click Edit beside the policy to change it, or click Create Mail Routing Policy to create a new policy. This loads the Inbound Mail Routing Policy page.
- Enter, or edit, the Policy Name.
- Check the Customer Domain(s) for which this policy will apply.
- The Next Hops section of the form defines the ordered list of mail servers that messages will be routed to. If this section is left blank, the MX Records will be used for next hops. To enter next hop hosts, enter a fully-qualified domain name in the text-entry field and click Add. The hostname appears in the Next Hops in priority order box above. Repeat to add all required hostnames. Click the Up or Down buttons to specify the order of the hops.
NOTE
Note that if a domain is in use by another mail routing policy (Current Policy column), checking the Include In This Policy box and submitting the form will reassign the domain to this policy.
WARNING
Hosts configured here must not send mail back to Aurea Messaging Solutions as a fail-over. Improper configuration can result in bounced or undelivered mail. If you are unsure of which hosts to specify, please contact Support.
- In the Next Hop Transport Layer Security box, the Use Opportunistic TLS option is checked by default, which means AMS delivers messages via TLS, unless the recipient is not capable of receiving messages via TLS, in which case, AMS delivers the messages via SMTP. Unchecking the Use Opportunistic TLS checkbox forces TLS to be used in all communication with hosts. If the message recipient is unable to receive email via TLS, the message may not be delivered to that recipient. Support suggests this checkbox remain checked for most efficient communication between hosts.
- To periodically test communication with next hops or MX records, check the Enable Readiness Checks box. See Next Hops Readiness Check
- Click Submit to save the changes.
The new setting appears in the Forwarding of Inbound Email to Your Mail System section.
Next Hops Readiness Check
If the target specified within the AMS Next Hop Routing section (see Routing Policies for Forwarded Mail) is not configured to accept email from the AMS Data Center (over port 25/SMTP) it is possible that critical emails may not be delivered.
Examples of potentially affected content includes:
- Mail sent from activated users to non-activated users during Email Continuity activations
- End-user welcome messages
- Password reset email confirmations
- Readiness Check Fault Notification Alerts to your AMS administrators
- Other Data Center initiated communications
Given how critical it is that the AMS Data Center be able to successfully communicate with the destination mail systems, a Readiness Check attempts to establish a connection at least once per day over port 25 to each destination mail system specified. If AMS is unable to establish a successful connection an error will be displayed within the Readiness Check section of the AMS Admin Console.

Readiness Check Next Hop Status
Click the Details... link to review the individual test results.
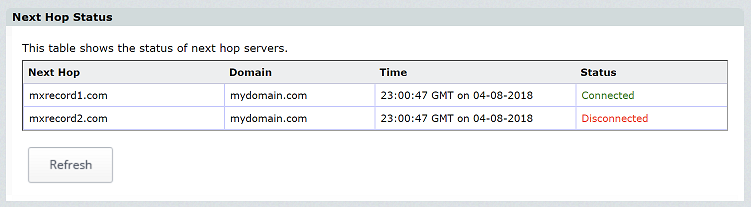
Readiness Check Next Hop Status
If Not Connected statuses are displayed, ensure that your firewall has been configured to always allow connection attempts sent over port 25 from your data-center-specific IP addresses.
Contact Support if further assistance is required.
Routing for Outbound Mail During an Activation
To configure the path for outbound mail during an activation:
- From the AMS Admin Console, as
emsrootuser or as a Super Admin user, click System Settings >> Email Routing. - The Sending Outbound Email to External Recipients During an Activation section displays the current setting.
- Click Edit.
- In the Routing Rules section, select either:
- According to MX record(s) (default)
- Via specific hosts - If you select this option, enter the host name in the text-entry field and click Add. The hostname appears in the Hosts in priority order field above. Repeat to add all required hostnames.
- Click Submit. The new setting appears in the Outbound Email to External Recipients During an Activation section.
Store and Forward
Checking the box, Reject mail (421) while inactive (do not store and forward), disables Store and Forward functionality.
If checked (disabled) no email will be accepted for your organization unless you activate Email Continuity. It causes the AMS MTAs to soft reject messages with a 421 error unless you perform a full activation.
Spammers often target the lower priority public MX records. Therefore, if the AMS MTAs are listed as a lowest priority public MX record for your organization, you may wish to check this option (disable store and forward) so that the AMS MTAs do not accept mail unless you have activated Email Continuity for your entire organization.
For customers who utilize a 3rd-party mail gateway, and/or who do not list the AMSEmail Continuity MTAs in their public DNS, it is generally not recommended that this option be checked. If you have a use case where you still want to disable store and forward in this configuration, please contact Support to discuss the possible impacts of this configuration change.
To disable Store and Forward
- As
emsrootuser or a Super Admin user, click on System Settings >> Email Routing. - In the Enable/Disable Store and Forward section, check Reject mail (421) while inactive (do not store and forward),.
- To save the updates, click Submit at the bottom of the page.
3rd-Party External Archive Support
NOTE
This section does not apply to on-premises Exchange Envelope Journaling when used in conjunction with Email Archival. See On-Premises Journaling
For AMS users who use a 3rd-party external archive support, this field provides the means of entering the target address of the external archive provider.
It is advised that you contact Support before enabling this functionality.
To enable 3rd-party external archive support
- As
emsrootuser or a Super Admin user, click on System Settings >> Email Routing. - In the Enable/Disable 3rd Party External Archive Support section, check Enable 3rd party external archive support for active users. This brings up a text-entry field.
- Enter the target address of your external archive.
- Click Submit at the bottom of the page.

Enable/Disable 3rd Party External Archive Support