Configuring SyncManager
The SyncManager component synchronizes your local directory, calendar and contact information with the data center.
SyncManager is required for all AMS installations and is installed using in the Aurea Messaging Solutions service software package. You can configure synchronizations to occur on a regular schedule, or you can launch SyncManager to run synchronizations at unscheduled times.
Notes about SyncManager
- A SyncManager Setup Wizard guides you through the configuration process, in which you describe your email environment and determine how often the service should synchronize data with your email system. The configuration process then performs an initial synchronization. After this initial synchronization, Email Continuity is ready for activation in the event of an outage.
- SyncManager synchronizes Directory information, as well as Contacts and Calendar data. For calendar data, all activities scheduled for the future are synchronized (including future instances of recurring meetings), as well as any activities that occurred during the past seven days. If you need to have a longer period of historical calendar data synchronized, the number of days is configurable.
- Personal distribution lists can be synchronized, if the system has been enabled to do so. Contact Support for more information. If a Personal Distribution List is created or edited using Outlook Web Access (OWA), the contents are not synced.
- While performing a sync, the system also checks for ID conflicts based on a user’s primary email address. If more than one instance of an email address is detected, a conflict is reported. (Note that the system does not use other criteria for detecting conflicts, such as aliases or X400 or X500 addresses.) The system provides means to resolve conflicts automatically or manually. For more information refer to Resolve User ID Conflicts.
The SyncManager Setup Wizard
To launch the SyncManager Setup Wizard
- From the Start menu, select Programs > Aurea > SyncManager.
- Click OK on the splash screen.
- Authenticate using your AMS root account or a Super Administrator account.
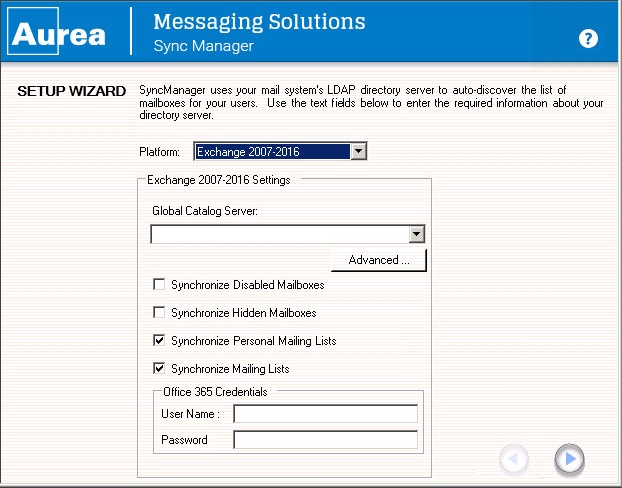
AMS Sync Manager Setup Wizard
- Select your version of Microsoft Exchange in Platform and complete the information in the Settings.
- The wizard usually detects the Active Directory global catalog or catalogs available for use. From the Server list, select the global catalog server that is physically closest to the machine on which you installed the SyncManager.
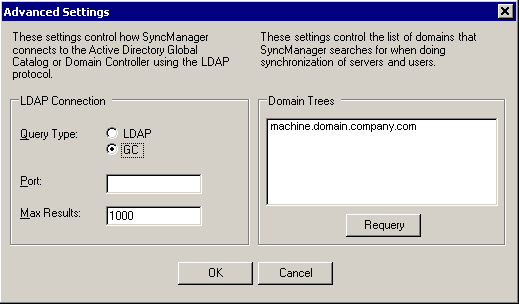
AMS Sync Manager Setup Wizard Advanced Settings
- Click Advanced to review and edit the Global Catalog Server and the LDAP connection. Click OK to apply changes.
- Select which special types of mailboxes and mailing lists to synchronize:
- Synchronize Disabled Mailboxes
- Synchronize Hidden Mailboxes
- Synchronize Mailing Lists
- Synchronize Personal Mailing Lists
- Click the Next arrow.
- The Setup Wizard registers the SyncManager instance with the Continuity server. Click the Next arrow.
- Configure how often the SyncManager synchronizes (or ‘syncs') directory data with the data center in the Directory Schedule Information window. We recommend that you run directory syncs on a regularly scheduled basis. If you do not want your selections for the directory sync process to run regularly, clear the Run Scheduled? check box. Select a Frequency, including Day and Start Hour. Indicate whether the start hour is AM or PM. Click the Next arrow.
NOTE
The sync process runs sometime within the Start Hour specified, and not exactly on the hour.
- Perform the initial Directory data synchronization between SyncManager and the data center. Click the Next arrow.
- A Directory Sync Status dialog box provides information about the progress of the initial synchronization. Depending on the size of your user base, the process may take a few minutes. When the synchronization completes, SyncManager creates a user account for each current user in your primary email system. The final window’s Status message displays the number of accounts created, as well as additional information. Note the total number of accounts created. This should be approximately equal to the total number of mailboxes in the supported system or systems. If there is a difference that is more than you expected, you may need to exclude mailboxes that are for resources (such as conference rooms) rather than for people. For information on excluding mailboxes, see Exclude Users or Mailboxes. Click the Next arrow.
- The SyncManager is ready for use. Click the Next arrow to launch the SyncManager summary screen.
If other synchronizations are available to you, you can run them at this time. After you have configured the SyncManager, you should set a deletion threshold percentage so that a fault alert message is sent when the set percentage of users or distribution lists is exceeded. See Sync Notify Settings for more information.
Configuring distributed synchronization with SyncManager
If you are using several servers and AMS controllers, you can configure SyncManager to specify which servers are synchronized by which controller. This is called distributed synchronization.
- On the server that is your primary controller, open SyncManager.
- Click the Configure button. The Edit Sync Properties window appears.
- Click the Distributed tab.
- Use the Add and Remove buttons to move servers from the Server List to the Included Servers list. Servers in the Included Servers list will be synchronized by this controller.
- Click Save.
Repeat this process for the secondary controllers in your configuration.