Use RecoveryManager to Restore Archives
Use RecoveryManager to recover Historical Mail archives to user mailboxes. Create the recovery archive using the instructions under Time-Based Recovery Archives, Activation-Based Recovery Archives, Search-Based Recovery Archives and Discovery Archives before launching the RecoveryManager.
To recover an archive that was created during an Email Continuity activation, see Restore Mail to Users’ Mailboxes.
To recover a Historical Mail archive to user mailbox(es):
- Login to your AMS server that hosts RecoveryManager, using an account with the required privileges.
- Go to Start > Programs > Aurea Messaging Solutions > RecoveryManager.
- Log into the RecoveryManager using the AMS Root or a Super Administrator account.
- Click Start Recovery.

Recovery Manager directory selection
- Select the Working directory for RecoveryManager to use as a temporary data store during the import process. Ensure that the directory chosen has sufficient disk space for all mail items. Also ensure that there is no anti-virus or backup software that may be scanning this folder, since it may block important temporary files causing errors. Refer to the anti-virus or backup software’s instructions for how to exclude directories from scans.
- Select the Active Recovery radio button to recover Recovery or Discovery Archives.
- Select the appropriate archive from the list. To refresh the list click Refresh List.
- Click Continue.
- The RecoveryManager downloads the archive metadata into the working directory. Actual mail data is downloaded for each user later in the process.
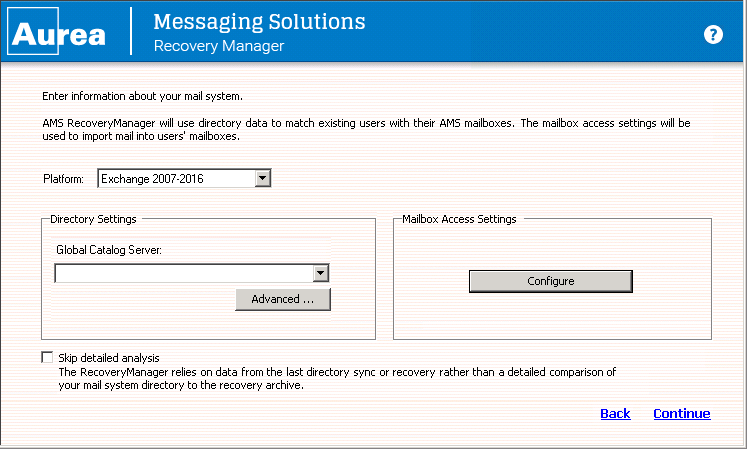
RecoveryManager global catalog settings
- RecoveryManager uses platform information pulled from SyncManager to access the primary email system. Typically these settings are correct for recovery. If, however, there were changes applied to the mail system, such as changes to the global catalog server or EWS connection settings, click Configure to adjust these settings.
- During recovery, directory information is compiled as part of the process. If SyncManager is installed, and if the most recent Directory sync was successful, RecoveryManager can use the cached results from the Directory sync for the recovery process. To use this cached data, check the Skip detailed analysis check box.
- Click Continue.
- RecoveryManager analyzes the archive to match up mailboxes in the archive to users’ mailboxes in the primary mail system. The duration of this process depends on the number of mailboxes. Click Continue.
- RecoveryManager shows mailbox and archive statistics to choose how to recover the archive:
| Option | Description |
|---|---|
| Mailboxes in Archive | The total number of mailboxes in the archive. |
| Recovered | The number of mailboxes for which mail has been recovered. |
| User Status | Click to review a detailed status of each user, including usernames per server, user accounts with email data for recovery, and user accounts that cannot be matched to an account on the primary mail system. |
| Matched to a user | The number of user accounts that can and cannot be matched to an account on the primary mail system. |
| Unmatched mailboxes | The number of mailboxes that cannot be associated with a user in the primary mail system. |
| Analyze Again | Click to re-analyze the archive mailboxes. |
| Configure Journaling |
Click to specify a journaling mailbox where to store a copy of all messages transmitted during activation. This is useful for example when using a mail archiving solution which retrieves mail from a journaling mailbox. Select the group, server or store you want to configure journaling for and click Change. Select the journaling mailbox where to copy all messages to and click OK. Also configure:
|
- The next steps depend on the type of archive being recovered:
- Click Discovery Archive button.
- From the Server drop-down list, select the server for the Discovery Archive.
- From the Mailbox drop-down list, select a user’s mailbox for the Discovery Archive.
- Click Continue.
- To recover all mail to a designated folder within users’ mailboxes, click the Recover to alternate folder check box and type a name for the folder in the field.
The messages are imported into the folder you specified, with a sub-folder labeled with the user name of the user who created the archive, with additional sub-folders Inbox and Sent Items.
- From the list of options in the right column, select the set of users to recover:
- All Users — This option imports email data for all users who were activated during the outage, who used the webmail interface, and for whom data has not yet been recovered.
- Users on a Specific Server — This option recovers email data for users on a selected message store, server, or group of servers. If you select this option, you must also check any combination of individual mail stores, servers, or server groups for recovery. (Servers without users that need recovery are greyed out.) Click Continue.
- One or More Select Users — This option recovers the mailbox of one user or the mailboxes of selected users by name. If you select this option, you will be taken to a page that displays a list of the first 300 users, including users with email data for recovery and users who cannot be matched to any account on the primary mail system. If your organization has more than 300 users, search by name to find users not listed. Select the users to recover, then click Add to copy them to the user list in the right-hand column. When you finish adding users to the list for recovery, click Continue.
NOTE
To view information about a specific user, click a user’s name and then click Properties. Information that appears includes which server hosts the user’s mailbox and the number and size of messages in the user’s Email Continuity mailbox. The Properties page also allows you to override the destination of the user’s restored email data.
- Group of Users — This option recovers users based on distribution list membership. When selected, the display lists all distribution lists with members who have email that needs recovery. If you select this option, you will taken to a new page to select a group of users and then click Add which will copy the group to the right-hand column. Continue to add groups until all you desire are copied to the right. Click Continue.
- Continuity Dropbox — This option provides a repository for email data received by Email Continuity for any recipients in your organization domains that it is unable to resolve. If there is no drop box, this option is unavailable. Select a mailbox to which all drop box content will be imported. In the primary mail system, log in to the selected mailbox, sort through the mail data, and manually forward each item to the appropriate recipient.
- Once you’ve completed the required information and clicked Continue, you are taken to the summary screen which lists the users identified for recovery.
- Choose how to restore the mail.
- Leave both the Recover to alternate folder and the Recover all messages to single mailbox options unchecked to import the messages into a folder labeled with the reviewer’s user name with sub-folders Inbox and Sent Items.
- To recover all mail to a designated folder within users’ mailboxes, click the Recover to alternate folder check box and type a name for the folder in the field. The messages are imported into the folder you specified, with a sub-folder labeled with the user name of the user who created the archive, with additional sub-folders Inbox and Sent Items.
- To recover all messages to a single mailbox (such as an administrator mailbox, for troubleshooting purposes), click Recover all messages to single mailbox and, in the dialog that appears, select the mailbox. After recovery is completed, messages recovered using this option will appear in the mailbox you chose.
- To recover all messages to a single mailbox but place them in a designated folder, complete both the Recover to alternate folder and Recover all messages to single mailbox options. After recovery is completed, messages recovered using both options will appear in the single mailbox you designated, with the alternate folder listed, like this:
- During the recovery process, if RecoveryManager encounters any unmatched mailboxes, you can:
- Click Prompt to Manually Match a Mailbox to select the correct server and mailbox for each user’s account not automatically matched. If this option is chosen, whenever a mailbox cannot be matched, the following screen appears for you to select a mailbox.
- Click Skip Users to reroute unmatched mailboxes later.
- Click Start Recovery to begin importing data.
- RecoveryManager downloads email data from the Aurea Messaging Solutions server and imports it to the appropriate mailbox and mailbox folder. The Progress page displays the number of items that successfully imported, failed to import, or were skipped. To see the recovery status for each mailbox, click View Log.
NOTE
If you click Cancel to stop the recovery process and a mailbox is being processed, the process completes that mailbox before stopping.
- When the mail for all selected users has completed recovery the link will become active, click Continue.
- If you need to recover another archive, click Select another archive to recover to return to the RecoveryManager main screen. If not, select Exit AMS RecoveryManager.
NOTE
Even if users or mailboxes belong to more than one group, their data is only imported once. The RecoveryManager skips already recovered user accounts, even if they are members of other distribution lists or groups.
Log in to the designated email account to view the contents of the Archive.