Calendar
The calendar allows you to display and create activities, tasks, absences and to-dos.
To open the calendar, click on Calendar on the icon bar or select Info > Calendar from the menu. The view that is selected the last time Aurea.CRM win is shut down is displayed (in this case, the working week view).

The following command bar is displayed in the Calendar info area:

The command bar is used to determine which appointments and information you want to display and to distribute appointments. Select the Daily View, Working Week View, Weekly View or Monthly View using the corresponding button.
- More details on the selected appointment are displayed at the bottom left. A list of participants is also displayed for activities.
- A small calendar is displayed at the bottom right, see Small Calendar. Click on a day to switch the view to that day.
- You can hide and display the mask and small calendar using the small arrows:
 ...
...
Calendar Views
-
Daily View (
 ): Displays a single day.
 -
Working Week View (
 ): Displays a working week.
 ): Displays a week.
-
Monthly View (
 ): Displays a month.
The current day is highlighted in the weekly and monthly views.
-
Resources (
 ): Switches to the resource view, see Resources.
Browsing
Use the left and right arrows in the header to navigate forwards and backwards.
Use the scroll bar to the right of the weekly and monthly view to move forwards and backwards.
Creating an Appointment
To create an appointment:
- Double-click on an empty area in the calendar to add a new appointment. A dialog box is displayed.
- Click on a hyperlink to determine which type of appointment you want to
add.Note: Your administrator can define templates used by new activity records, see Special Case: New Templates in the Calendar in the Aurea.CRM win Administrator Guide.
- If you added an activity, the company search is displayed. Search for the company and person you wish to add a new appointment for, see Searching.
- Enter data in the desired fields, see Appointment Types and To-Dos.
- Save.
The appointment is displayed in the calendar.
Modifying or deleting an Appointment
To edit or delete an appointment:
- Double-click on an appointment.
- Edit the appointment as desired.
To take into account the availability of resources, click on
(Resources) to switch to the resource view, see Resources.
To reschedule an appointment, drag the appointment to the desired time using the mouse.
To change an appointment's duration, drag the appointments border to the desired position.
Selecting Appointments with the Keyboard
To select appointments using the keyboard:
Daily and Working Week View
- Use the up and down keys to move the cursor within the calendar. Use the left and right cursor keys to switch between individual days.
- Once you have highlighted a time that contains an appointment, press the Tab key. If there are several appointments scheduled at this time, use the Tab key to scroll through all the appointments. The appointment's details are displayed below the calendar.
Weekly and Monthly View
- Use the arrow keys to move the cursor from one day to another.
- Use the Tab key to switch between appointments on the selected day.
Appointments Lasting Several days in the Daily and Working Week View
- Use the Page Up and Page Down keys to select appointments that last for several days in the daily and working week view.
- Use the Tab key to switch to the appointment or position on the calendar that is last selected.
Appointments Lasting Several Days in the Weekly and Monthly View
Appointments lasting several days are selected the same way as appointments lasting one day.
Appointment Duration and Type
The duration of an appointment is indicated using a vertical bar in the weekly and month views.

The color of the time bar indicates the type of appointment (activity, task, absence or to-do).
The duration is also indicated using a vertical bar in the daily and working week views.
Activities
For activities, the type is indicated using one of the following icons:

Activity records that are part of a series of appointments are
additionally indicated using the  icon, see Recurring Activities.
Tasks
The status of a task is displayed as default.
|
|
|
|
|
 Open
Open Completed/Approved
 Assigned/In Progress
 Missed
Absences
The status of an absence is displayed as default.
|
|
|
|
|
 Open
Open Accepted
 Denied
 not relevant
To-Dos
The participation type, participation status and status are indicated for To-Do records.
Part Type:
|
|
|
|
 Required
 Optional
 Informational
Participation status:
|
|
|
|
|
Status:
|
|
|
|
|
 Show
ShowAll-day Appointments
Appointments lasting for a whole or several days are displayed beneath the date in the daily and weekly views:

Your administrator can determine how much space is available by default for appointments lasting the entire day, see Configuration Info Area (Calendar category, Maximum lines for all day-appointments option)in the CRM.core Administrator Guide.
Click on  to close this area; appointments lasting all day are
indicated with a dot beneath the date:
to close this area; appointments lasting all day are
indicated with a dot beneath the date:

Click on  to display the appointments again.
All-day appointments are shaded gray in the weekly and monthly views.
Small Calendar
The small calendar is located in the bottom right of the appointment view. You can also
open it as a popup calendar using the Popup Calendar button
( ) in the
command bar.
) in the
command bar.
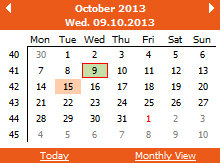
The calendar weeks are displayed on the left. The current day is highlighted. Public holidays can also be displayed in a different color, see Calendar Interface Settings.
Click on a day in the calendar to switch the display to that date.
Use the arrows in the small calendar's header to move forward or backward by one month.
The small calendar is updated if you navigate in the main calendar and vice versa.
Click on the following links to change the small calendar's display:
- Today: Switches to the current date.
- Monthly View: Switches to the monthly view.
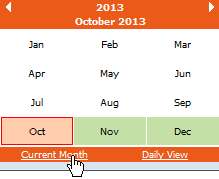
- Current Month: Switches to the current month (available in monthly view).
- Daily View: Returns to the daily view.
The following options are available when the popup calendar is open:
- Use the Esc key, the Return key or the Tab key to close the popup calendar.
- Use the arrow keys to select and display a date.
- Use the Home key to switch to the current date.
- Use F2 to switch between the small calendar's daily view and monthly view.
- If you use the popup calendar to select a day, the focus changes to that day and the popup calendar is closed immediately.
Context Menu
Depending on the type of record, various options are available from the popup menu in the calendar:
- Accept: Accepts an appointment.
- Refuse: Refuses an appointment.
- Completed: Sets the status of a To-Do record to "Completed", see To-Dos.
- Execute: Executes a trigger or workflow.
- Load: Switches to the corresponding record.
Appointment Settings
Click on  (Filter view) to determine which appointments you wish to
display.
(Filter view) to determine which appointments you wish to
display.

- Status, Priority and Activity: Determine which activities are displayed.
- Rep: Choose which rep's appointments to display: your own appointments, those of your group, your group leader or the rep for whom you have been entered as deputy.
- Reps/Groups: Opensthe rep list. Select the reps whose appointments you wish to be displayed from the list, see Rep List. The selected reps are displayed in the Active Reps field.
Your administrator can determine which reps' appointments should be displayed. In this case, the Rep and Active Reps lists are unavailable, see Calendar Tab in the Aurea.CRM win Administrator Guide.
- All reps: Displays the appointments for all reps (only applies to the calendar).
- Appointments without a time: Includes appointments for which no time has been entered.
- Show rep: Displays the selected reps in the overview's header (only applies to the calendar).
- Scheduled appointments: Days on which appointments are scheduled are highlighted in a different color (only applies to the Daily Overview).
These settings are saved for each level, i.e. you can define different settings for the calendar, resource view, overlapping appointments and daily overview.
By default, only those appointments are displayed where the selected rep(s) are entered in the Rep or Participants fields. Use the Own appointments/activities/tasks only configuration entries to ignore the Participants field, see Configuration Info Area (General Settings category, Own appointments/activities/tasks only option)in the CRM.core Administrator Guide.
Calendar Interface Settings
If you have the appropriate rights, click on  (Settings) to change the calendar's settings and appearance.
For example, you can change the colors used to display different types of activities.
These personal settings take precedence over the desktop settings defined by your
administrator; i.e. they are reloaded every time you log on to Aurea.CRM win.
(Settings) to change the calendar's settings and appearance.
For example, you can change the colors used to display different types of activities.
These personal settings take precedence over the desktop settings defined by your
administrator; i.e. they are reloaded every time you log on to Aurea.CRM win.
These settings are saved for each level, i.e. you can define different settings for the calendar, resource view, overlapping appointments and daily overview.
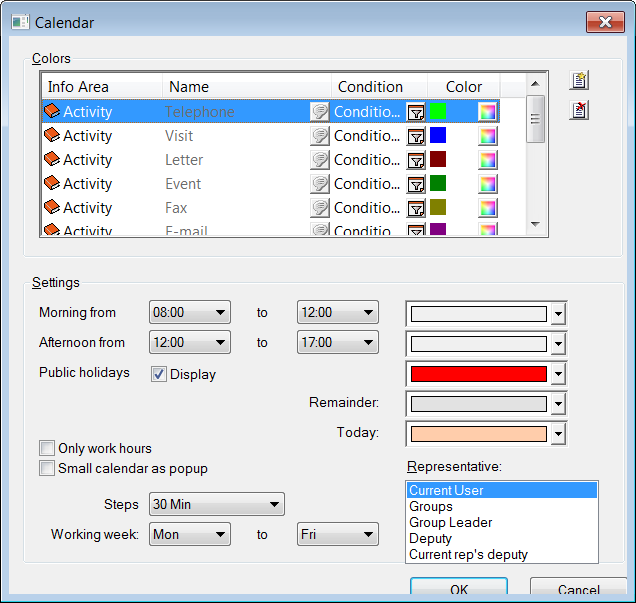
Colors Pane
Use this option to change the colors used to display different types of appointments. A stripe in the chosen color is displayed on the left hand side of the appointment.
To change the color of an appointment type:
- Click on the New button, and select the appointment type from
the popup menu.

- You are presented with a window prompting you for a name. Enter a name, e.g. "Visit", and click OK.
- Define the condition, e.g. "Type = Visit" and "Priority = High", see Conditions.Note: Instead of executing steps 1-3, you could also edit the predefined entry for activities of type = "Visit", and add the condition "Priority = High".
- Click on the Color icon and select the desired color (e.g. yellow).
- Close the dialog box with OK.
Visits with the priority "High" is now displayed with a yellow stripe in the Calendar info area.

For those colors that have already been defined in the Colors
pane, click the  icon to enter the text in several languages, the
  icon to edit
the condition and the
icon to edit
the condition and the  icon to change the color.
Settings Pane
The options in the Settings pane allow you to change the following:
- Morning from/to: Select the time range you wish to be displayed as morning in the two time fields, and select a color from the adjacent field.
- Afternoon from/to: Select the time range you wish to be displayed as the afternoon in the two time fields, and select a color from the adjacent field.
- Public holidays: Enable the Display check box, and select a color for public holidays.
- Remainder: Select a color to represent those times outside your morning or afternoon office hours.
- Today: Select the background color for the current date.
- Only work hours: Restricts the view to the morning and afternoon periods defined in the settings.
- Small calendar as popup: If this check box is enabled, then the small calendar is only accessible using the Popup calendar button in the calendar's command bar.
If this check box is disabled, the calendar is always displayed at the bottom right of the Calendar.
- Steps: This field allows you to specify whether the time is divided into 15 minute, 30 minute or hourly intervals.
- Working week/to: Use these fields to determine which days of the week are part of the working week.
- Representative: You can specify whose records are displayed in the calendar (the current rep, the entire group, the group leader or deputy).
You can select multiple entries. If you do not select an entry, appointments are displayed for all entries.
Predefined Views
Your administrator may have provided predefined views. Select these views using the drop down menu in the command bar form the Calendar info area.

Printing Appointments
To print the appointments displayed in the calendar:
- Select File > Print from the menu.
- Select at least one of the following options:
- Print calendar: Prints the current calendar view.
- Print activity list: Prints a list of all activities in the current view.
- Print compact overview: Prints an overview of the current appointments.
Distributing Appointments
Use the distribute function to move several appointments to a different date.
- Click on the Distribute button
 to access
the Distribution of Appointments level. The
Appointment Distribution dialog box is displayed.
to access
the Distribution of Appointments level. The
Appointment Distribution dialog box is displayed.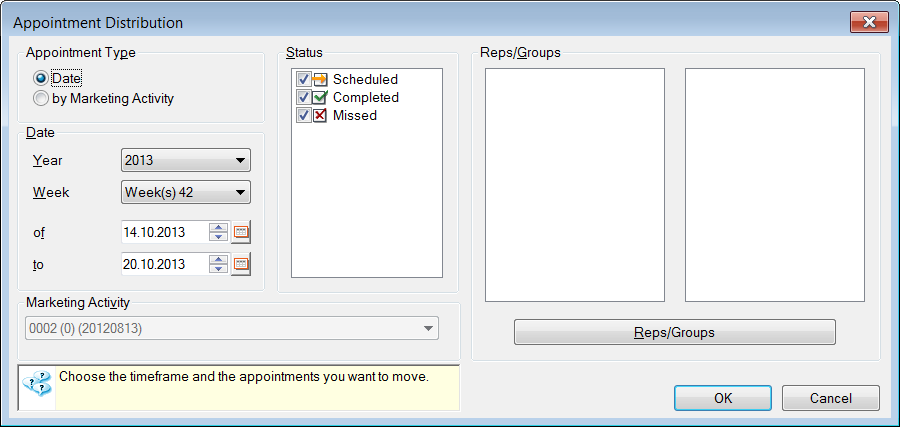
- Determine which appointments should be rescheduled:
- Date: All the selected rep's appointments in the specified time range. Select the Year and Week from the drop-down lists or enter the time period in the of and to fields.
- by Marketing Activity: All activities that are generated as part of a marketing activity. Select the desired marketing activity from the Marketing Activity drop-down list.
- Select the status of the activities to be rescheduled under Status.
- Select one or more reps or groups that the appointments should be distributed
amongst under Reps/Groups. Click the Reps/Groups
button to access the rep list, see Rep List.
If you do not select a rep or a group, the appointments for all reps are distributed.
Note: You can only distribute your own appointments in the default configuration. Your administrator can determine that you can also distribute appointments assigned to other reps, see Defining Further Settings in the Rights topic of the CRM.core Administrator Guide. - Confirm your selection with OK.
The Distribution of Appointments level is displayed. The numbers in the cells indicate the number of activities of each type.

You can select Appointments from the context menu to edit your settings.
- Select Distribute from the context menu. A further dialog box
is displayed.
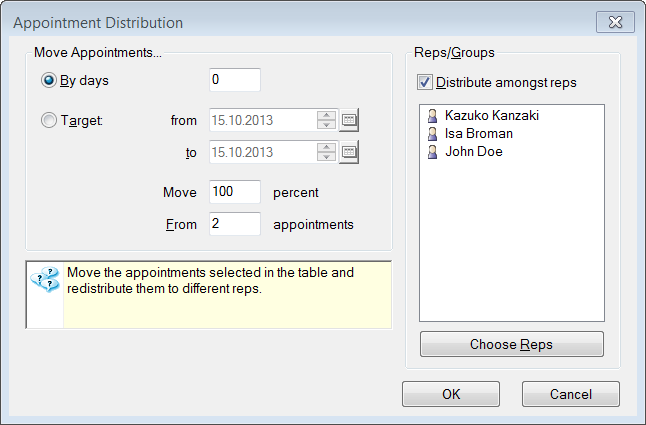
- Choose your settings:Move Appointments pane:
- By Days: Enter the amount of days that appointments should be moved by.
- Target from/to: Define the time period over which the appointments should be distributed.
- Move ... percent: You can specify a percentage of appointments you wish to move. The selected appointments are weighted according to their priority, however.
- From ... appointments: The amount of appointments selected is automatically entered by the system. You can edit this field.
Reps/Groups pane:- Distribute amongst reps: Enable the check box, and select the reps you wish to distribute the appointments amongst from the rep list, accessed by clicking Choose Reps, see Rep List. You can select multiple entries. If this check box is disabled, the appointments are distributed to the rep who is assigned to the original activity record.
- Use OK to confirm your settings and to begin distributing the
appointments.
You return to the distribution table where you can review the results.
- Return to the calendar using the Close button. The display is updated to reflect any changes.
Rescheduling a Single Appointment Directly
Appointments can be rescheduled directly in the Distribution of Appointments level.
- Double-click on the appointment to be rescheduled.
The mouse cursor changes.

- Click on the date you want to move the appointment to.
- The Move Appointments dialog box opens.

- Enter the appropriate settings and confirm with OK.
The appointment is rescheduled.
Transferring Appointments to Microsoft Outlook or Lotus Notes
Depending on the settings in the Configuration info area, either
the Outlook ( ) or Lotus Notes button (
 ) is displayed,
see Configuration Info Area in the CRM.core
Administrator Guide (External Calendar category,
External Calendar option). Click on the button to transfer the
displayed appointments to your mail client.
) is displayed,
see Configuration Info Area in the CRM.core
Administrator Guide (External Calendar category,
External Calendar option). Click on the button to transfer the
displayed appointments to your mail client.
Country-specific Calendar Settings
You can determine country-specific settings for public holidays. Public holidays are displayed in red.
To select a country-specific calendar:
- Select Extras > Other Options from the menu.
- Select a country-specific calendar from the drop-down menu in the Calendar pane.
Overlapping Appointments
Only activities are checked for overlaps, not tasks or absences.
Activities without an end date/time or duration are not tested for conflicts.
Whenever new activities are added, they are checked for overlaps. If activities overlap, the Overlapping Appointments area is opened automatically. The overlapping activities are displayed as in the resource view. The conflicting activity record is highlighted with a red border.

Reschedule one of the activities, see Moving Appointments. You cannot access the activity record (as in the resource view) by double-clicking on it.
Click on  (OK) once you have made the desired
changes or if you do not wish to edit the activity records.
(OK) once you have made the desired
changes or if you do not wish to edit the activity records.