Appointments
You can manage your appointments from the calendar, the resource view and the daily overview.
For further details, see Calendar, Resources, Appointments.
You can also see in the corresponding info areas in Appointment Types.
Appointment Types
The Activity info area provides the basis for providing personal customer support. Activity records provide valuable information about telephone calls, customer visits and similar appointments.
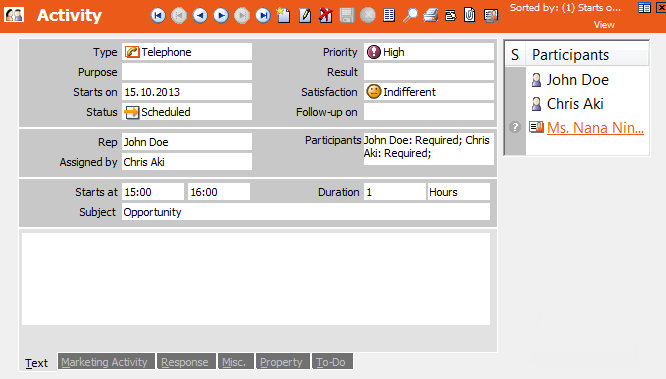
Activities are added for companies and persons. The Activity Overview level allows you to display your activities with all companies. Select Info > Activity Overview to access the Activity Overview level.
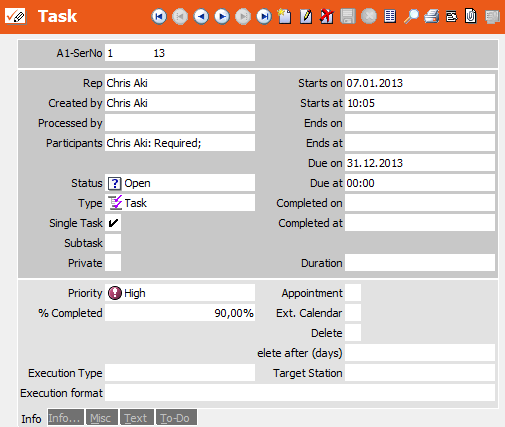
Use the Task info area to store tasks that are not dependent on a specific customer. Tasks are displayed in the calendar, but not in the daily overview.
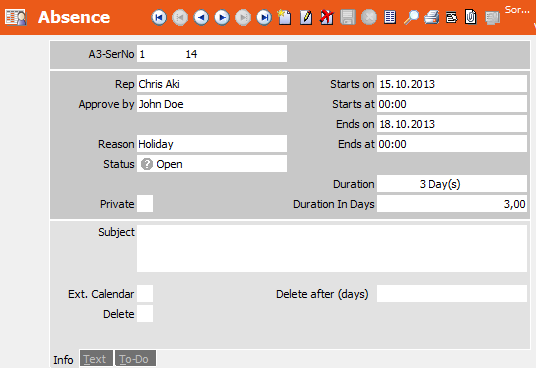
Use the Absences info area to determine when certain employees are unavailable for business appointments (vacations, sick leave etc.).
Adding Appointments
To add an appointment:
- To add an activity, switch to the company/person you wish to add the activity for. (This step is not necessary for tasks and absences, as these are independent records and are not added for a specific company or person.)
- Switch to the Activity, Tasks or Absences info area.
- Click on
 (New).The input mask is displayed. A number of fields may
already be filled out with predefined default values.
(New).The input mask is displayed. A number of fields may
already be filled out with predefined default values. - If your name has not been entered in the Rep
field, or if you wish to add an appointment for another rep, double-click
on the Rep field or click on the rep icon (
 ) and select
the desired rep from the rep list, see Rep List.Note: If you make a change to the Rep field, your name is automatically entered in the Assigned by field.
) and select
the desired rep from the rep list, see Rep List.Note: If you make a change to the Rep field, your name is automatically entered in the Assigned by field. - Enter further details (e.g. the reason for an absence, time and/or duration of the appointment).
- Select the participants in the Participants field, see Adding Reps and Resources to an Activity/Task and Adding Customers to an Activity.
- Switch to the To-Do tab and enable the Create To-Do check box if you want the participating reps to accept or refuse the appointment or the appropriate superior to approve an absence, see To-Dos.
- Enable the Escal. To-Do check box if message and escalation records should be added as well, see Reminders and Messages and To-Do Escalation.
- Enter a time period in the Reminder duration field, if you want to remind participants of the appointment, see Adding Reminders for all Participants.
- Confirm with
 (Save).
Adding Reps and Resources to an Activity/Task
You can add reps and resources to activity records; you can only add reps to tasks.
To add reps and resources:
- Click on in the Participants field in an
activity or task record.
- Use the following buttons to determine what is displayed in the list:
-
 (List): All types are listed (reps, groups and
resources)
(List): All types are listed (reps, groups and
resources) -
 (Rep): Only reps are listed
 -
 (Groups): Only groups are listed
 -
 (Resources): Only resources are listed
-
- Enable the check boxes next to the desired participants or resources in the list.
Select the Part. Type (participation type) for each
participant using the drop-down list. You can choose between
Required, Optional and
Informational. Only "Required" and "Optional" make sense as
the participation type for resources.Note: You cannot add resources to tasks.You can select up to 100 reps.
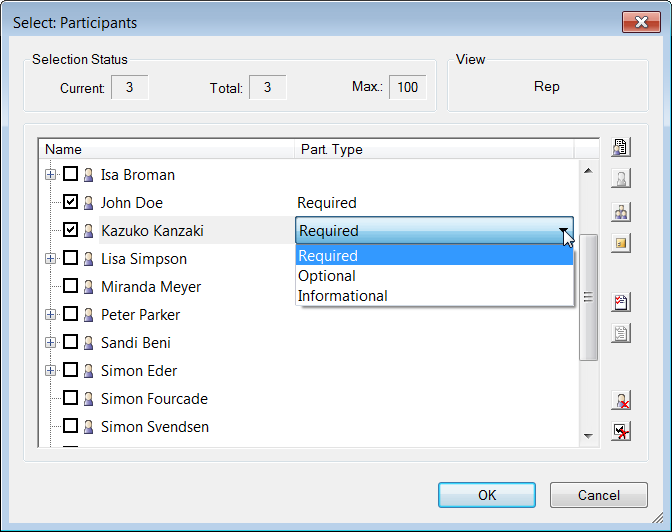
Click on
 (Delete Current Selection) to
clear the reps/groups/resources currently displayed. Click on
(Delete Current Selection) to
clear the reps/groups/resources currently displayed. Click on  (Delete Entire Selection) to clear all
reps/groups/resources (even if they are not currently displayed in the
list).
(Delete Entire Selection) to clear all
reps/groups/resources (even if they are not currently displayed in the
list). - Click on OK.
- Save the record.
Adding Customers to an Activity
To add further companies or persons to an activity:
- Select Activity Participant from the context menu. The Activity Participant level is displayed.
- Click on New ().
- Select Company Search or Person Search
from the context menu.
The Company Search or Person Search is displayed, see Searching.
- Search for and select the desired company or person. You are returned to the Activity Participant level.
- Select the desired entry from the Part. Type field (Required, Optional, Informational).
- Save and close the Activity Participant level.
You are returned to the activity you added the participating company or person to.
The list of participants to the right of the mask now includes the newly added company/person as a hyperlink.

Activity Participation Level
The Activity Participation level offers the same options as the Activity level. In addition, activities are also displayed for companies and persons that are simply entered as an activity participant (i.e. added using the Activity Participant entry in the context menu).
Double-click on an activity in the calendar to switch to the Activity Participation level.
Moving Appointments
You can reschedule appointments:
- Directly in the record by changing the date and time
- In the calendar by dragging the appointment with the mouse, see Modifying or deleting an Appointment .
- In the resource view, see Rescheduling Appointments.
- Using the Distribute option in the calendar (only for activities), see Distributing Appointments.
Messages are generated when an appointment is rescheduled:
- For all activity participants (message type: "Update")
- For all reps entered in a task (message type: "Information")
- The rep who needs to confirm an absence (message type: "Information")
The updated time is entered in the Message field.
The start and end time and dates, as well as the To-Do Until Date, To-Do Until Time, Due on and Due at fields are updated in the To-Do record and activity, task or absence. The point in time when the organizer receives a message if participants have neither confirmed nor declined to attend is also moved.
Deleting Appointments
You can delete appointments as follows:
- In the daily overview: Select the appointment and click on
 (Delete).
 - In the calendar and resource view: Double-click on the appointment and click on
(Delete).
- In the Activity/Activity Participation/Tasks/Absences info
areas: Switch to the appointment and click on (Delete).
Upon deleting the appointment, the appointment and all associated To-Do, message and reminder records are deleted for all participants.
No message records are created when an appointment is deleted.
Transferring Appointments to Microsoft Outlook or Lotus Notes
Before you can transfer data to the calendar of Microsoft Outlook or Lotus Notes, you need to determine which e-mail client you are using in the Configuration info area, see Configuration Info Area (External Calendar category, External Calendar option)in the CRM.core Administrator Guide.
You can transfer an appointment (activity, task or absence) as follows:
- Select Transfer to external calendar from the context menu in the appointment record.
- Select View > All Mask Fields from the menu and enable the Ext. Calendar check box.
Appointments that are deleted in Aurea.CRM win are also deleted in the e-mail client.
You can also transfer all the appointments displayed at once, see Transferring Appointments to Microsoft Outlook or Lotus Notes.
Context Menu for Appointments
The following entries are available from the context menu by default (MA= activity, A1 = task, A3 = absence):
|
Entry |
MA |
A1 |
A3 |
Description |
|---|---|---|---|---|
|
My Own |
x |
x |
Displays all tasks where you are entered in either the Rep or Participant field. Displays all tasks where you are entered in either the Rep or Participant field. |
|
|
Delegates |
x |
x |
Displays all tasks where you are entered in the Created by field. Displays all absences that you have to approve; i.e. where you have been entered in the Approved by field. |
|
|
Rep |
x |
x |
Displays all tasks/absences for all reps. |
|
|
Deputy |
x |
x |
Additionally displays the tasks and absences for those reps that you are entered as deputy in the Rep info area, see Rep in the CRM.core Administrator Guide. |
|
|
All |
x |
x |
Displays all tasks/absences, irrespective of their status. |
|
|
Active |
x |
x |
Displays tasks with the status set to "Open" or "In Progress" where the Due on date is either undefined or in the future (including later the same day). Displays all absences where the start date and time lies in the future. |
|
|
Completed |
x |
x |
Displays all tasks with the status "Completed". Displays all absences with the status "Accepted". |
|
|
Missed |
x |
x |
Displays all tasks where the status is either "Open", "In Progress" or "Missed" and where the due date either lies in the past or is empty. Displays all absences with the status "Open" and a start date in the past. |
|
|
Accept |
x |
x |
x |
Accepts the activity or task. This option is available for tasks created with To-Do records. Approves an absence. This option is available if you are entered in the Approved by field in an absence record. |
|
Refuse |
x |
x |
x |
Refuse the activity or task. This option is available for tasks created with To-Do records. Refuses an absence. This option is available if you are entered in the Approved by field in an absence record. |
|
Completed |
x |
For participants of a task: Sets the To-Do status of the To-Do record linked to this task to "Completed" or sends a notification to the organizer of the task. For the organizer of a task: Sets the status of the task to "Completed". |
||
|
Execute |
x |
For tasks: Starts the predefined trigger or workflow entered in the Execution Type and Execution Format fields. |
||
|
New Subtask |
x |
Opens the New Subtask level and adds a new task linked to the current task via the A1_1_StaNo and A1_1_SerNo fields. The Predecessor Task field contains the link to the parent task. |
||
|
Connect tasks |
x |
Opens the New Subtask level and adds a new task linked to the current task via the A1_1_StaNo and A1_1_SerNo fields. |
||
|
Reminder |
x |
x |
x |
Opens the Edit Reminder level, where you can edit existing reminders or add new reminders for yourself, see Adding and Editing Reminders for Yourself. |
|
Document |
x |
x |
Opens the documents entered in the document fields. |
|
|
Transfer to external calendar |
x |
x |
x |
Transfers the appointment to Microsoft Outlook or Lotus Notes, see Transferring Appointments to Microsoft Outlook or Lotus Notes. |
|
Project View |
x |
Opens the project view where tasks can be subdivided into multiple stages, see Structuring Tasks. |
||
|
New Activity |
x |
Starts the company search and adds a new activity for the selected company. |
||
|
Load Opportunity |
x |
Only available in the BTB vertical. Loads the associated opportunity, see Opportunity Management in the Business Logic BTB manual. |
||
|
Survey |
x |
Opens the survey entered in the Questionnaire field. |
||
|
Expenses |
x |
Opens the independent Expenses info area. |
||
|
Load Offer |
x |
Only available in the BTB vertical. Loads the associated offer. |
||
|
Load Property |
x |
Only available in the BTB vertical. Loads the associated property. |
||
|
Load Installed Base |
x |
Only available in the BTB and OTC verticals. Loads the associated installed base. |
||
|
Activity Participant |
x |
Opens the Activity Participant level. |
||
|
Repetition |
x |
Opens the Repetition level, from where you can add a series of appointments, see Recurring Activities. |
||
|
Appointment Planning |
x |
Opens the Resources level where you can check the availability of participants, see Resources. |
Follow-up Date
If you enter a date in the Follow-up on field and save the record, a new activity is automatically created on this date.
Aurea.CRM win automatically switches to the new activity upon saving the record. Reps and links are transferred automatically. The serial number and station number of the predecessor activity are entered in the MA_1_SerNo and MA_1_StaNo fields.
After saving the follow-up activity, Aurea.CRM win returns to the original activity.
Structuring Tasks
You can structure tasks: The sub-tasks are grouped to form projects by assigning types (sub-project, milestone etc.) and linking tasks according to the project structure.
To divide a task into projects:
- Create a new task and select "Project" in the Type field.
- Save the record and select Project View from the context
menu.
The Project View is displayed.
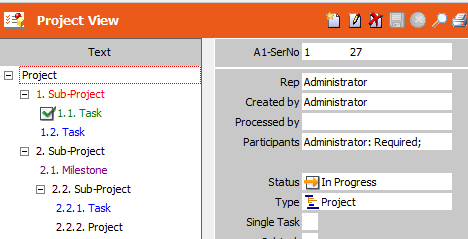
The Type of task is displayed in the Text field.
- Click on
(New) to add a new sub-step to the original task, and set
the Type to "Sub-Project".
- Once the record is saved, the subdivision of the task is displayed in the Text field. Click on an entry to select and display the record in the mask.
- You can add further sub-steps to the root task or add further sub-steps to sub-steps.
- Black: project/sub-project
- Green: project/sub-project with status "Completed"
- Red: project/task with status "Missed"
- Purple: Milestone
- Blue: Task
If the status is "Completed", this is also indicated by the  icon; if the
status is "Missed",
icon; if the
status is "Missed",  is displayed.
If you position the cursor over an entry, the due date and time, rep and subject are displayed (providing this data has been entered).
You can edit the order by dragging entries with the mouse.
The Project View provides access to the same fields as in the Tasks info area and to some of the entries in the context menu.