Lists
The list view displays records in a list.
Click  (List) in the command bar to switch to list view.
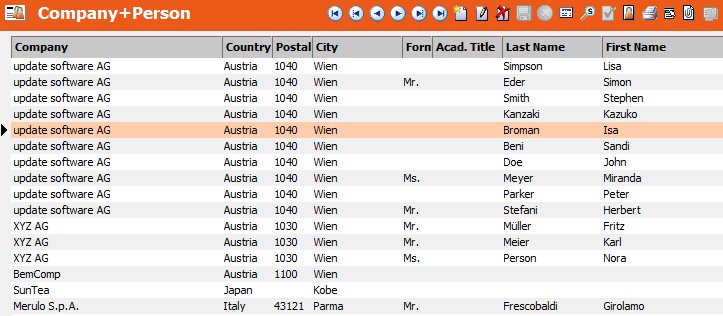
The current record is highlighted and indicated by a triangular cursor in the control bar.
Double-click on a record to display it in the mask view.
The following list options are available in the View menu:
- Define List Format: Opens the Define List Format dialog box, see Defining Lists
- Load List Format: Loads an existing list format, see Saving, Loading and Deleting Formats.
- Totals Line: Displays or hides the total line.
Lists can be customized, see Defining Lists and User Interface in the Aurea.CRM win Administrator Guide.
To prevent user settings from being reloaded enable the Do not load last list settings option in the desktop settings, see Masks/Lists Tab in the Aurea.CRM win Administrator Guide.
Defining Lists
All fields available in a level can be included in a list in any order.
To define a list:
- Switch to the list view.
- Select View > Define List Format
from the menu. The Define List Format dialog box opens
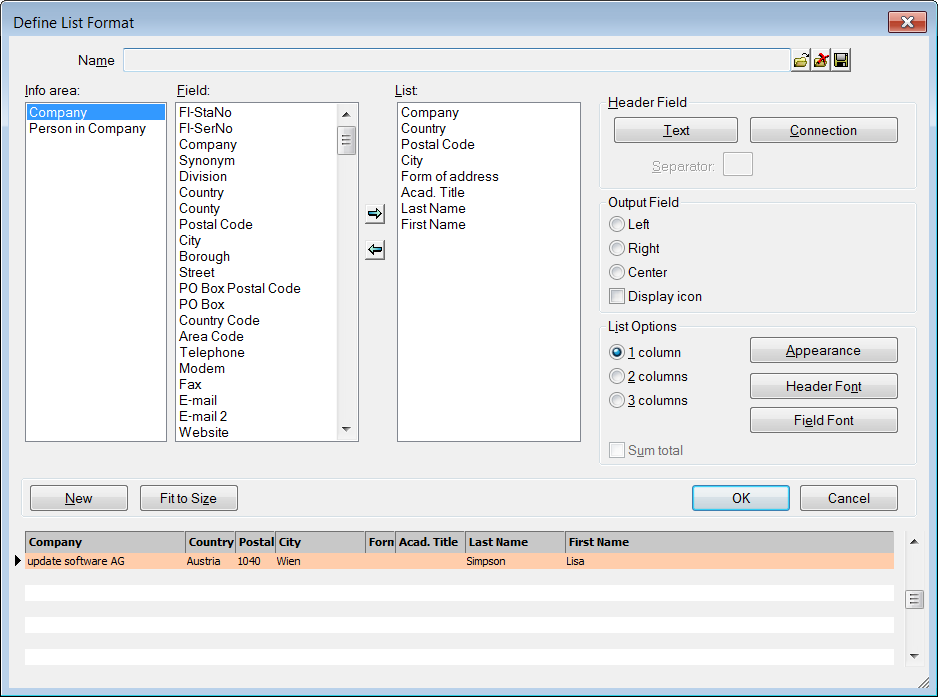
- If the current level contains more than one info area, select the desired info area
from the list under Info area. The fields available in the
info area are displayed under Field.Note: Enable the Sort selection lists alphabetically option under Extras > Other Options in the Aurea.CRM win main module to sort the fields alphabetically.
- Double-click on a field to add it to the list. Double-click on the field again to
remove it from the list.
The bottom portion of the dialog box provides a preview of the selected fields and settings.
- To change the column order, click on a column header in the preview and drag it to the desired position.
- To change the column width, click on the divider between columns and drag it to the
desired position.Note: You can also edit the column width and order in the list view.
- Define more view settings for the list, see List Properties.
- Click OK.
- When prompted:
- Select Yes to save the list format, see Saving, Loading and Deleting Formats.
- Select No if you want to use the list only temporarily.
List Properties
You can set the following list options in the Define List Format dialog box:
- Fit to Size: Changes the column width so that all columns are displayed.
- New: Clears the field selection (List list box).
Header Field
- Text: Select a field in the List list box. Click on Text to change the column header text for all available languages.
- Select a field in the List list box.
- Click the Connection button.
- Select the second field.
- Confirm with OK. The list view now displays two fields in one column.
- Separator: Enter a character to separate connected fields.
Output Field
- Left, Right, Center: Determines the alignment of a field's contents. Select a field from the List list box and choose the desired alignment.
Display icon: Select this option to display the contents of catalog fields using the corresponding icon.
You cannot connect fields displayed as icons to other fields in the list. Catalog fields that are displayed as items cannot be edited in list view. Select the same catalog field a second time from the List list box to display both the icon and the text.
List Options
- Columns: The list can be displayed as one or split into two or three columns.
- Sum total: Enable the Sum total check box to display a line at the bottom of the list that contains totals. This option can only be selected if the list contains numerical fields.
-
Appearance: Click on the Appearance
button to determine the following:
- Border: Displays the control bar on the left, right or both sides.
- Selected Records: Highlights the current line using a colored bar or frame.
- Cursor: Position of the triangular cursor on the left and/or right control bar.
- Header Font: Use the Header Font button to set the font used to display the column headers.
- Field Font: Use on the Field Font button to set the font used to display the list contents.