Spreadsheet
Learn how to transfer data to spreadsheet.
You need to enter your spreadsheet application before you can transfer data to it.
Select Extras > Document Directories from the menu and select the version of your spreadsheet application.
Transfer to Spreadsheet
Preparation:
- Define transfer field formats containing any info areas and fields that you wish to
transfer to the application, see Transfer Fields. Note: The Max. no. records field in the Define Transfer Fields window must be left blank when transferring data to your spreadsheet.
- If you do not define any transfer fields, the current list view is transferred. Switch to the desired info area, and define or load the desired list view (View > Define List Format and View > Load List Format options)
- Define or load any conditions or selections to restrict the data, see Defining Conditions and Defining a Selection. Note that not all conditions are applied, see Transfer Conditions.
To transfer data to a spreadsheet:
- Select File > Transfer to Spreadsheet from the menu, or
click
 (Excel).Note: Your administrator determines (in the desktop definition) which levels include the (Excel) button, see
Header Tab in the Aurea.CRM win Administrator
Guide.
(Excel).Note: Your administrator determines (in the desktop definition) which levels include the (Excel) button, see
Header Tab in the Aurea.CRM win Administrator
Guide.The Transfer to Spreadsheet dialog box is displayed:
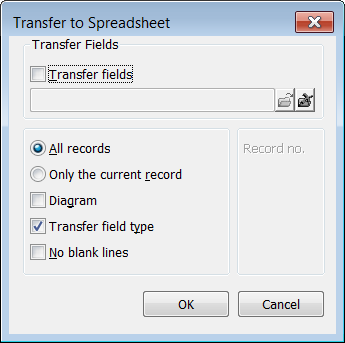
- You have two options when transferring data:
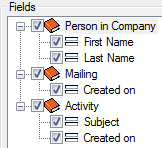
- Enable the Transfer fields check box and load a format:
all fields defined in the transfer field format are transferred.
Example: Activities and mailings for Person in Company:

-
If the Transfer fields check box is disabled, all fields in the current list view are transferred. All records that are currently displayed in the list are transferred. (For child info areas this may be affected by whether you have enabled Data > Company-Related Info or Data > Person-Related Info.) If a total line is included in the list, it is also transferred.
- Enable the Transfer fields check box and load a format:
all fields defined in the transfer field format are transferred.
- Enable All records to transfer all records in the list. Enable Only current record to only transfer the record currently selected in the list.
- Enable the Diagram check box if you want to create a diagram in addition to the table.
- The Transfer field type option is enabled by default. This
option determines that data are transferred to Excel using formatting based on the
field type:
- Telephone numbers as text (leading zeros are retained)
- Percentages as percentages
- Floating point numbers as floating point numbers
- All other numeric fields as integers
- Date fields as dates, if entered in a valid format, otherwise as text
- Time fields using the format "hh:mm:ss"
- All other fields as text
- Enable the No blank lines option to determine that the parent
record should be transferred prior to each dependent record.

If this option is disabled, blank lines are generated instead.

- Click OK.
Aurea.CRM opens your spreadsheet application and enters the field contents in a table. The Record no. field displays the number of records transferred to the spreadsheet.
The field name is transferred to the table as a column header.