Master Data – FSI
Use the Accounts menu to manage customers (persons, companies, associations).
You can store customer data, such as their name, address, telephone number, number of employees and depict relationships between customers.
When accessing customer data, data is displayed in the tree view by default. Different data is displayed depending on the type of customer. For example, contact persons are displayed in the tree for companies.
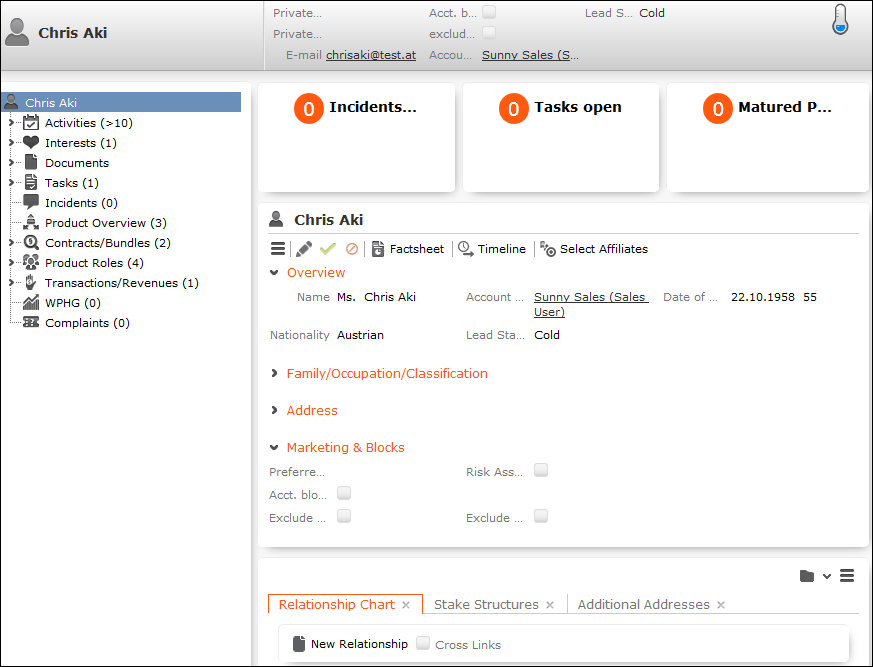
Persons
Private customers are stored as persons and you can depict these persons’ relationships, e.g. association membership or where they are employed.
Select  (Accounts) > Persons to search for
persons.
(Accounts) > Persons to search for
persons.
Select (Accounts) > Contact
Persons to search for contact persons entered for companies in the
database, see Adding Contact Persons.
 (Go to Company/Association) to switch
the tree view to that record.
(Go to Company/Association) to switch
the tree view to that record.Companies
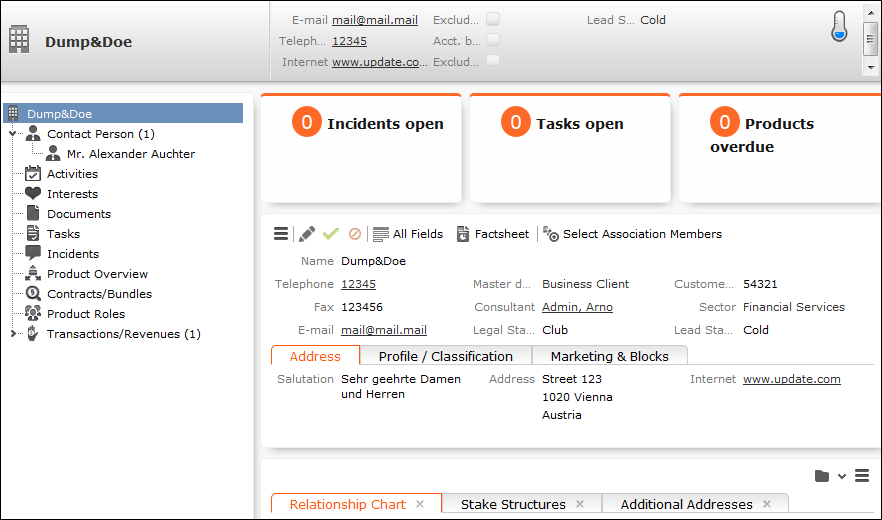
You can store companies (business clients), including their relationships with other customers (e.g. employer, member of a corporate group).
Select
(Accounts) > Business
Clients/Associations to search for companies.
Adding Contact Persons
When adding a contact person at a company, enter their contact data at the company (e.g. their corporate e-mail address and telephone extension). When adding persons, enter their private contact details (e.g. private e-mail address), see Persons.
To add a contact person at a company:
- Open the desired company.
- Switch to the Contact Person node in the company tree.
- Click on
 (New) in the results list.
 - Choose the desired option:
- Link to existing person record: Link the contact person with a person already in the database.
-
Create new person record: Add a new person record for
the contact person.
In this case you need to enter and save the person’s private details.
- Enter the contact details for the person at the company (e.g. Position and E-mail).
- Save the record.
 (Go to Private Person)to switch to the person record
associated with the contact person.If your system is configure accordingly, you can also
add contact person records from the person tree (Contact Person
at node).
(Go to Private Person)to switch to the person record
associated with the contact person.If your system is configure accordingly, you can also
add contact person records from the person tree (Contact Person
at node).Associations
You can add associations to group related customers. The following types exist:
- Private association: Families, households etc.
- Business association: Corporate groups etc.
- Mixed association: Lobbies, foundations etc.
Select
(Accounts) > Business
Clients/Associations to search for associations.

Adding Master Data
To add new customers:
- Select (Accounts) > New Master
Data.
- Select the type of record (person, business client, private association, business association, mixed association).
- Enter the data.
- Save the record.
(New) in the search (e.g. the person
search) to add new records.Relationships
Relationships are used to depict hierarchies and networks between companies, associations and persons. You can store relationship in Aurea CRM web (e.g. dependents, association members, business partners, suppliers) allowing you to depict hierarchies and networks.
You can also store information on stakes in companies. A stake is a type of relationship.
Adding Relationships
To add a new relationship:
- Switch to the desired customer (person, contact person, company, association).
- Switch to the Relationship Chart tab.
- Click on
(New Relationship).
- Select whether you want to create a relationship with a person or business
client/association..
The search is opened.
Note: You can also select a record from your favorites or recently viewed customers. - Double-click on the desired record in the search results to add the relationship.
- Determine whether a reciprocal relationship should be added.
The Do you want to create a reciprocal relationship? check box is enabled by default. For example, if you select the relationship "Employee", the reciprocal relationship is "Employer".
- You can enter search criteria under Relationship level.
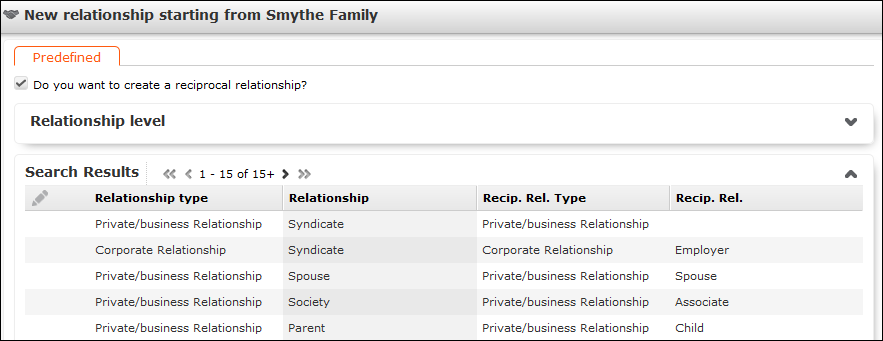
- Double-click on a relationship to select it. The relationship is added and the relationship chart is displayed, see Relationship Chart and Stake Structures.
Adding Stakes
A stake is a type of relationship.
To add information on a stake held by a customer:
- Switch to the desired customer (person, contact person, company, association).
- Switch to the Stake Structures tab.
- Click on
(New Stake Structure)
- Choose the type of customer the stake is held in. The search is opened.Note: You can also select a record from your favorites.
- Double-click on the customer in the list of results you want to enter the ownership
information for.
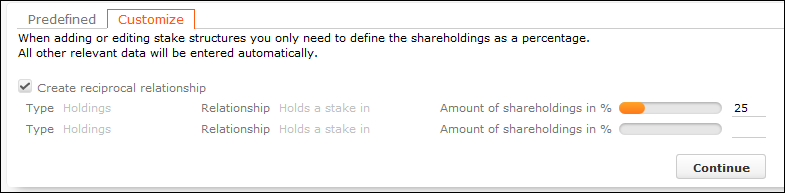
- Enter the stake as a percentage. Enter the stake held by the source customer in the target customer in the first row. Enter the stake held by the target customer in the source customer in the second row.
- Click on Continue. The stakes are added.
Stakes can be displayed in a chart, see Relationship Chart and Stake Structures.
Note: This chart only displays information on the stakes held by the customer, not on stakes held in the customer by others.
Displaying, Editing and Deleting Relationships and Stakes
You can display, edit and delete relationships and stakes.
You can edit relationships in the relationship network, see Relationship Network.
To edit a relationship:
- Switch to the desired customer (person, contact person, company, association).
- Switch to the Relationship Chart tab.
- Click on the node in the graph corresponding to the record whose relationship you want to edit.
- Move your cursor over a relationship in the list on the left.
The context menu and quick view icons are displayed:
- Select Delete from the desired relationship’s context
menu to delete it. Select
 > Refresh Working Area to refresh the relationship chart.
 - Select Edit Relationship from the desired relationship’s context menu to edit the relationship.
- Select Delete from the desired relationship’s context
menu to delete it. Select
To edit stakes:
- Switch to the desired customer (person, contact person, company, association).
- Switch to the Stake Structures tab.
- Click on
 (Edit Stakes).
All stakeholdings defined for the customer are displayed.
- Edit the stake or select Delete from the context menu to delete it.
Relationship Chart and Stake Structures
The relationship chart displays the relationship network for persons, companies and associations, see Relationship Network.
The Stake Structures tab displays ownership stakes held by the current customer.
To display the relationship chart or information on stakes:
- Switch to the desired customer (person,contact person, company, association).
- Switch to the Relationship Chart or Stake Structures tab. The chart is displayed.
-
Relationship Chart:
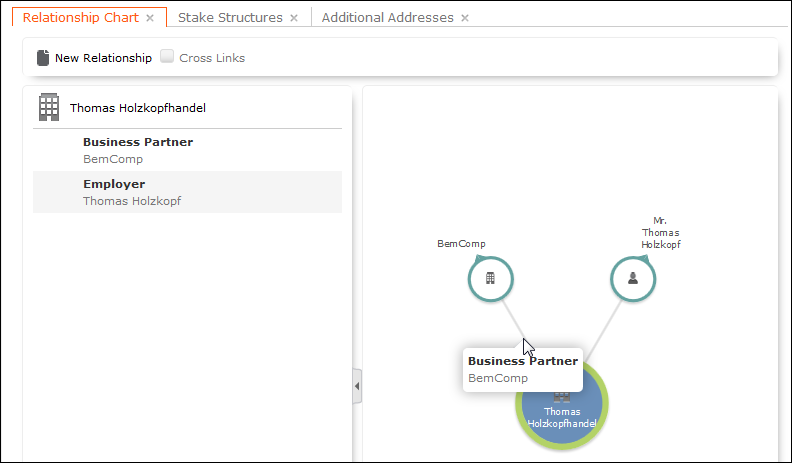
The current record is displayed in the center. All company and person records that are linked to the current record via a relationship are displayed surrounding the current record.
Click on
(New Relationship) to add a new relationship, see
Adding Relationships.The relationships stored for the currently selected record are displayed on the left. Select Edit Relationship from the context menu to edit the relationship.
-
Stake Structures:
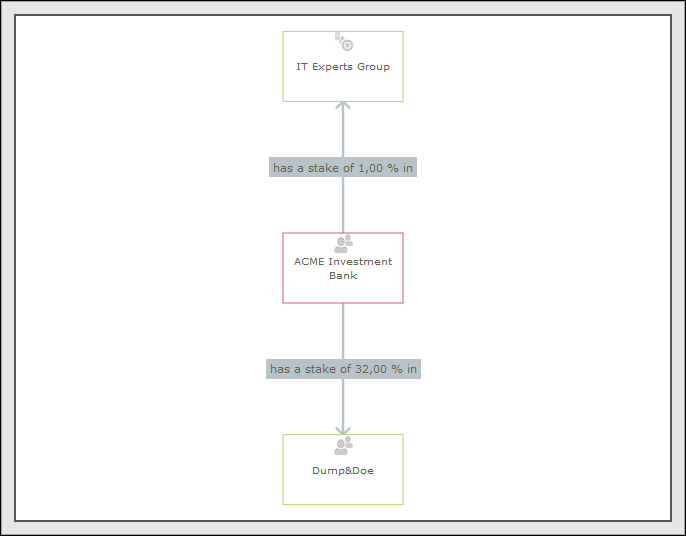
The current record is displayed in the center. The customers the current customer holds a stake in are displayed surrounding the current record. The ownership percentage is displayed over the connecting lines.
- You can drag customers (nodes) in the chart to a new position.
- Click on a customer to open the customer record.
- Hover the mouse cursor over a customer to display additional information on the customer (e.g. their ABC classification).
- Click on (New Stake) to add a new
record, see Adding Stakes.
- Click on (Edit Stake
Structures) to edit existing records, see Displaying, Editing and Deleting Relationships and Stakes.
Relationship Network
The relationship network displays all a company or person’s relationships with other companies and persons.
Multiple levels can be displayed in the relationship network.
- The current record (company or person) is displayed at the center (large node with a green border). All records that are linked to the current record via a relationship are displayed surrounding the current record. Reciprocal relationships are not displayed.
- Move the mouse cursor over a connecting line to display the type of relationship.
- Click on
 on the left to open the side bar containing a list of the
relationships stored for the current record (note that any predefined filters are
also applied to this list). Open the context menu for an entry in the list and select
the person or company’s name to display the company or person in the quick view.
Click on
on the left to open the side bar containing a list of the
relationships stored for the current record (note that any predefined filters are
also applied to this list). Open the context menu for an entry in the list and select
the person or company’s name to display the company or person in the quick view.
Click on  to close the side bar.
 - Click on a node in the tree to select that company or person. The list of relationships on the left is updated to display the relationships defined for the selected company or person.
- Double-click on a node to open the corresponding record.
- Click again on a selected node to hide or display all relationships defined with that company or person. The nodes are color-coded according to their level in the network (i.e. how many degrees of separation lie between the node and the current record).
- Select a node and click on
New Relationship to add a new relationship for the selected
company or person, see Adding Relationships.
The relationship tree is refreshed once the relationship has been added.
- Click on a node and hold down the mouse button to open the company or person in the quick view. You can access the record’s context menu from the quick view.
- Use your mouse wheel to zoom.
- You can the scroll the view and reposition nodes in the network:
- Click anywhere in the network where the
 mouse
cursor is displayed to scroll in the network.
mouse
cursor is displayed to scroll in the network. - Click on a node and then click on it again while holding down
the mouse button (the mouse cursor is displayed as
 ) to
move the node. Any child nodes are also moved.
) to
move the node. Any child nodes are also moved.
- Click anywhere in the network where the
- If the current record has relationships with more than 10 records
(by default), the
 and
and  nodes are displayed. Click on these nodes to
display additional records that relationships have been defined with.
nodes are displayed. Click on these nodes to
display additional records that relationships have been defined with. - Enable the Cross Links option to prevent the same record
being displayed multiple times in multiple nodes (when more than one company or
person is related to the same company/person). Each company/person is only displayed
once and a dotted line indicates the additional relationships with a node.
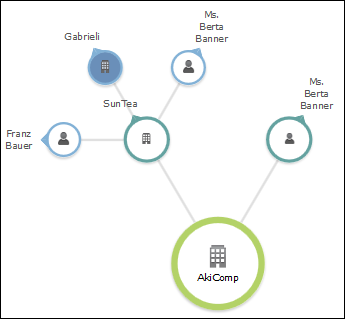
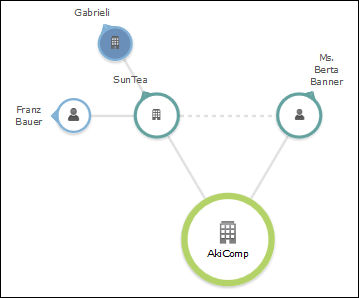
Example:If a relationship is defined between a person and two companies, and a relationship has also been defined between these two companies, the person is displayed twice, once for the relationship with each company. If the Cross Links option is enabled, the person is only displayed once and a dotted line links the second company to the person.
|
Cross Links disabled |
Cross Links enabled |
Defining Relationship Levels
The relationships that are available for selection are defined in the Relationship Level info area.
To add a relationship level record:
- Select
 (Settings) >
Maintenance > Relationship
level.
(Settings) >
Maintenance > Relationship
level. - Click on Start Search and then on
(New).
- Enter the Relationship, Relationship type, Recip. Rel. (reciprocal relationship) and Recip. Rel. Type (reciprocal relationship type).
- Save the record. The defined relationship can then be selected when adding relationships.
Company Hierarchy
The company hierarchy displays an overview of a company or association’s corporate relationships (parents, subsidiaries, holdings) with other companies/associations.
The Company Hierarchy tab is only available for companies/associations.

- Click on
 /
/ to show/hide the contact persons at a company.
 - Click on New Relationship to add a new
relationship, see Adding Relationships.
You can only add relationships with business clients or associations, and the relationship type is always set to "Corporate Relationship".
- Click on the name of a company or person in the chart to open the company or person record.
Affiliation View
By default, only data added for the current customer is displayed. The affiliation view allows you to display data concerning other customers that are affiliated with to the current customer. For example, you can display activities for both the current person and all related persons (e.g. household members) at once.
Click ![]() > Affiliation View to enable the association view globally (indicated by a tick in the check
box). Aurea CRM web stores this setting between sessions.
> Affiliation View to enable the association view globally (indicated by a tick in the check
box). Aurea CRM web stores this setting between sessions.
Example:
Activities displayed for a customer in the default view:

Activities displayed for a customer in the association view, including activities added for all association members.

If configured accordingly, the affiliation view provides an overview of the customer records (e.g. the company (Name field) or person (First Name and Last Name fields) an activity belongs to).
The affiliation view is available in lists, queries and the tree view.
The affiliation view is available in the following areas: transactions, revenue, activities, interests, documents, product overview, incidents, contracts/bundles, product roles, contract/bundle roles, contact persons.
The affiliation view only displays child data stored for records that are directly linked to the current record. Indirect relationships are not included. For example, the affiliation view can only include records added for immediate subsidiaries, but not records added for the immediate subsidiaries' subsidiaries.
If you define which other customers are included the affiliation view of a customer, these settings are visible to all users.
To determine which customers are displayed in the affiliation view:
- Switch to the desired customer.
- Click on
 (Select Affiliates).
All customers where a relationship with the current customer has been defined are displayed graphically in a relationship network, see Relationship Network.
Move the mouse cursor over a connecting line to display the type of relationship.
- Click on a node to select it and click on Add to Affiliation
or Remove from Affiliation to define whether the corresponding
record is an affiliate of the current customer.
You can select more than one node (Ctrl + Click).
Affiliates are highlighted in orange. Hover the mouse cursor over a node to display whether that company or person is defined as an affiliate.
- Click on Close to close the view.
Select Close & Refresh to close the view and refresh the display to include data stored for the selected affiliates.
 , records stored for association members
are included in the results if the Association View check box is
enabled in the main menu.
, records stored for association members
are included in the results if the Association View check box is
enabled in the main menu.Additional Addresses
You can add additional addresses for customer, e.g. the customer’s second home.
To add an additional address:
- Switch to the desired customer (company, person, contact person on the Contact Person node in the company tree).
- Click on
(New) on the Additional Addresses
tab.
- Select the additional address’s Address Type.Note: You can only add one additional address per account and Address type.
- Enter the address and additional contact information.
- Save the record.
Interests
You can store information on a customer’s interests (e.g. hobbies or whether they wish to receive certain newsletters). Interests may also useful when meeting a business partners, in order to strike up a conversation.
Which interests are available is defined by your administrator.
To assign interests:
- Switch to the desired customer.
- Click on Interests in the tree.
- Click on
 (Manage Interests) in the results
list. A dialog opens.
(Manage Interests) in the results
list. A dialog opens.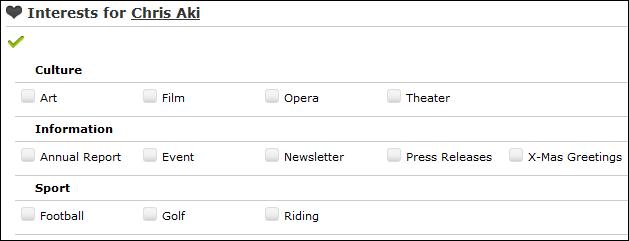
- Enable the corresponding check boxes to assign interests to the customer.
- Save the record.
Fact Sheet
The fact sheet contains an overview of the information stored for a customer and is suitable for printing.
To generate the fact sheet:
- Switch to the desired customer.
- Click on
 (Fact Sheet) in the header. The
fact sheet is generated.Note: Your browser’s popup blocker may prevent the fact sheet from being displayed.
(Fact Sheet) in the header. The
fact sheet is generated.Note: Your browser’s popup blocker may prevent the fact sheet from being displayed. - Click on
 to print the fact sheet.