Configuring Logins
Learn how to configure logins.
Select Configure Login from the context menu in the Rep info area to link a rep record to an Aurea CRM login for the current station. Use the Central Login Configuration info area to define logins for other stations, see Central Login Configuration.
By default, the Configure Login context menu entry is only available for a user's own rep record (except for the SU), i.e. a user can only create/update/delete his own login (US) record. (Only the Password (US:38) and Encrypted Password (US:47) fields can be updated.)
Access to all US records is controlled via the CRM process 1.5.2.2.1.6. "Manage Logins" (CRM process ID 70000310).
The "Manage Logins" CRM process is disabled by default.
However, access to the Configuration module (mmcfg.exe) needs to be controlled via module access rights.
To configure the Aurea CRM login for a rep:
- Switch to the desired record in the Rep info area.
- Select Configure Login from the context menu.
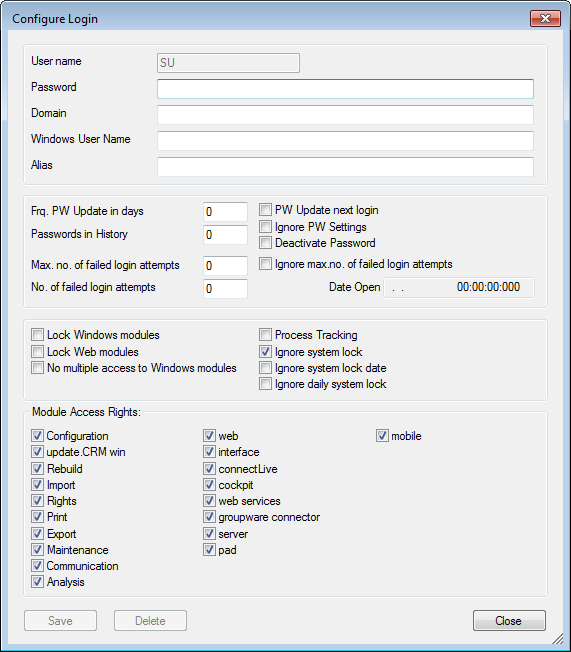
- Enter the Name used to log on to Aurea CRM (login name).
The name is limited to a maximum of eight characters and may not contain spaces or special characters. You may not use reserved device names (COM2, LTP1 etc.) as login names.
- Enter a login password for the user in the Password field.
The maximum password length is 128 characters. The password is saved as it is entered (i.e. case-sensitive).
Passwords entered in the Password field (US:38) are encrypted upon saving the record. To import an already encrypted password, use the Encrypted Password field (US:47).
For more information on password security, see Password Security.
- Enter the desired password settings, see Password Settings.
- Assign the desired module access rights and configure lock and process tracking settings, see Module Access Rights, System Locks and Process Tracking.
- Click Save.
A user directory (and the corresponding sub-directories) is added with the same name as the user's login name. The user settings are saved in the Login (US) info area.
- Click Close to return to the Rep info area.
When deleting a rep record (ID), all linked US records are deleted as well (except for the SU). The SL and OS (BTB only) tables are deleted as well. The respective user directory is not deleted.