Login Roles
Depending on their current tasks, employees often operate in various roles, e.g. in some cases as a sales rep, in other situations as a support agent. Some employees may occasionally undertake administrative tasks in the system.
The Login Role info area allows you to define roles for these various situations. You can define a separate CRM process configuration for each role, restricting the CRM processes to only those immediately necessary. This requires a valid system-wide CRM process configuration, see Configuring CRM Processes.
You can assign up to 16 roles to Aurea CRM users, and users can select a role when logging on to the system, see Rep Roles. Each role can be assigned different access rights, desktop formats and CRM process configurations.
To define a login role:
- Switch to the Login Role level in the Rights module (using the Info menu or icon bar).
- Click on
 (New).
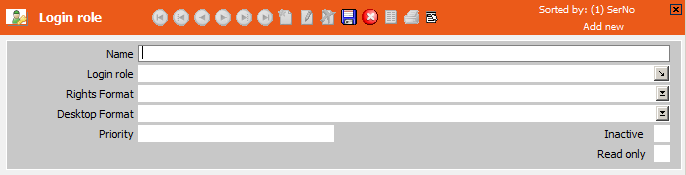
- Enter a Name for the role. This name must be specified when
using the
--roleparameter, see General Aurea CRM Parameters. - Enter a name for the login role in the Login role field. This
field accesses a variable catalog, allowing you to enter role names in multiple
languages, see Catalogs. The login
role name is displayed when selecting a role at logon, see Logging on to Aurea
CRM in the Aurea CRM win User Manual.Note: Each catalog value in the Login role catalog can only be used by a single login role record.
- Use the Rights Format field to assign an access rights format to the login role, see Rights.
- Use the Desktop Format field to assign a desktop format to the login role, see Desktop in the Aurea CRM win Administrator Guide.
- Enter an integer value in the Priority field. The priority determines the order in which rights, desktop formats and CRM process configurations are applied if a rep logs on using several roles at once.
- Enable the Inactive check box to disable a login role without deleting the record. Inactive login roles are not loaded or displayed for selection when logging in.
- Use the Read only check box to define a role that only grants
read access to the available CRM processes (i.e. those processes for which
Allow is selected in the Lock
field).
For more information on read only roles in Aurea CRM web, see Aurea CRM web Administrator Guide.
- Save the record.
- Select CRM Process configuration (login role) from the context menu to assign a specific CRM process configuration to the role, see CRM Process Configuration for Login Roles.
The login roles defined here must be assigned to the desired reps in the Rep Role info area, see Rep Roles.
If a rep logs on to Aurea CRM using one or more roles, the settings in the system-wide CRM process configuration are combined with the CRM process configuration(s) assigned to the selected role(s): The system-wide CRM process configuration has the highest priority, followed by role-specific CRM process configurations according to the Priority entered in the login role records. Exception: If access is granted to a CRM process for a role (Allow option), access can only be denied to the CRM process using the Deny option in a child role (higher Priority). Overridable locks are ignored in this case.
The access rights and desktop formats assigned to roles are also combined with the access rights and desktop formats assigned to stations, groups and reps, see Rights Hierarchy and Extended Desktops in the Aurea CRM win Administrator Guide.
The roles cache (i.e. the login role records) is refreshed every 60 seconds.