Viewing and changing a user's settings
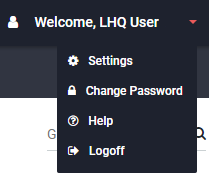
To go to the Settings page, on the Toolbar, click Welcome, <user_name> > Settings.
To view details for a profile, do one of the following:
- To view details for your profile, click the details command in the Your Profile section.
- To view details for another user, click the user's name in the Other Users section.
- To change the settings for yourself or another user, on the User Details page, click the edit command.
To change a user's settings, you must have the appropriate administrative privileges.

- To change basic information (name, password, and so on), in the Details section, type your changes in the appropriate fields.
- First and Last Name: Edit the names in those fields.
- Email:
- Click the Change button for the Email setting.
- On the Change Email page, follow the instructions to type in the new email twice.
- Press the Request Change button.
- Login: Edit the log in name.
- Password:
- Click the Change button.
- On the Change Password page, read the instructions.
- Click the Confirm button.
Access and permissions
- Organization - A user may belong to two or more organizations. To change the user's settings as a member of a different organization, click the Organization drop-down list and then choose the organization.
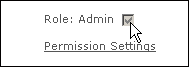
- Role: Admin - To change the user's administrator status, select or clear the Admin box.
Email marketing or email test
- To allow access to Email Marketing and/or Email Test, in the Email Marketing tab, select or clear Marketing and Deliverability. Marketing refers to Email Marketing, and Deliverability refers to Email Test.
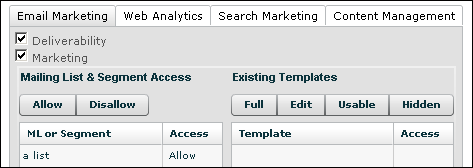
- To allow or disallow mailing lists or segments, click an item in the list, and then click the Allow or Disallow button.
- To set the access for templates, click a template in Existing Templates list, and then click Full, Edit, Usable, or Hidden.
- Full: You can edit or delete the template.
- Edit: You can edit the template and use it to create a message.
- Usable: You can use the template to create a message but you cannot edit the existing template content.
- Hidden: You will not see this template as a choice.
- To apply your choices in the Email Marketing tab, click the Apply button.
Web Analytics
To allow access to Web Analytics, click the tab labeled with the feature you want, and then select Grant Access.
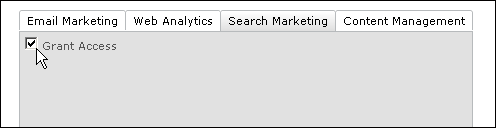
When you have finished choosing edit options, click the Save button.
Content Management
- To view Content Management options, click the Content Management tab.
- To allow access to menu items in Content Management, in the CMS Admin Access section, click one or more items (to select more than one, press CTRL key while you click each one). This allows user access to any of the menu items in Content Management. To allow operations such as delete, modify, and so on, click the Permission Settings command. These settings are explained below.
- To allow access to pages in Content Management, in the Webpage Access section, click one or more pages (to select more than one, press CTRL key while you click each one). For example, if the user is in the HR department and is the only person who should have permission to modify the My Company page, you can grant permission to that page here, and not grant the same permission to anyone else.
Changing user permissions
For each of the available features (Email Marketing, Content Management), there are various operations that you allow or deny access to for a user.
For each of the four available features (Email Marketing, Web Analytics, Search Marketing, Content Management), there are various operations that you allow or deny access to for a user.
Changing a user's access to operations for a feature
- Click the Permission Settings command.
- In the dialog that appears, click the tab for the feature whose permissions you want to set.
- Select or clear the specific operations you want to grant permission for. To select all the operations in a section, click Select All for that section.
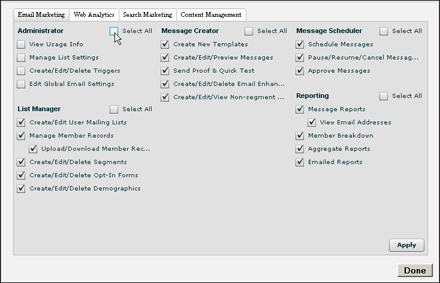
- To apply the settings, click the Apply button.
- Click the Done button.
Creating a new user for an organization
- On the Organization Details page in the Members section, click Create User.
- On the Create User page, type or select the requested information.
Adding an existing user to an organization
- On the Organization Details page in the Members section, click Add Existing User.

- On the Add User page, select the user(s) you want to add and click the Add User button.
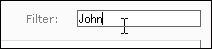
If there are a lot of users, you can narrow down the list. Type the first few letters of the name of the user of you want in the Filter box, and then press the Enter key.