Getting started with advanced landing pages setup
Before you can use landing pages, you must choose domains or sub-domains for them (we recommend that you read Understanding Domains and Subdomains topic to better understand these choices). If you want landing page metrics to show up in your web analytics, you must set that up as well. The steps below describe how to do both.
To go to the Landing Pages tab:
- In the upper right corner of the screen, click Settings.
- On the Settings page, click the name of the organization you want to apply your landing pages to.

- Click the edit command.

- On the Edit Organization page, click the Landing Pages tab.

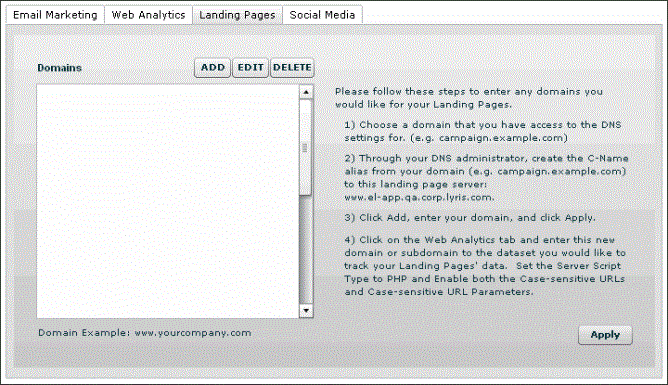
The Landing Pages contains an area for the list of domains, buttons for adding, editing and deleting domains, and instructions for setting up a custom domain.
Setting up domains
Under Understanding Domains and Sub-domains, you will see that a default domain has been created for you. This consists of your account "short name" (displayed in the Details section at the top of the page), plus hqcampaign.com.
Do one of the following:
Option 1: If you are satisfied with the default domain name
Click the Apply button, and then click the Update button at the bottom of the screen.
If you want to track landing page metrics in your web analytics reports, you must choose further settings in the Web Analytics tab. Follow the instructions in the next section for Steps 4.a to 4.f.
Option 2: If you want a custom domain name
This will normally be the case if you own your Web site domain (that is, www.example.com), and want your landing pages to be a sub-domain to maintain a consistent brand (that is, campaign.example.com).
Follow the steps listed in the right side of the tab:
- Choose a domain that you can access the DNS settings for (for example,
campaign.example.com). - Instruct your DNS administrator to create the C-Name alias from your domain (for example,
campaign.example.com) to the landing page server listed in step 2 of the onscreen instructions. - Click the Add button, type your domain, and then click the Apply button.
- This step requires further setup in the Web Analytics tab.
- Click the Web Analytics tab.
- To add a domain, click Add. To add a sub-domain, select an existing domain and then click Add Sub-Domain.
- Click the Server Scripting Type drop-down list, and choose PHP.
- Scroll down to the Case-sensitive URLs? option and select Enabled.
- For the Case-Sensitive URLUniform Resource Locator. An Internet address, as well as a standard method of naming files on the Web. A URL begins with a protocol name (such as http), followed by a colon and two forward slashes(//). Next comes the name of the internet server that the file is stored on, followed by directories that hold the file, separated by forward slashes(/). The filename comes last, as shown in the following example: http://www.mycompany.com/whatsnew.htm Parameters? option, select Enabled.
- Click the Apply button, and then the Update button.