Export Discovery Archives
After Export Manager is installed on your local machine, you can launch Export Manager and use it to export Discovery Archives you created in the Archive web interface.
 Step 1: Launch Export Manager & view available archives:
- Launch Export Manager using Start > Export Manager > Export Manager or double-click on the Export Manager desktop icon.
- On the AMS Export Manager Login screen, enter the user ID and password for your Email Archive Reviewer account. Click Next.
IMPORTANT
Use the same user ID and password that you used to generate the Discovery Archives that you want to export.
- Export Manager displays all archives available for export.

AMS Export Manager
You can view and export archives that you and others in your Reviewer Group have created. Export Manager displays the following information for each archive:
- Archive Name: The name of the archive, as provided by the reviewer who created the archive using the Archive web interface.
- When Reviewers name Discovery archives, it is a good practice to prefix the name with the content type (email or IM) so it is easy to differentiate between the two in the Archive web interface and Export Manager.
- Status: The export status of the archive:
- New: Indicates that the archive is available for you to export, but you have not yet downloaded it to a file.
- Partial: Indicates that you partially exported the archive. You can select a partially exported archive and restart the export to finish creating the file.
- Completed: Indicates that you have successfully exported this archive to a file.
- CompleteWithError: Indicates this export was completed, but some error occurred in the processing.
- Exported Messages: The number of messages that have been exported to the file.
- For New archives, Exported Messages is always zero, because no messages have been exported.
- For New archives, Exported Messages is always zero, because no messages have been exported.
- Percent Completion: This field displays the current progress of the export. Click Refresh to load updated values.
- Reviewer Group: The name of the Reviewer Group to which this archive belongs.
- Check or uncheck the Archive Filters check boxes to show or hide archives that are:
- New: Displays all archives that are available for export but have not yet been exported.
- Partial: Displays all archives that have been partially exported. You can select a partially exported archive and restart the export to finish creating the export file.
- Completed: Displays all archives that have been completely exported.
- CompleteWithError: Displays all archives that have been completely exported but encountered errors in the export process.
- Refresh: Click this button to refresh the page with updated values.
- Select output format Select either PST or EML to select the format of the exported file.
NOTE
Once an archive is exported in one format, it cannot be exported in a different format. To export the messages in another format, create a new archive for export.
Once the available archives are displayed, an archive can be selected for export.
 Step 2: Export Discovery Archives to PST or EML file:
- From the list of available archives, click on the archive’s name to highlight it and select it for export.
NOTE
If you do not see a recent archive in the list, click Refresh. This updates the list to include any archives completed since the last time you launched Export Manager. You can then select the archive and export it.
- Select the desired output format, by clicking on either the PST or EML radio buttons. Click Next.
- If
PSTis selected, Export Manager displays the PST Options page.
NOTE
Once an archive is exported in one format, it cannot be exported in a different format. To export the messages in another format, create a new archive for export.

AMS Export Manager PST Options
- Export Manager populates Outlook Display Name by default with the name of the archive as provided by the Reviewer who created it. You can type a new name of up to 255 characters in the field or accept the default. This will be the name of the Outlook mail folder that contains the exported messages.
- Export Manager sets the File Name and location by default. You can change the file name or export location by clicking Browse. You can save the PST file to your local machine or network. You may want to copy this location so you can easily locate the file when the export has completed
- Set the Max PST File Size. You can choose from:
- DVD 4.5 GB: Create a PST file that you can store on a 4.5 GB DVD.
- CD 650 MB: Create a PST file that you can store on a 650 MB CD.
- Custom: Create a PST file of a custom maximum size.
- By default, the Free Disk Space Margin is set to 500 MB. You can increase this size by typing a new value in the field or setting the MB label to GB. The Free Disk Space Margin indicates the amount of space, above the Max PST File Size, that your computer must have free for the PST file to export correctly.
- (Optional) To set a password that will be required to open the PST file, enter a PST password of up to 15 characters.
- (Optional) To set a password that will be required to open the PST file, enter a PST password of up to 15 characters.
- If
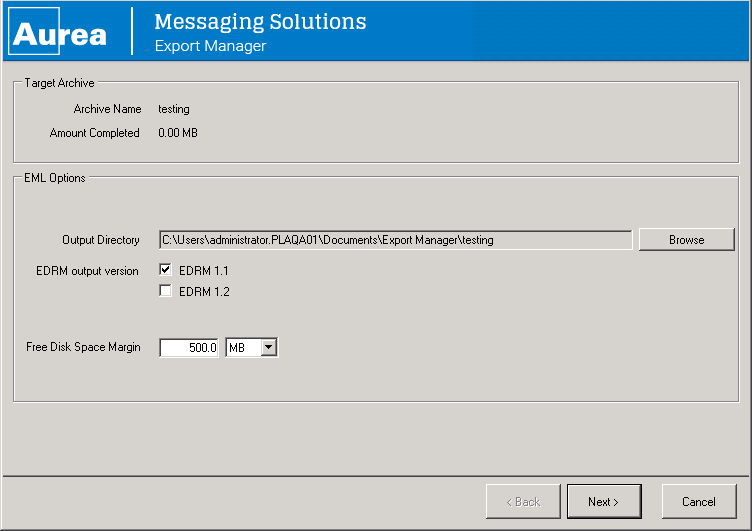
EMLis selected, Export Manager displays the EML Options page.

AMS Export Manager EML Options
- Export Manager sets the File Name and location by default. You can change the export location by clicking Browse.
The directory you select must be empty, and unique to this export. This directory may be on your local machine or on a network. You may want to copy this location, so you can easily locate the file when the export has completed
- Select EDRM output version, either
EDRM 1.1orEDRM 1.2 - Enter the Free Disk Space Margin, the default is 500MB.
You can increase this size by typing a new value in the field or setting the MB label to
GB. The Free Disk Space Margin indicates the amount of space, that your computer must have free for the EML file to export correctly. - Click Next
- Export Manager exports the archive and provides status messages about the number of messages exported and the number of messages remaining. If the archive contains many messages, Export Manager sometimes downloads the archive from multiple chunks.
If the archive does not completely export during this session, Export Manager marks the archive status as Partial, and you can restart the export the next time you log into Export Manager.
When the export is complete, the Next button becomes active. Click Next.
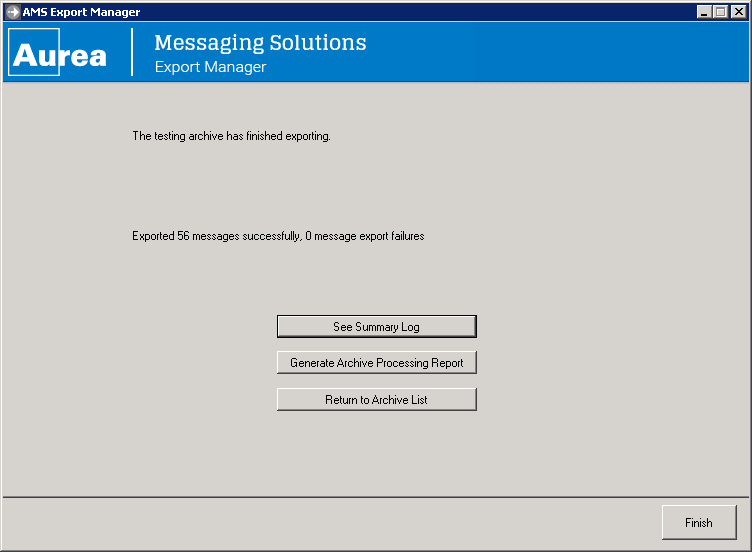
- When Export Manager has finished exporting the archive, the following screen appears:

AMS Export Manager Summary
- Click the See Summary Log button to view the Export Log. Click the X to close the log window.
- Click the Generate Archive Processing Report button to generate a report.
A pop-up appears containing the path to the location of the report. Make a note of the path so you can view it later. Click OK to close the pop-up.
- To export another archive, click Return to Archive List.
- To close Export Manager, click Finish.