Configuring QR Code Scanning in EditView and NewView for any Type of QR Code
Learn how to configure QR code scanning in editview and newview.
The following example procedures show the following:
- Adding a button to scan and edit (EditView) the First Name and Last Name fields in the field control mask of the KP infoarea. See, QR Code Scanning to Add a Person in Company in EditView.
- Adding a button to scan and add a new Person (EditView) to the Person Info area using plain text in the QR Code. See, QR Code scanning plain text to add a person in EditView.
- Adding a button to scan and add a new contact person (NewView) to the Person in Company (KP) info area. See, Configuring QR Code Scanning for Business Cards.
QR Code Scanning to Add a Person in Company in EditView
Perform the following steps in the CRM.Designer to add a person in EditView by scanning a QR Code:
- Open the All Info Areas page and select KP (Person in Company) info area. The Info Area KP page displays.
- Select the KP field group for the update.tablet configuration. The Field Control For
‘KP’ page displays. Note: In this sample configuration we use the Person in Company (KP) info area. But this is applicable to any infoarea.
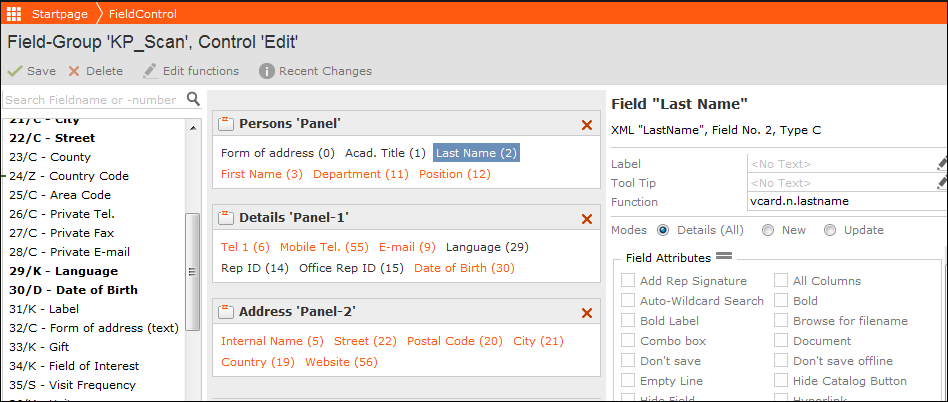
- Select the Details Control. Set up the panels as shown in the following screen shot.
Select the field First Name (3).
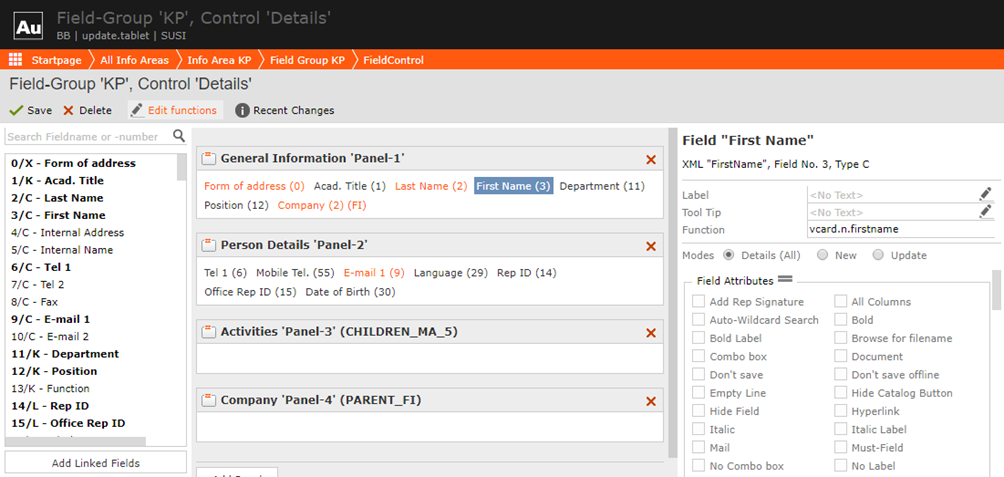
- Enter the value vcard.n.firstname for the Function attribute of the Field “First Name”.
- Select Last Name (2) and enter the value vcard.n.lastname for the Function attribute of the Field “Last Name”.
- Click Save.
- Go to the Start Page and click Expands under Info Area. The All Expands Page displays.
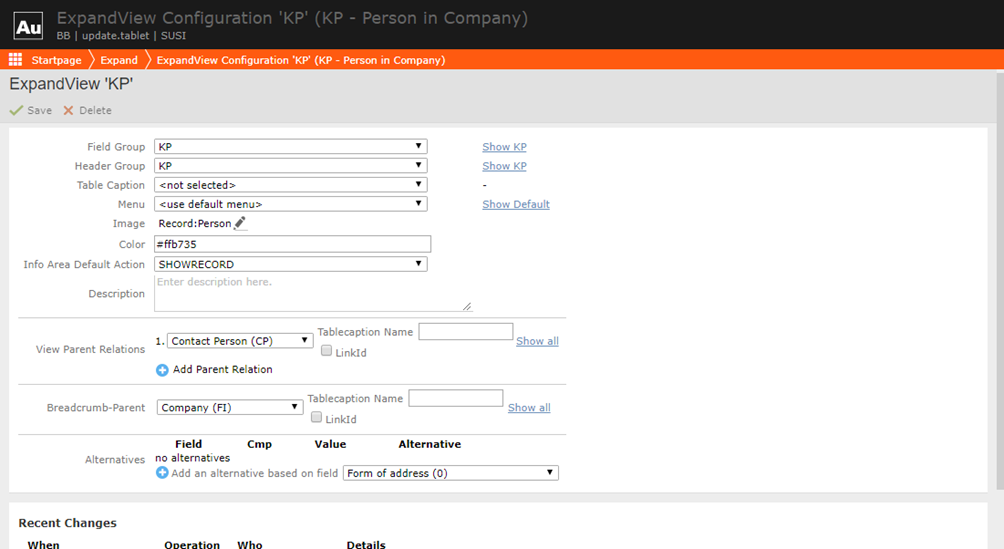
- Select KP info area and copy the default configuration. The ExpandView ‘KP’ page displays.
- Set up the ExpandView as shown in the screenshot below:
- Click Save. Go to the Start Page.
- Add some buttons to Scan the Person details using the QR Code.
- Add a new button, Scan Edit and copy from the Add Person button. The Button ‘Scan Edit’ page displays.
- Select the EditView action template and open the action dialog. The Action for Button Scan Edit dialog displays.
- Configure the keyboardWithScannedSuggestion argument with CONTROLS as the input value.
Click Apply. See the screenshot below:

- Click Save and go to the Start Page.
- Add the button to the expand view header. Click Headers. The Headers page displays.
- Open the KP header group. The Header Group KP for Info Area Person in Company page opens.
- Select Search expand option. The Header Search, Header Group 'KP' page opens.
- Select Scan Edit button from the drop-down list in the Buttons pane. Click + to
add the button to the Header. See the screenshot below:

- Click Save. The configured person is now able to scan and edit the Person in Company details using the QR Code.
QR Code scanning plain text to add a person in EditView
Perform the following steps in the CRM.Designer to add a person in EditView by scanning a QR Code:
- Open the All Info Areas page and select PE (Person) info area. The Info Area PE page displays.
- Add a new field group PE QR Scan for the update.tablet configuration. The Field Controls
for 'PE QR Scan’ page displays. Note: Note: In this sample configuration we use the Person (PE) info area. But this is applicable to any infoarea.
- Select the Edit Control. Set up the panels as shown in the following screen shot. Select
the field First Name (4).
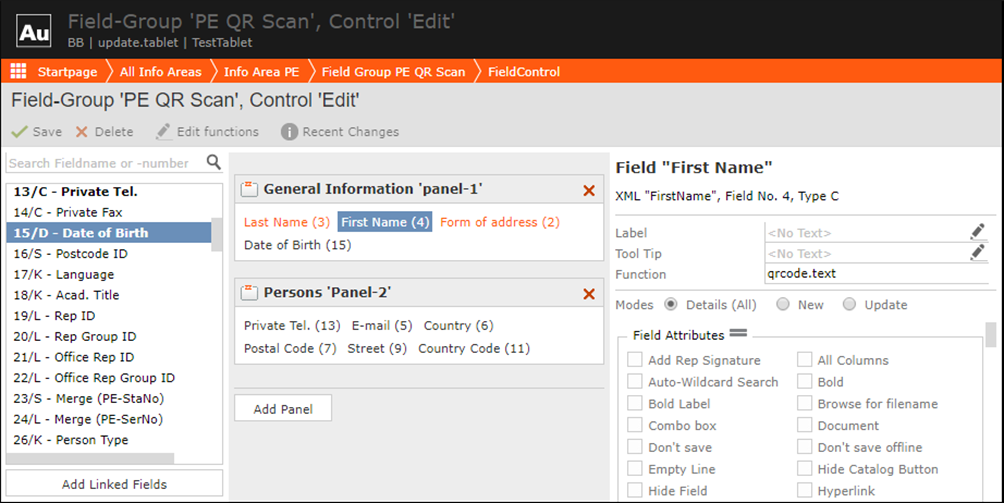
- Enter the value qrcode.text for the Function attribute of the Field “First Name”.
- Click Save.
- Go to the Start Page and click Expands under Info Area. The All Expands Page displays.
- Create new expand configuration PE_Scan for the Person (PE) info area and copy the default configuration.
- Open the PE_Scan expand view. The ExpandView ‘PE_Scan’ page displays.
- Set up the ExpandView as shown in the screenshot below:

- Click Save. Go to the Start Page.
- Add a button ScanPlainTextPerson to and copy from the Edit Person button.
- Open the ScanPlainTextPerson button. The Button ‘Scan Edit’ page displays.
- Open the Action template. The Action for Button ScanPlainTextPerson dialog displays. Select the EditView action template.
- Configure the keyboardWithScannedSuggestion argument with CONTROLS as the input value.
Click Apply. See the screenshot below:

- Click Save and go to the Start Page.
- Add the button to the expand view header. Click Headers. The Headers page displays.

- Open the PE QR Scan header group. The Header Group PE QR Scan for Infoarea Person (PE)
page opens.

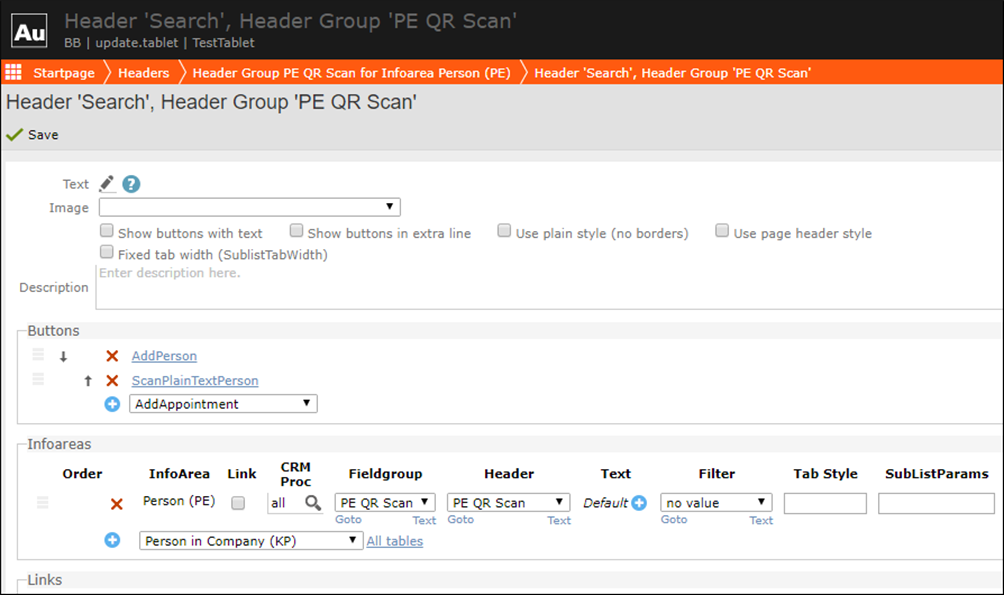
- Select Search expand option. The Header Search, Header Group 'PE QR Scan' page opens.
- Select ScanPlainTextPerson button from the drop-down list in the Buttons pane. Click
+ to add the button to the Header. See the screenshot below:
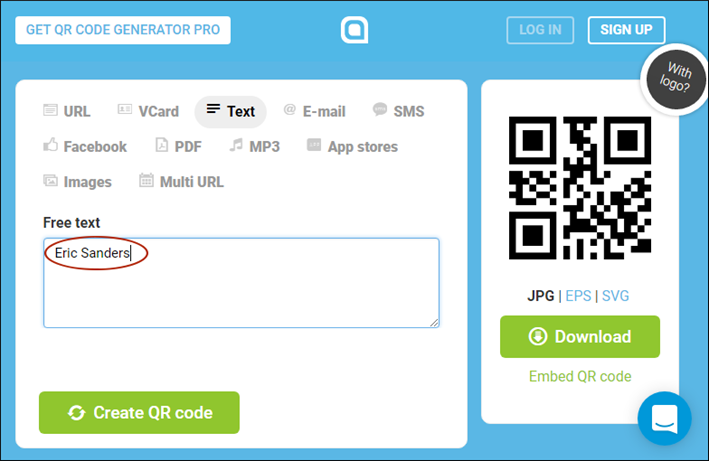
- Click Save. The Configured user is now able to scan and edit Person details from a plain text QR Code.
- The following screenshot shows the QR Code for a name in plain text.
Configuring QR Code Scanning for Business Cards
The following example shows how to configure scanning business card to add a new a contact person (KP).
To configure the QR scan function to scan business cards to add a new a contact person (KP):
- Click on Infoareas on the start page and then switch to the Person in Company (KP) info area.
- Add a field group, e.g. KP scan:
- Assign the following Function names to the following
fields:
Field Function Last Name vcard.n.lastname First Name vcard.n.firstname Tel1 vcard.tel+work+voice Mobile Tel vcard.tel+cell E-Mail vcard.email+work Birth Date vcard.bday Internal Name vcard.org.0 Postal Code vcard.adr.postalcode Ort vcard.adr.locality Street vcard.adr.street Country vcard.adr.country Website vcard.url Department vcard.org Positition vcard.org.0 - Add an Expand configuration, e.g.
KP_Scan, to the KP info area and and assign the previously added field group, e.gKP_Scan: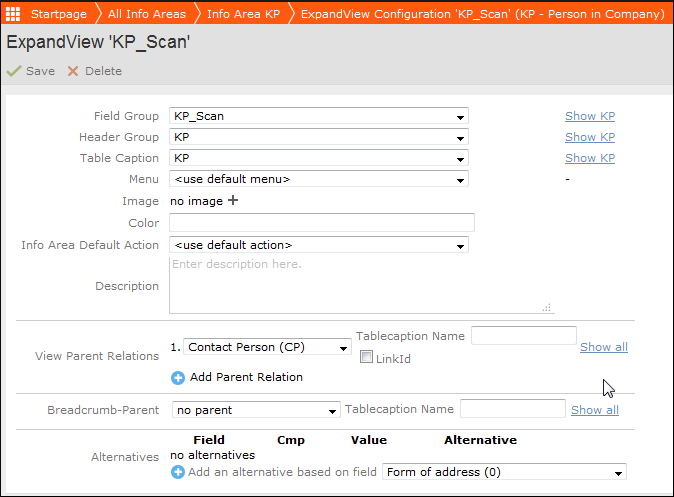
- Switch to the Buttons area (from the start page) and add a button
(e.g.
AddPerson_Scan), assign theNewViewaction and specify the following input arguments:Input Argument Value keyboardWithScannedSuggestions CONTROLS ConfigName KP_Scan LinkRecord Record - Add the button to the desired Expand header.