Customizing a Control
Learn how to customize controls.
To customize a control (e.g. the Details control from field group FI):
- Navigate to the desired field group (info area FI > field group
FI). - Open the definition of the desired control by clicking
 (Edit).
Or, if the control belongs to a parent configuration:
- Click
 (View) to view the control definition.
 - Click
 to
copy the control definition to your configuration.
to
copy the control definition to your configuration.
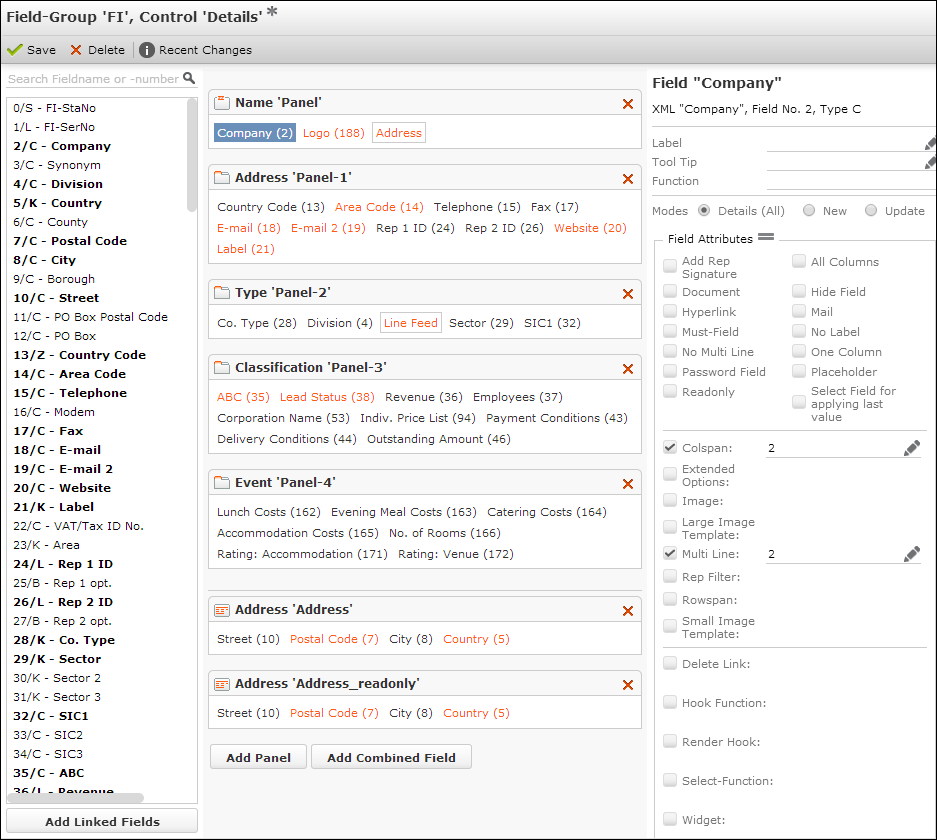
The Field Control Editor contains the following elements:
- Search field: Enter a field name or part of it or a field number to filter the field list or search for a specific field.
-
Field list: All fields of the selected info area are listed. Fields that
are currently included in the control are displayed bold. Clicking on such
a field highlights all occurrences of the field in the control definition (i.e.
the central part of the Field Control Editor).
Fields are displayed with their name, data type and unique ID. For further details, see Field Names and IDs and Data Types in Aurea CRM.
At the end of the field list non-field elements (caption, separator etc.) and combined fields you defined are listed. For further details, see Non-Field Elements and Add Combined Field.
- Panels/Fields/Sort Fields: Depending on the control (Details, MiniDetails, List etc.) all panels/fields/sort fields currently defined for this control are listed on the central part of the screen. For further details, see Configuring Panels.
- Attribute list: Depending on the control and the selected element (panel, field, sort field) all available settings and attributes are displayed on the right part of the screen.
You can resize the three parts of the screen by dragging the border with the mouse.
- Click
- Add, rearrange and remove fields using drag & drop. Use the Shift and Ctrl keys to
select multiple fields.
- Add fields by dragging them from the field list to the desired panel.
- Rearranging/moving fields: Change the field order inside a panel or drag fields to another panel.
- Use Ctrl+drag&drop to copy one or more fields from one panel to another. The field(s) are copied with all their attributes.
- Remove fields from a panel by pressing Del or by dragging them to the field list on the left part of the screen.
- You can modify the fields and sort fields defined for other controls (MiniDetails, List etc.) by drag & drop as well.
- You can add additional elements like separators, free text etc. to your panels. For further details, see Non-Field Elements.
- Click Add Combined Field to create "combined" fields e.g. displaying the address of a company or a person's full name (Details, MiniDetails only). For further details, see Add Combined Field.
- Click Add Linked Fields to add fields from linked info areas. For further details, see Add Linked Fields.
- Define additional settings for the control, the panel or field. For further details, see Control Attributes, Configuring Panels and Field Attributes.
- Click
 (Save) to save your changes.
To discard your changes, click
 (Delete): If the parent configuration contains a control
with the same name, your configuration reverts to this definition.
(Delete): If the parent configuration contains a control
with the same name, your configuration reverts to this definition.For Details controls changed by users inAurea CRM.Web, you can click
 to reset the control definition.
For further details, see Details Controls Extended by Users.
to reset the control definition.
For further details, see Details Controls Extended by Users.
To view the differences between control definitions from different configurations on one screen, use the Compare Field Controls option in Administration area. For further details, see Compare Field Controls.