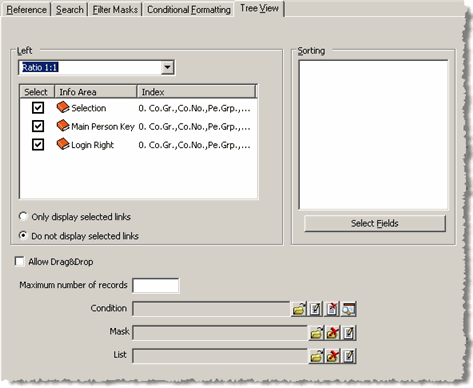
Tree View Tab
Use the Tree View tab to configure the info area's tree view.
The tree view depicts relationships between records (parent and child records are displayed), see Tree View in the User Manual.
To configure the tree view for an info area (e.g. Person):
- Select the desired info area under Available Info Areas.
- Switch to the Tree View tab.

- Select one of the following options:
- Only display selected links: Determines that the info areas for which the check box is enabled in the Select column are displayed in tree view.
- Do not display selected links: Determines that the info areas for which the check box is enabled in the Select column are not displayed in tree view.
- Select a ratio under Links to display the linked info areas.
Determine which info areas should be displayed in tree view.
Only records in the selected info areas are displayed when the tree view is opened (e.g. for a person record).
- Determine how records are displayed in the tree view:
- Select an info area under Available Info Areas (e.g. Activity).
- Switch to the Tree View tab.
- Click the Select Fields button under Sorting.
- Select (up to 5) fields used to sort records in the selected info area.
- Click on OK.
- Enable or disable the Allow
Drag&Drop
check box as desired. If the option is enabled, users can move records
in this info area between parent nodes (e.g. move an activity from one person to
another), as well as merge companies and persons.
If the check box is gray, the setting defined in the Configuration info area applies, see General Settings in the CRM.core Administrator Guide (Drag&Drop in Tree View option).
- Determine the Maximum number of records in this info area to be displayed in the tree view. If you leave the field empty, all records are displayed.
- Click on
 (Edit) next to the Condition
field to define a condition that determines which records should be
displayed in the tree view (e.g. only activities whose Status
is "Open"), Conditions in the User Manual.
 - Click on
 (Edit) next to the Mask or
List fields to load a mask or list to be used by records
selected in the tree view, see Mask Generator. Alternatively, click
on
  (Load) to load an existing format.
If you do not specify a mask, the custom mask is displayed. If you do not specify a list, the List option is unavailable from the context menu in the tree view.
Loading a list has no effect on 1:1 links, and the List option is always available.
If you have defined filter masks for the selected info area, the filter masks are used instead of the mask entered in the Mask field, see Filter Masks Tab.
- Configure any further info areas.
- Save the info area format.
In order for users to be able to access the tree view, you need to add a link to the Tree View level to either the icon bar or define a context menu for each info area, see Accessing the Tree View from the Context Menu.
Records are displayed using the references defined in the info area settings, see Reference Tab.
The text and background color of the root node is taken from the list bar colors in the current color scheme, see Configuring the Appearance of the Selected Record.