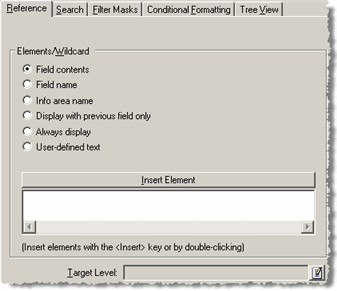
Reference Tab
Use the Reference tab to define references and target levels.

The reference is the text displayed for a record in link fields, links in the context menu and in e-mails, in summary index cards and in the tree view.
By default, the name of the level is displayed in the header (e.g. Company+Person). Level names can be changed on the Navigation tab, see Navigation Tab.
To display the reference in the header instead of the level name, disable the Show reference option on the Context Menu/Header tab in the user interface settings, see Context Menu/Header Tab. If a level contains several info areas, select the info area whose reference should be displayed in the header on the Header tab in the level properties, see Header Tab.
The default reference is displayed if you enable the Show reference option but have not defined a reference for the info areas in the level (e.g. "Company: <company name>" is displayed in the Company+Person level).
You can also define references directly in the data model using corresponding configuration entries, see Data Model in the CRM.core Administrator Guide (Reference Text option). The desktop settings take precedence over settings in the Configuration info area.
To define a reference:
- Select the desired info area under Available Info Areas.
- Switch to the Reference tab.
Add the desired elements under Elements/Wildcard. You can freely combine elements.
The following options are available:
- Field Content: Select this option and click on Insert Elements to open a list of fields in the selected info area. Enable the check box next to the field whose contents should be displayed in the reference and click on OK.
- Field Name: Select this option and click on Insert Elements to open a list of fields in the selected info area. Enable the check box next to the field whose name should be displayed in the reference and click on OK.
- Info Area Name: Select this option and click on Insert Elements to open a list of available info areas. Enable the check box next to the info area whose name should be displayed in the reference and click on OK.
-
Display with Previous Field Only: Select this option and
click on Insert Elements to add the "{<}" placeholder.
The next element added to the reference is then only displayed if the element
before the placeholder is not empty.
Example (Person in Company info area): "{2KP0*Form of address}{<} {2KP3*First Name} {2KP2*Last Name}": The space between the form of address and first name is only displayed for records containing a form of address.
-
Always Display: By default, text elements are only
displayed if the following element is not empty. Select this option and click on
Insert Elements to add the "{.}" placeholder. The next
element you add is then displayed even if the following element is empty.
Example: "{2KP}{.}: {2KP0*Form of address}{<} {2KP3*First Name} {2KP2*Last Name}": The text element ": " following the info area name is displayed even if the Form of address field is empty.
- User-defined Text: Select this option and click on Insert Elements to add text (including punctuation and spaces), see Defining Multilingual References.
- Save the info area format.
The reference
"{2KP}{.}: {2KP0*Form of address}{<} {2KP3*First Name} {2KP2*Last Name} - {2KP11*"Department"}: {2KP11*Department}"
is displayed as:
 .
.
Defining Multilingual References
To display references correctly in all languages, you need to define the text elements for all languages. To define a reference in several languages, such as "Reminder: <Subject> for <Rep>" for the Reminder info area:
- Select the desired info area (e.g. Reminder) under Available Info Areas.
- Switch to the Reference tab.
- Select the Info Area Name option.
- Click the Insert Elements button.
- Select "Reminder" from the list and confirm with OK.
- Select the Text option and click on Insert Elements.
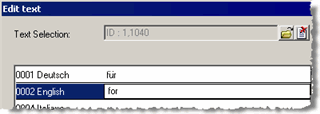
- Enter the text in the available languages (e.g. " for ", " für " etc.).
 Note: Include the spaces in the text element. If you add the space directly (i.e. not using the Insert Elements button), the space is only displayed in the current language.
 - Click on OK.
- Select the Field Content option and click on Insert Elements.
- Select the Rep/Group field and click OK.
- Save the info area format.
The reference is displayed as follows (e.g. as a tooltip):
 or
or 
Selecting the Target Level
You can determine which level an info area is opened in by default in the Reference tab.
- Click on
 (Edit) next to the Target Level
field and select a level.
(Edit) next to the Target Level
field and select a level.The target level is used by the following functions:
- Link in reports
- Custom links
This setting is only used by levels for which you have not defined a target level on the Links tab in the level properties, see Defining Links.