Activities
Learn about Activities appointment type.
You can add an activity as follows:
- In the calendar, see Adding Appointments.
- From outside the calendar, see Adding Activities.
Adding Activities
To add an activity:
- You can add an activity as follows:
- Select
 (Collaboration) >
New Activity. Select who the activity should be added
for (person, company, opportunity participant etc.). Search for and select the
desired company or person. Select the type of activity (Telephone, Visit,
Letter etc.). Click on Select.
(Collaboration) >
New Activity. Select who the activity should be added
for (person, company, opportunity participant etc.). Search for and select the
desired company or person. Select the type of activity (Telephone, Visit,
Letter etc.). Click on Select. - Select
(Collaboration) > Activities
and click on Start Search. Click on
 (New E-mail to add an e-mail activity.
 - Switch to the Activities node in the company/person
tree view and click on (New E-mail).
- Select (Collaboration) >
New E-mail to add an e-mail activity.
 Note: You can also add activities directly in the calendar, see Adding Appointments.
 - Select
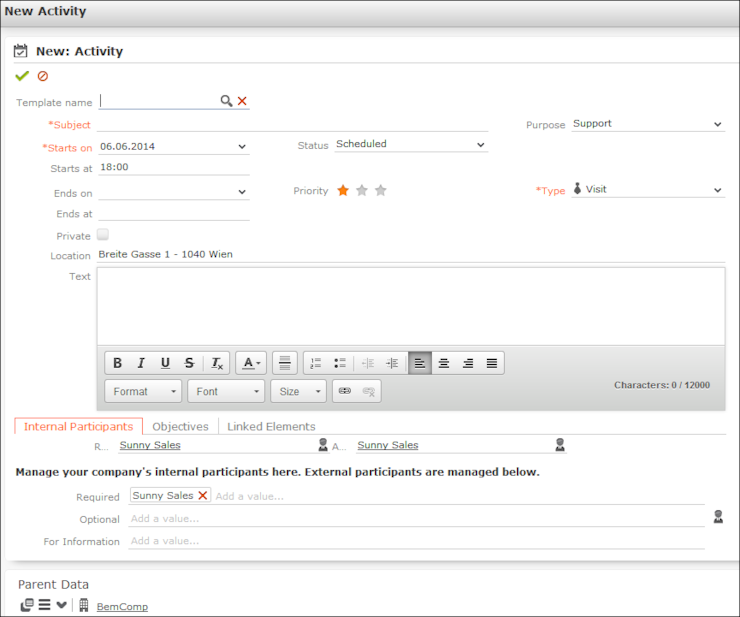
- You can select an activity template from the Template name field, see Activity Templates. The values entered in the template are automatically transferred to the fields in the new activity.
- You need to enter a Subject in order to save the activity.
- The current date and next full hour are automatically entered as the start of the activity. You can edit the date and time.
- The following fields are entered automatically and can also be edited: Type, Rep, Assigned by, Status = Scheduled, Priority = Low, Purpose = Support, Satisfaction = Indifferent.
- Enter further information concerning the activity on the following tabs:
- Internal Participants: Select the activity’s participants, see Adding Internal Participants.
- Objectives: Enter information on the targets of the activity. If the status of the activity is "Completed", you can also enter information concerning the goals that were achieved. Enter information on the product group that the activity related to.
-
Linked Elements: The following options are available:
- you can enter a questionnaire (either manually or within the scope of a marketing activity) that should be answered within the scope of the activity, see Carrying Out a Survey.
- you can enter a person’s response to a marketing activity here, see Responses.
- link the activity to various other records. This can occur automatically as part of a process or you can enter the link manually in the appropriate field.
- Save the record. The activity is displayed in the company’s tree view.
- You can add additional external participants, see Adding External Participants.
- You can add documents to the activity on the Documents tab under Related Data. The number of documents is displayed in the Number of Attachments field on the Linked Elements tab.
- Click on
 (Add Lead) to add a lead relating
to the activity, see Lead Management – ISI.
(Add Lead) to add a lead relating
to the activity, see Lead Management – ISI. - Click on
 (Add Opportunity) to add an
opportunity relating to the activity, see Opportunity Management – ISI.
(Add Opportunity) to add an
opportunity relating to the activity, see Opportunity Management – ISI.
Activity Templates
If you regularly add similar activities, you can save the activity data in an activity template and use the template when adding an activity, reducing the time it takes to enter data.
To add an activity template:
- Select (Collaboration) >
Activity Templates.
- Click on
 (New).
 - Enter the data.
- Save the record.
Adding Internal Participants
Enter internal participants in the Required, Optional and For Information fields:
- Click on Add a value and select an entry from the drop-down
list:

- Or click on Add a value and begin typing the name of the rep. Aurea CRM lists all matching reps.
- Click on
 (Select Rep), to select the
desired rep in a separate window, see Selecting Reps. You can then select
the desired participation type from the rep’s context menu.
(Select Rep), to select the
desired rep in a separate window, see Selecting Reps. You can then select
the desired participation type from the rep’s context menu.
Adding External Participants
You can add external participants to an activity under Participants below the record.
- You can choose to add a company, person, a person linked to the current company or a record in your favorites.
- Select the desired person or company. The selected participants are displayed under
Participants below the record.
The participation type is indicated with an icon:
- In the T (Type) column:
 =
Required,
=
Required,  = Optional and
  = For Information
 - In the S (Status) column:
 =
Accepted,
=
Accepted,  = Open,
  = Declined,
  = Not
relevant
= Not
relevant
The person or company for which the appointment was added is displayed as a link.
- In the T (Type) column:
- To change the participation type and status, select the options available under Participation Type or Participation Status in the participant’s context menu.
- Save the record.
Follow-up Activities
To add a follow-up activity for an activity:
- Select Follow-up Activity from the activity’s context menu.
- Enter the details of the follow-up activity.Note: Your administrator can define which field values are automatically transferred from the previous activity.
- Save the record. The new activity is linked to the previous activity via the Previous/Main Activity field.
Recurring Activities
You can add recurring activities that take place at regular intervals. You can determine the frequency (e.g. daily, weekly, monthly or yearly) in the first activity (the main activity), from which you can then generate the remaining appointments.
Adding Recurring Activities
To add a series of recurring activities:
- Add the first (main) activity.
- Click on
 (Recurrence). The
Appointment Recurrence window is displayed.
(Recurrence). The
Appointment Recurrence window is displayed. 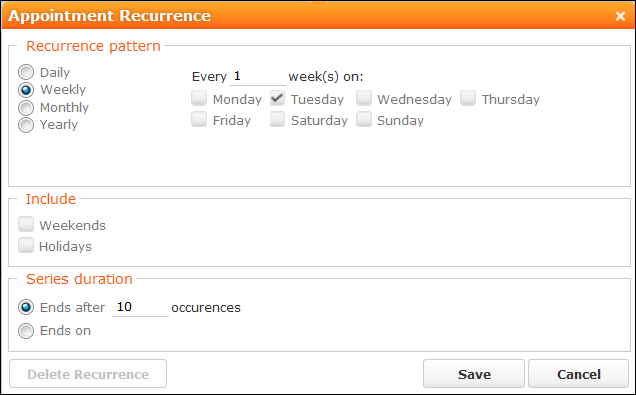
- Determine the whether the activities should recur on a Daily, Weekly, Monthly or Yearly basis.
- Depending on your settings, you can determine when the activity is repeated:
- Daily: The number of days before the activity is repeated.
- Weekly: The number of weeks before the activity is repeated and the day of the week. You can select multiple weekdays.
- Monthly: The number of months before the activity is repeated; the day of the month; the day of the week.
- Yearly: The number of years before the activity is repeated; the day and month; the day of the week.
When repeating activities on a monthly or yearly basis, enable Do not create substitute activities to prevent activities that would fall on a holiday or weekend from being moved to the next work day.
- Enable the Weekends and Holidays options if activities should also be added on holidays or weekends.
- Define the Series duration:
- Ends after: The number of recurring appointments after which the series ends.
- Ends on: Date on which the series should end.
- Save the data. The activities are generated. Recurring activities are indicated
using the
 icon.
icon.
Editing Recurring Activities
To edit activities that are part of a series of recurring activities:
- Edit the first activity in the series that you want to apply changes to.
- Save the record.
You are asked whether you wish to apply your changes to just the one activity or to the remaining activities in the series starting from the current activity.
Note: Fields that are not transferred from the main activity to other activities in the series are not transferred when applying these changes, see Adding Recurring Activities. - Select the desired option and confirm with OK.
Displaying the Main Activity of a Series
To display the main activity of a series:
- Select (Collaboration) >
Activities to display activities in list view and search
for an activity in the series.
- Select Main Record in Series from the context menu. The main activity is displayed.
Deleting Activities in a Series
To delete one or more activities that are part of a series of recurring activities:
- Select Delete from the activity’s context menu.
You are asked, what you wish to delete:
- Just this activity
- This activity and all subsequent activities
- The entire series
Note: If you have chosen to delete the main activity, you can only choose to delete the entire series. - Choose the desired option and confirm with OK.
Editing the Recurrence Pattern
To edit the recurrence pattern of an entire series:
- Click on (Recurrence) in the main activity
record.
- Edit the recurrence pattern and click on Save. The activities in the series are deleted and new activities are generated based on the new settings. The main activity is not deleted.
To edit the recurrence pattern for part of a series:
- Open the activity in the series from which point on you wish to change the recurrence pattern.
- Click on (Recurrence).
- Edit the recurrence pattern and click on Save. A message is displayed informing you that this activity is part of a series of activities, and you are asked if you wish to use the activity as the main activity of a new series.
Activities and E-mails
Sending E-mails to Participants
To send an e-mail to all an activity’s participants:
- Enter the subject of the e-mail in the Subject field and the
e-mail’s text in the Text field in the activity.

- Use the buttons in the text editor to format the contents.
- Click on
 (Add Signature) to add
your e-mail signature.Note: You can change your signature in the settings, see Changing Your E-mail Signature.
(Add Signature) to add
your e-mail signature.Note: You can change your signature in the settings, see Changing Your E-mail Signature. - Click on (Send E-mail). The reps and
external participants are transferred to the To: and
Cc: fields based on their participation status (Required,
Optional, For Information).
If your administrator has defined that e-mails are sent from your e-mail client, your e-mail client is opened. E-mails can also be sent directly via the server.
The Sent fields in the activity display the number of times the e-mail was sent and the date and time the e-mail was last sent.
Notifying Reps
You can send an e-mail to all an activity’s internal participants, e.g. if you need to reschedule the appointment.
To notify the reps:
- Select Notify Recipients from the context menu of the
activity.
If your administrator has determined that e-mails are sent from your e-mail client, your e-mail client is opened. If e-mails are sent by via the Aurea CRM server, the following window opens:

- Enable the check boxes next to the persons you wish to notify under Recipients.
- You can add additional recipients to the Additional internal recipients and Additional external recipients fields.
- The contents of the Subject and Text fields in the activity are transferred to the e-mail, but you can still edit them in the e-mail.
- Use the following check boxes to carry out the corresponding action: Insert Aurea CRM web link, Insert Aurea CRM win link, Request a delivery receipt, Request a read receipt. Your administrator is responsible for defining which options are available.
- If your administrator has enabled the corresponding option, click on Insert Signature to insert your e-mail signature.
- The documents linked to the activity are added as attachments.Note: Your administrator can determine that certain types of files or files exceeding a certain size are not sent.When sending e-mails from your e-mail client, no attachments can be added.
- Click on Send to send the e-mail.
Printing Activities
To print out an overview of the most important information concerning your activities:
- Click on
 (Print). A print preview is
displayed.
(Print). A print preview is
displayed. 
- Use the print function in your browser.