Adding New CRM Processes
Learn how to add new CRM processes.
You can define additional CRM processes and functions in order to extend Aurea CRM's functionality and tailor the application to meet your individual needs. In Aurea CRM win, you need to define new levels and integrate them in a desktop format, see Desktop in the Aurea CRM win Administrator Guide. In Aurea CRM web, the CRM processes are defined as menu options and direct buttons, see Aurea CRM web Administrator Guide. You can also enable or disable triggers and workflows (that have been assigned in the rights definition) in the process tree by referencing a format.
You can add these user-defined CRM processes to the CRM process configuration in order to control access to these processes:
- Click on the new process's parent in the CRM Process
Configuration level.
Select Select user group from the context menu to determine the number ranges used by user-defined CRM processes: update (200-599), Partner (600-799) and Customer (800-999). You require a password for the update and Partner options. For the update user group, the process tree displays all processes including those currently without children (displayed in red).
If you do not select a user group, the CRM process number is assigned according to the current station number, >> Number Ranges in Aurea CRM.
- Select New from the context menu.
The CRM Process info area is opened.
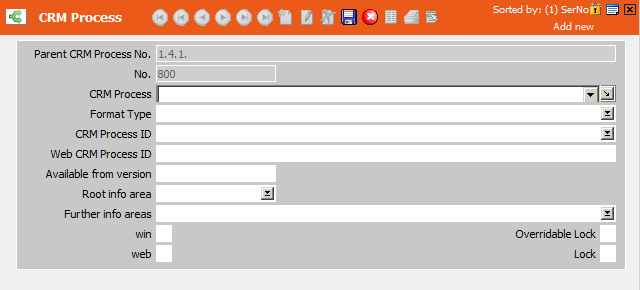
- Enter a name for the CRM process in the CRM Process field. This name is displayed in the CRM Process Configuration level. This field accesses a variable catalog, allowing you to enter CRM process names in multiple languages, see Catalogs.
- Select the Format Type ("empty", Trigger, Workflow).
- Enter the desired ID in the CRM Process ID and/or Web
CRM process ID fields:
- The level IDs can be determined in the level settings, or you can output a list
of all available levels and their IDs in a module using the
--writeprocesslistparameter, see Defining New Levels in the Aurea CRM win Administrator Guide and General Aurea CRM Parameters.You can use wildcards (*, ?) to define a CRM process that affects several levels in Aurea CRM win. You can also enter predecessor levels for such CRM processes (using the syntax "Level;Parent1;Parent2" or "Level;Parent1;*") if the settings should only apply to a particular constellation.
If a CRM process ID contains wildcards, access settings are applied to all sub-processes with matching IDs. Exception: If the lock is overridden for one of these sub-processes in a role, the sub-process is accessible, irrespective of the Priority entered in the role, see Login Roles.
- Button IDs must be specified using the syntax B_<ID>. Button IDs can be determined in the mask generator, see Button Properties in the Aurea CRM win Administrator Guide. User-defined context menu entries cannot be integrated in the process tree.
- IDs for new Aurea CRM web CRM processes can be freely defined. After transferring the CRM process configuration to Aurea CRM web, you need to assign the CRM process ID to the corresponding functions in CRM.designer (menu options, direct buttons), see Roles & CRM Processes in the Aurea CRM web Administrator Guide.
Note: Use the Web CRM Process ID field for CRM processes that should only be used in Aurea CRM web or that have a different ID in Aurea CRM web and Aurea CRM win.- If you have selected a trigger or workflow, select the desired format in the CRM Process ID field or use wildcards (*, ?) to define a CRM process that affects several trigger/workflow formats.
- The level IDs can be determined in the level settings, or you can output a list
of all available levels and their IDs in a module using the
- Select the Root info area used by the CRM process. Select the
other info areas used by the CRM process in the Further
info areas field.Note: If all CRM processes that reference a particular info area are locked in the system-wide CRM process configuration (visible under Root info area and Further info areas), access is denied to this info area and all child info areas. Links to this info area are also no longer displayed. This behavior corresponds to enabling the Deny Access option in the access rights, see Defining Rights at the Info Area level.
- Use the win and web check boxes to determine whether access can be denied to the CRM process in Aurea CRM win and/or web products (Aurea CRM web, CRM.pad). Only CRM processes for which the web check box is enabled are transferred to CRM.designer along with the process configuration.
- Use the Overridable Lock and Lock check boxes to define the process as either variable of fix by default in the CRM process configuration, see CRM Process Configuration.
- Click on
 (Save).
You are returned to the CRM Process Configuration level.
Select Edit from the context menu to edit the currently selected user-defined CRM process in the CRM Process info area.
Select Delete from the context menu to remove the currently selected user-defined CRM processes from the CRM process tree.