Create Retention Policies
Retention policies allow you to store email and instant messages for configurable lengths of time. To use Email Archival, at least one retention policy must be created and have users assigned to it.
To use a retention policy, you must:
- Create a retention policy. This includes giving it a name and specifying the number of days mail retained under this policy should be kept.
- Decide the type of retention policy:
- Membership-based
- Capture-based
- User classification
- Decide its scope. The scope of the policy determines to which users the policy applies. The scope can be assigned based on mailing lists, servers, individual users, and user sets.
- Decide what should happen when users are deleted from the system. With a Membership-based policy, you must decide to either keep the mail of the deleted users for the length of time set in the policy, or delete the mail.
- Prioritize the policy. If a message is subject to more than one policy, the “keep or delete” decision is made based on the priority of the retention policy. You assign priority by rearranging the policies in the user interface, so that the most important ones appear higher in the list.
Membership within mailing lists, servers, or user sets is updated automatically when SyncManager is run, therefore the scope of the policy can be dynamic after the policy is created.
Then, at designated intervals, the system’s purge function evaluates each message to determine:
- Which policies apply to this message?
- Is the message stored under a Retention Hold?
- Is the message stored under a storage management policy?
- Of the retention policies that apply to this email, which one is highest in the priority list?
- Based on the highest priority policy, should this message be kept or marked eligible for purging?
- Is Email Continuity active for the user?
Each message can be subject to multiple policies. If none of your organization’s policies apply, then the 30 day default policy is used.
A retention hold always takes highest priority, preventing messages covered by a hold from being deleted, regardless of other criteria.
See Storage Management for more details.
Mail will not be purged during an activation. When the activation is over and the system returns to the Ready state, retention policies will be applied.
Then the system marks the message as eligible to be purged or allows it to remain in the archive.
WARNING
A policy’s priority determines whether a message should be retained or purged. If a message is subject to a highest priority policy with a retention period of 90 days, as well as a lower priority policy with a retention period of 180 days, the message will be deleted after 90 days. To avoid unintentional purging of messages intended to be retained for a longer period, ensure that policies with longer durations are prioritized higher than those with shorter durations.
WARNING
Any changes you make to a policy are logged. To see a policy’s history, click Edit and scroll to the Change History section at the bottom of the page.
Policy deletions are recorded in the data center. To obtain information about deleted retention policies, contact Support.
Create a retention policy
- Admin Console, click Historical Mail.
- Click Retention Policies.
- Click Create a new retention policy.
- In the Name box, type a unique name for the new policy.
The Retention Policies page appears.
The Retention Policies Details page appears.
- In the Retain Mail for box, type the number of days for the retention period.
- Select the type of retention policy.
NOTE
Once you have selected a retention policy type, you cannot change it.
-
If you selected
Capture Based, no further options are required. -
If you selected
User Classification, choose a name for the folder that users will place the applicable mail into, and type it in the Mail Folder field. If you want to have this folder created automatically in a users Inbox, click the Automatically create this folder in user mailboxes check box. Next, select a VaultBox for connection to the server.
For User Classification policy, you must also complete the steps to configure user classification retention scheduling, Configure Manual Retention (User Classification) Task schedule settings:.
- If you selected Membership Based Policy, if you want to retain mail for users who have been deleted from the system, click the Retain Deleted Users check box.
This option is relevant for users added to the retention policy as part of a distribution list, mail server, or user set.
Depending on your system’s configuration, this prompt may not appear. If this is the case, mail is not retained for deleted users.
The Retain Deleted Users option does not apply to mail for users who are added individually to the retention policy. Mail for these explicitly added users is retained under the retention policy even after the users are removed from the mail system.
- With the Retain Deleted Users option selected, messages for users added to the retention policy as part of a distribution list, mail server, or mail store will be retained even after the users have been deleted from the mail system.
- If the Retain Deleted Users option is not selected for a membership-based retention policy, messages for users added to the policy through a distribution list, mail server, or mail store will be purged after those users are deleted from the mail system.
- Click Submit.
- This returns you to the retention policy page, where you must click Select Users to complete the creation of the Retention Policy.
Add users to a retention policy
- Select a retention policy and click Select Users.
- Identify the scope of the policy, which are the users to be included in the policy. You can locate and select users to add based on several criteria. For example:
The Select Users page appears.
- To add all administrators to a retention policy, click the User Sets tab, select All Administrators, and click Add.
- To add all users that are part of a specific mailing list or lists, click the Mailing Lists tab. Search for the correct mailing list or lists (you can use % as a wildcard). When search results display, select the ones you want and click Add.
NOTE
Administrators do not have to manually add or delete users to the retention policy when a list or system-created user set changes. The lists and system-created user sets are updated when SyncManager runs and the retention policy’s scope is dynamically updated.
User-created user sets are NOT dynamically updated.
NOTE
If a distribution list used by a retention policy is deleted on Exchange, the distribution list is placed on a purge list.and a fault alert notice is sent to each member of the fault alerts notifications list.
This allows a 30-day window for Administrators to recover from accidental deletion of lists, before retained data is lost.
NOTE
Envelope Journaling requires all enabled users be in a Retention Policy. However, Email Archival Retention Policy membership and Exchange Journaling membership are managed separately.
It is recommended that the same criteria (such as a distribution list) be used to identify users for a retention policy and to enable users for journaling in Exchange.
Mismatches between retention and journaling policies may result in data loss.
- To add all users with mailboxes on designated email servers, click the Servers tab. Select the appropriate server listings and click Add.
- To add users individually, click the Users tab. Search for the appropriate user or users. When search results display, select the one or ones you want and click Add. Deleted users display a X next to their names, and may be added to the policy like any other user. While no new mail will be captured for deleted users, existing retained mail for these users will be added to the retention policy.
- Repeat adding users from any or all of the above categories, clicking Add to copy the selected users to the Current selection pane on the right, until the full scope of the Retention Policy is defined.
- When all appropriate users have been added to the retention policy, click Next.
- Examine the contents of the Confirm page, which lists all changes made to the retention policy.
- If the data is correct, click Submit.
If an item listed in the right-hand pane is incorrect, check the box beside the item and click Remove, to remove the entry from the Current selection list.
The Confirm new policy scope page appears.
To see a list of all users affected by the policy click the Click here link, which pops up a new window containing a user list. To export this list to a CSV file, click the Export to file link at the top-right of the pop-up window.
Prioritize retention policies
- From the AMS Admin Console, click Historical Mail.
WARNING
Reprioritize policies with care. See Retention Policy Best Practices.
- Click Retention Policies.
- Click Reorder/Reprioritize Retention Policies at the bottom of the page.
- Click anywhere in a policy’s row, and drag the policy to a new location in the list. The higher up in the list a Retention policy resides, the greater its priority.
- When you’re satisfied with the list, click Save new ordering.
The user interface changes so that DRAG appears next to each retention policy.
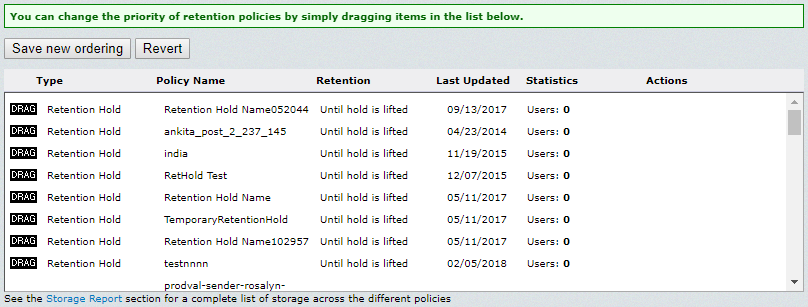
Dragging the Retention Policies
Remember that each email’s purge date is specified by the highest priority policy that includes that message. So if you move a 10-day policy above a 100-day policy, once the change is saved, all emails covered by both policies will be evaluated by the purge process and any email that is older than 10 days will be scheduled for purge.
The normal interface returns and all polices are listed in the new order, with the exception that Retention Holds always have higher priority than any other kind of retention policy, so all policies will be listed in priority order following the last of the Retention Holds.